Today, we are announcing the general availability of a new API for Autonomous JSON Database: the Oracle Database API for MongoDB.
Seamless development and migration of MongoDB application
With the new API, developers can continue to use MongoDB's open-source tools and drivers connected to an Oracle Autonomous JSON Database while gaining access to Oracle’s multi-model capabilities and the benefits of a self-driving database. Customers can now run MongoDB workloads on Oracle Cloud Infrastructure (OCI).
Often, little or no changes are required to existing applications—just change the connection string.
Now available for Oracle Autonomous JSON Database
Autonomous JSON Database is designed for JSON-centric development at low cost. Developers can use both the API for MongoDB and Oracle SQL for accessing the same document data, avoiding the need to move data to a separate database for analytics, machine learning, spatial analysis, and more. This provides an alternative to MongoDB Atlas, with advanced features such as:
◉ Full analytical queries and reports using scalable SQL
◉ Joins between different JSON document collections, or between JSON documents and other relational data
◉ Expose relational data and analytical query results as MongoDB collections
◉ Run machine learning algorithms or spatial analysis over JSON document data
◉ Low Code application development using Oracle APEX
◉ ACID transactions without limits on duration or data sizes
◉ Enterprise security features, such as Database Vault to prevent administrators from accessing user data.
The API for MongoDB is also available for Oracle’s flagship cloud database service, Autonomous Database.
Getting Started with Autonomous JSON Database and the API for MongoDB
This quick-start guide steps you through the stages needed to get started with the Oracle Database API for MongoDB. The full documentation is available at the locations below -
Autonomous Database chapter about configuring Database API for MongoDB
Documentation for Oracle Database API for MongoDB
First, if you don't have one already, you will need to sign up for an Oracle Cloud account. You can use an Always-Free account, and nothing will ever be charged to your credit card unless you explicitly upgrade your account to a paid account.
When we're signed up, we will need to create an Autonomous JSON Database, or AJD (you can also use the Database API for MongoDB with other Autonomous Database workloads, but we'll stick with AJD here).
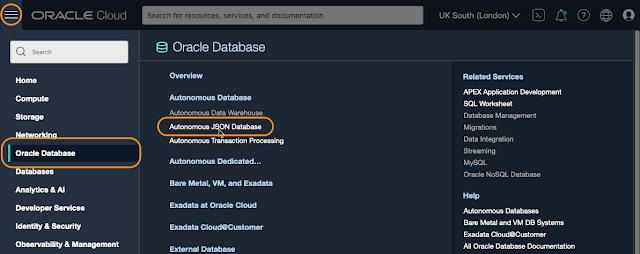
Once signed into Oracle Cloud, you'll use the "Hamburger Menu" in the top left to choose Oracle Database, then Autonomous JSON Database:
Now click on Create Autonomous Database
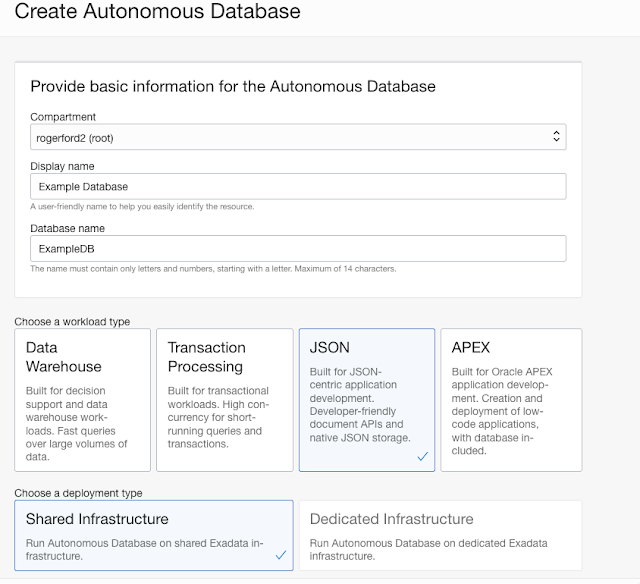
Provide a Display name and Database Name (or leave them at the generated defaults). Leave workload type set to JSON and deployment type as Shared Infrastructure.
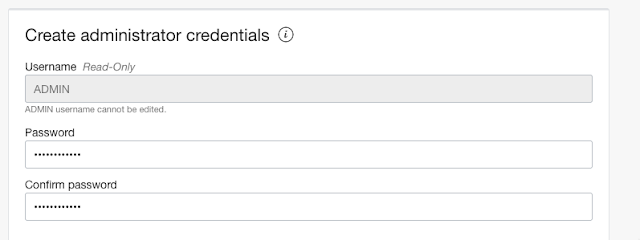
Scroll down to "Create administrator credentials", and enter and confirm a password for the ADMIN user. Don't forget this password!
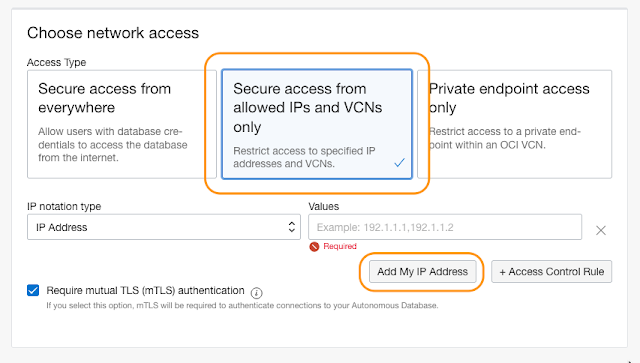
The next part is important. The Database API for MongoDB will only be available if you define "Secure access from allowed Ips and VCNs only". Click that option (it is not the default):
If you will just want to connect from your current machine, use the "Add My IP Address" button. If you will want to connect from other machines (such as an Oracle Cloud VM) you can enter the addresses of those as well.
Hint: If you’re not sure what compute instances you will want to connect from, you can change the IP notation type field to CIDR block, and enter a value of 0.0.0.0/0. That will allow you to connect from anywhere, but naturally you should only use that for testing.
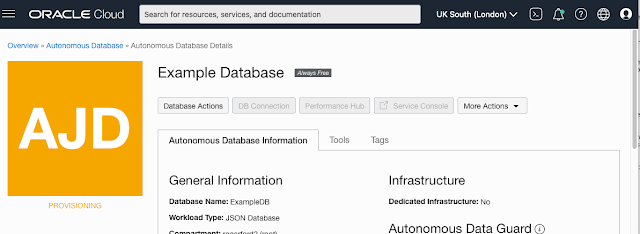
When done, click “Create Autonomous Database” at the bottom of the screen. You will see an orange AJD logo with PROVISIONING underneath.
When finished (it typically takes around one minute), the logo will go green with AVAILABLE underneath.
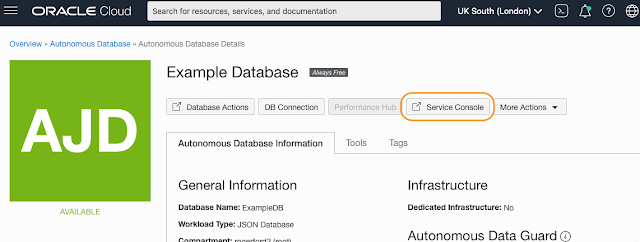
You can now go to the Service Console.
The Service Console will open in a new tab, and you can choose Development.
You may need to scroll down a little on the Development page, but you should see "Oracle Database API for MongoDB", with two URLs listed.
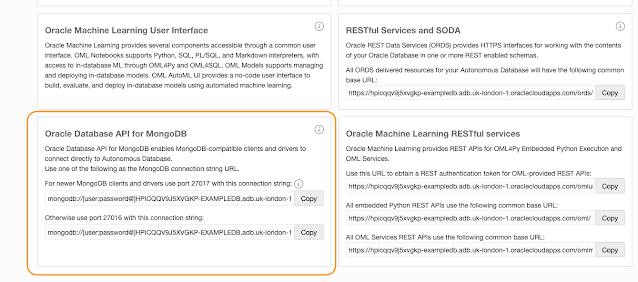
Don't see that? Most likely you didn't define "Secure Access from allowed IPs" for your database. If the database is set up for "Secure Access from anywhere" then this card will not be shown (in later versions it may be shown, but grayed out).
Port 27017 should work for most newer clients and tools, but if you have problems it may be worth trying the port 27016 URL instead.
Copy the first URL using the Copy button, and save it somewhere for later use.
The URL has the format:
mongodb://[user:password@]autonomousDatabaseAddress:27017/[user]?authMechanism=PLAIN&authSource=$external&ssl=true&retryWrites=false&loadBalanced=true
Take out the initial [user:password@] (we will provide separate credentials) and change the [user] in the second part of the URL to our database username, currently "admin". So the modified URL will look something like:
mongodb://autonomousDatabaseAddress:27017/admin?authMechanism=PLAIN&authSource=$external&ssl=true&retryWrites=false&loadBalanced=true
Make sure you're not connecting through any kind of VPN or proxy server (which will alter your IP address and prevent you from connecting), and run mongosh from a command prompt with "-user admin" and the URL we modified above, enclosed in single quotes (Linux/Mac) or double quotes (Windows). So the command will look something like:
mongosh -u admin -p MyPassword123 'mongodb://autonomousDatabaseAddress:27017/admin?authMechanism=PLAIN&authSource=$external&ssl=true&retryWrites=false&loadBalanced=true'

Can't connect? Check the URL is properly quoted, and that you have the correct IP address for your client system registered for the database (and you're not connected through any kind of VPN). Also make sure the mongosh command is on a single line and you haven't unwittingly introduced any extra newline characters.
Once you're connected, you can use the Mongo Shell to create a collection and add some documents. For example we can create a collection called 'emp' and add some employee documents in JSON format:
db.createCollection('emp')
db.emp.insertOne(
{ "name":"Blake", "job": "Intern", "salary":30000 }
)
db.emp.insertOne(
{ "name":"Smith", "job": "Programmer", "salary": 60000, "email" : "smith@example.com" }
)
db.emp.insertOne(
{ "name":"Miller", "job": "Programmer", "salary": 70000 }
)
You can run most Mongo operations when connected to AJD except for user management commands, index operations, and aggregation pipeline operations. Those should be done through SQL instead.
Other MongoDB tools, and programs using MongoDB drivers will work in a similar way, providing the URL as we did above, and the credentials as necessary.
Next let's look at how we can work with collections through database tools. Go back to Oracle Cloud and find your database via Overview -> Autonomous Database -> Autonomous Databases. Click on the name of your database:
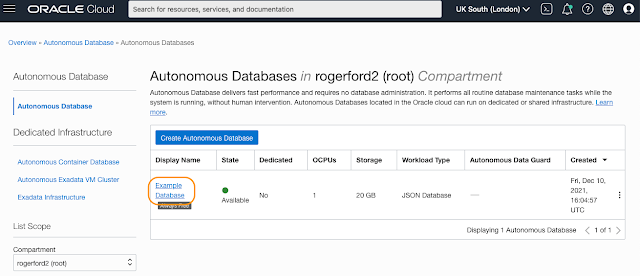
Then click on the Database Actions button:
That will launch the Database Actions page in a new browser tab. Failed to launch? Probably a network connection issue - check your ACL is still valid for the IP address the browser is running on. When you're connected, you should be be logged in automatically as user ADMIN. If prompted for username and password, the username is ADMIN and the password is the one you supplied when creating the database.
In Database Actions, there are several options available. We're interested in JSON and SQL. First, launch JSON:

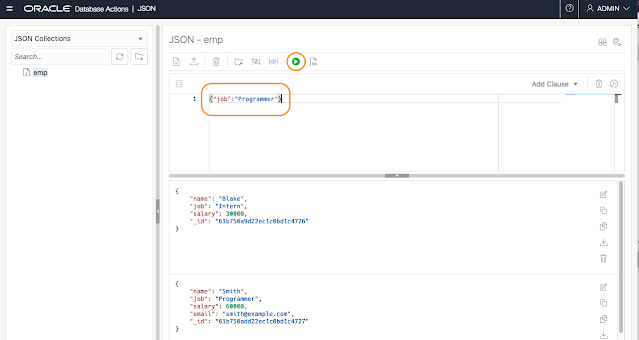
That will take us to the "JSON Workshop". On first entry, you will see a short tutorial. I recommend stepping through it, but you can always find it again later using the button in the top right of the screen.
The JSON Workshop will show your collections on the left, and documents on the right. You can create, edit and delete collections and documents from within the Workshop. The box above your documents is a search box where you can enter queries. These are known as "Queries by Example" or QBEs. Try entering a simple search: { "job":"Programmer" }, and click the "Run" button
You can also create indexes on JSON content from here. It's clearly not necessary to use an index to speed up queries on a three-document collection, but we'll do so just to illustrate how.
Right-click on the collection "emp" at the left of the screen:
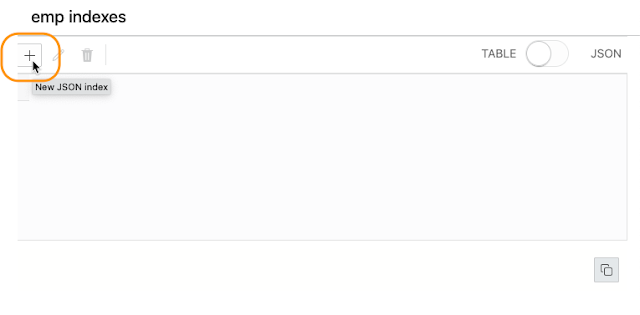
Click on Indexes and it will bring up the indexes dialog. Click on the "+" sign to add a new JSON index:
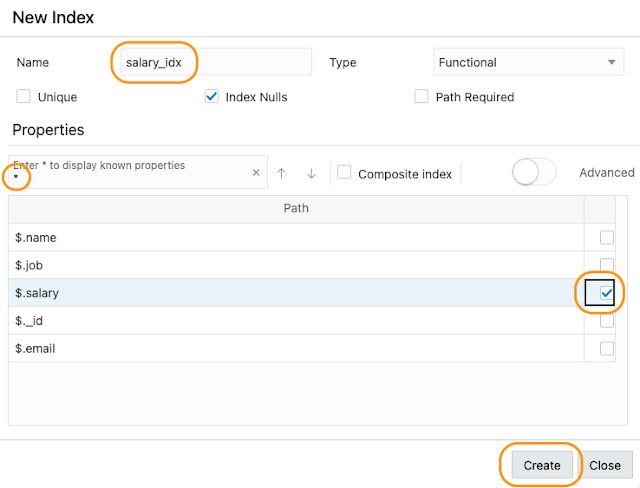
We have a number of options here - more if we select "advanced". We won't go into all the options here, but let's create a functional (normal) index on salary. Give it a name such as "salary_idx" and enter * in the Properties box. Check the box next to "salary", then click on "Create" at the bottom:
Feel free to explore the JSON Workshop further, or we can move on to SQL.
Click on Database Actions in the header:
This takes us to "SQL Developer Web". It should be familiar to people used to using the desktop SQL Developer tool. Again, a tutorial will run on first entry.
On our left we will see "Tables", and we'll see a table called EMP. This is a table which was automatically created to hold our "emp" collection. If you open it, you will see it contains several columns, one of which is called DATA. You might guess that contains our JSON document, but what is less obvious is that this is a binary represention which we can't see if we just do something like "select * from emp". Instead we can use JSON_SERIALIZE to examine the contents. Let's try that:
select json_serialize(data) from emp;
Enter that, and click the "Run Statement" button.
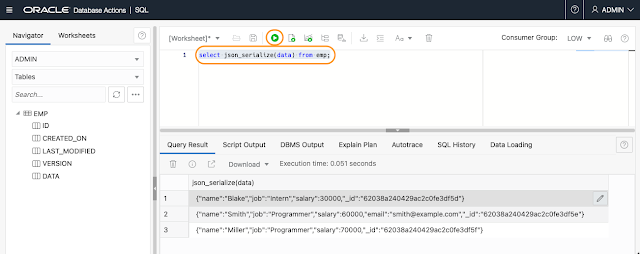
We can see that each of our three JSON documents is stored in a separate row of the EMP table.
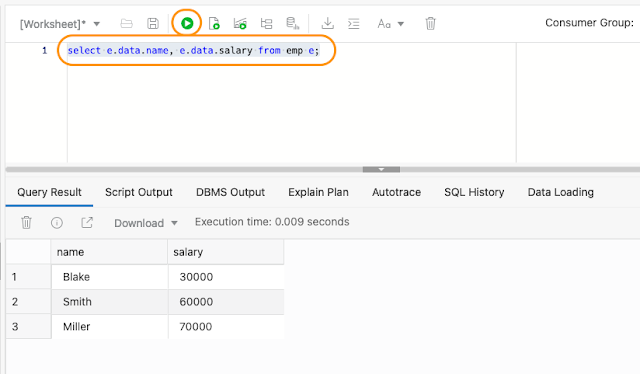
That's great, we can get the JSON out of the table using SQL as well as mongosh or the JSON Workshop. But what if we want to do SQL on fields inside the JSON? That's pretty easy as well, we can use the "simple dot notation" to fetch a value from the JSON "data" column. Note that we must use a table alias ("e" in the next example) in order to use dot notation:
select e.data.name, e.data.salary from emp e;
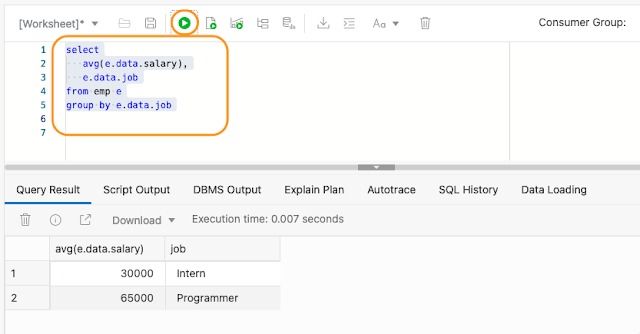
You can see that our data is returned exactly as though it was relational data in table columns. Indeed, we can do anything with this data that we could do with normal columns. Let's get the average salary by job for our simple collection:
select
avg(e.data.salary),
e.data.job
from emp e
group by e.data.job
We have only scratched the surface of SQL/JSON capabilities here, but the intention was simply to show you that you can work seamlessly with MongoDB tools, Oracle JSON tools, and SQL/JSON on the same data.
Source: oracle.com








0 comments:
Post a Comment