Tuesday, March 31, 2020

Considerations for Deploying Azure SQL Database Managed Instances

Azure SQL Database, Azure Tutorial and Material, Azure Certifications, Azure Learning

Microsoft provides a number of different deployment options for its Azure SQL Database offerings. While most of them share the same characteristics, one in particular warrants special attention from the standpoint of its infrastructure dependencies. That exception is Azure SQL Database Managed Instance, which will be the topic of this article.

The majority of the caveats regarding Azure SQL Database Managed Instance results from its unique architecture. Its primary tenets, which differentiate it for other Azure SQL Database Platform-as-a-Service counterparts, include its networking model and virtual cluster-based implementation, which provides access to a number of SQL Server features, such as SQL Server Agent, along with close to 100% compatibility with full-fledged SQL Server installations.

Regarding networking, Azure SQL Database Managed Instance deploys into a dedicated subnet of a virtual network. On one hand, this facilitates direct connectivity with Azure virtual machines not only on the same or directly connected virtual network, but also from any on-premises environment connected via ExpressRoute private peering or Site-to-Site VPN tunnel. On the other hand, this introduces additional considerations that should be accounted for when preparing for a new deployment. More specifically, management and deployment services for each instance reside outside of the virtual network, which implies that the corresponding traffic must be allowed to flow without being obstructed by restrictions imposed by a customer unaware of this requirement.

The required configuration is implemented automatically based on the network intent policy, which designates the subnet as dedicated for Managed Instance deployment (also referred to as delegated to the Microsoft.Sql/managedInstances resource provider), precluding provisioning any other services within the same subnet. The subnet requires at least 16 available IP addresses, although the recommended minimum is 32. In addition, the platform creates a Network Security Group and a User Defined Route table, associates them with the designated subnet, and adds rules and routes to each of them (respectively).

Azure SQL Database, Azure Tutorial and Material, Azure Certifications, Azure Learning

Another potentially surprising networking caveat is that, while Azure SQL Database Managed Instance is accessible via its private IP address, that endpoint is actually represented by a publicly resolvable DNS name (in the form <managed_instance_name>.<dns_zone>.database.windows.net, where <dns_zone> is generated during the provisioning process).

From the operational standpoint, it is worth noting that the virtual cluster-based implementation of Azure SQL Database Managed Instance, which was mentioned earlier, while beneficial in many aspects, has also some negative consequences. In particular, management operations, such as provisioning, resizing, or deprovisioning, take considerably longer than the equivalent tasks performed on Azure SQL Database. For example, according to the metrics published by Microsoft, in 90% of cases, virtual cluster creation completes in about 4 hours, while resizing (expansion or shrinking) and deletion take 2.5 hours and 1.5 hours, respectively (although it is important to point out that expansion and shrinking are online operations, which do not affect instance availability, except for a short, about 10 second-long downtime).

Last, but not least, it is likely that databases of Azure SQL Database Managed Instance will be migrated from on-premises SQL Server deployments, rather than created anew. If that is the situation you are facing, then you might want to first verify their full compatibility (even though the possibility of issues is relatively small). Somewhat surprisingly, this functionality is not yet incorporated into Data Migration Assistant, so the current recommendation is to use it to perform an assessment against Azure SQL Database and review its results against the documented capabilities of Managed Instance.

Monday, March 30, 2020

Oracle Database 19c Installation On Oracle Linux 8 (OL8)

Oracle Database 19c, Oracle DB Cert Exam, Oracle Certifications, Oracle Guides

This article describes the installation of Oracle Database 19c 64-bit on Oracle Linux 8 (OL8) 64-bit. The article is based on a server installation with a minimum of 2G swap and secure Linux set to permissive.

◉ Download Software


Download the Oracle software from OTN or MOS depending on your support status.

- OTN: Oracle Database 19c (19.3) Software (64-bit)
- edelivery: Oracle Database 19c (19.3) Software (64-bit)

◉ Hosts File


The "/etc/hosts" file must contain a fully qualified name for the server.

<IP-address>  <fully-qualified-machine-name>  <machine-name>

For example.

127.0.0.1       localhost localhost.localdomain localhost4 localhost4.localdomain4
192.168.56.107  ol8-19.localdomain  ol8-19

Set the correct hostname in the "/etc/hostname" file.

ol8-19.localdomain

◉ Oracle Installation Prerequisites

The automatic setup is not available for Oracle Linux 8 yet, so perform the Manual Setup and Additional Setup.

If you are using RHEL8 or CentOS8, you can pick up the PRM from the OL7 repository and install it. It will pull the dependencies from your normal repositories.

# yum install -y https://yum.oracle.com/repo/OracleLinux/OL7/latest/x86_64/getPackage/oracle-database-preinstall-19c-1.0-1.el7.x86_64.rpm

     ◉ Manual Setup

Add the following lines to the "/etc/sysctl.conf" file, or in a file called "/etc/sysctl.d/98-oracle.conf".

fs.file-max = 6815744
kernel.sem = 250 32000 100 128
kernel.shmmni = 4096
kernel.shmall = 1073741824
kernel.shmmax = 4398046511104
kernel.panic_on_oops = 1
net.core.rmem_default = 262144
net.core.rmem_max = 4194304
net.core.wmem_default = 262144
net.core.wmem_max = 1048576
net.ipv4.conf.all.rp_filter = 2
net.ipv4.conf.default.rp_filter = 2
fs.aio-max-nr = 1048576
net.ipv4.ip_local_port_range = 9000 65500

Run one of the following commands to change the current kernel parameters, depending on which file you edited.

/sbin/sysctl -p
# Or
/sbin/sysctl -p /etc/sysctl.d/98-oracle.conf

Add the following lines to a file called "/etc/security/limits.d/oracle-database-preinstall-19c.conf" file.

oracle   soft   nofile    1024
oracle   hard   nofile    65536
oracle   soft   nproc    16384
oracle   hard   nproc    16384
oracle   soft   stack    10240
oracle   hard   stack    32768
oracle   hard   memlock    134217728
oracle   soft   memlock    134217728

The following packages are listed as required. Don't worry if some don't install. It won't prevent the installation.

dnf install -y bc   
dnf install -y binutils
#dnf install -y compat-libcap1
dnf install -y compat-libstdc++-33
#dnf install -y dtrace-modules
#dnf install -y dtrace-modules-headers
#dnf install -y dtrace-modules-provider-headers
#dnf install -y dtrace-utils
dnf install -y elfutils-libelf
dnf install -y elfutils-libelf-devel
dnf install -y fontconfig-devel
dnf install -y glibc
dnf install -y glibc-devel
dnf install -y ksh
dnf install -y libaio
dnf install -y libaio-devel
#dnf install -y libdtrace-ctf-devel
dnf install -y libXrender
dnf install -y libXrender-devel
dnf install -y libX11
dnf install -y libXau
dnf install -y libXi
dnf install -y libXtst
dnf install -y libgcc
dnf install -y librdmacm-devel
dnf install -y libstdc++
dnf install -y libstdc++-devel
dnf install -y libxcb
dnf install -y make
dnf install -y net-tools # Clusterware
dnf install -y nfs-utils # ACFS
dnf install -y python # ACFS
dnf install -y python-configshell # ACFS
dnf install -y python-rtslib # ACFS
dnf install -y python-six # ACFS
dnf install -y targetcli # ACFS
dnf install -y smartmontools
dnf install -y sysstat

# Added by me.
dnf install -y unixODBC

# New for OL8
dnf install -y libnsl
dnf install -y libnsl.i686
dnf install -y libnsl2
dnf install -y libnsl2.i686

Create the new groups and users.

groupadd -g 54321 oinstall
groupadd -g 54322 dba
groupadd -g 54323 oper
#groupadd -g 54324 backupdba
#groupadd -g 54325 dgdba
#groupadd -g 54326 kmdba
#groupadd -g 54327 asmdba
#groupadd -g 54328 asmoper
#groupadd -g 54329 asmadmin
#groupadd -g 54330 racdba

useradd -u 54321 -g oinstall -G dba,oper oracle

Uncomment the extra groups you require.

     ◉ Additional Setup

Set the password for the "oracle" user.

passwd oracle

Set secure Linux to permissive by editing the "/etc/selinux/config" file, making sure the SELINUX flag is set as follows.

SELINUX=permissive

Once the change is complete, restart the server or run the following command.

# setenforce Permissive

If you have the Linux firewall enabled, you will need to disable or configure it, as shown here or here. To disable it, do the following.

# systemctl stop firewalld
# systemctl disable firewalld

If you are not using Oracle Linux and UEK, you will need to manually disable transparent huge pages.

Create the directories in which the Oracle software will be installed.

mkdir -p /u01/app/oracle/product/19.0.0/dbhome_1
mkdir -p /u02/oradata
chown -R oracle:oinstall /u01 /u02
chmod -R 775 /u01 /u02

Putting mount points directly under root without mounting separate disks to them is typically a bad idea. It's done here for simplicity, but for a real installation "/" storage should be reserved for the OS.

Unless you are working from the console, or using SSH tunnelling, login as root and issue the following command.

xhost +<machine-name>

The scripts are created using the cat command, with all the "$" characters escaped. If you want to manually create these files, rather than using the cat command, remember to remove the "\" characters before the "$" characters.

Create a "scripts" directory.

mkdir /home/oracle/scripts

Create an environment file called "setEnv.sh". The "$" characters are escaped using "\". If you are not creating the file with the cat command, you will need to remove the escape characters.

cat > /home/oracle/scripts/setEnv.sh <<EOF
# Oracle Settings
export TMP=/tmp
export TMPDIR=\$TMP

export ORACLE_HOSTNAME=ol8-19.localdomain
export ORACLE_UNQNAME=cdb1
export ORACLE_BASE=/u01/app/oracle
export ORACLE_HOME=\$ORACLE_BASE/product/19.0.0/dbhome_1
export ORA_INVENTORY=/u01/app/oraInventory
export ORACLE_SID=cdb1
export PDB_NAME=pdb1
export DATA_DIR=/u02/oradata

export PATH=/usr/sbin:/usr/local/bin:\$PATH
export PATH=\$ORACLE_HOME/bin:\$PATH

export LD_LIBRARY_PATH=\$ORACLE_HOME/lib:/lib:/usr/lib
export CLASSPATH=\$ORACLE_HOME/jlib:\$ORACLE_HOME/rdbms/jlib
EOF

Add a reference to the "setEnv.sh" file at the end of the "/home/oracle/.bash_profile" file.

echo ". /home/oracle/scripts/setEnv.sh" >> /home/oracle/.bash_profile

Create a "start_all.sh" and "stop_all.sh" script that can be called from a startup/shutdown service. Make sure the ownership and permissions are correct.

cat > /home/oracle/scripts/start_all.sh <<EOF
#!/bin/bash
. /home/oracle/scripts/setEnv.sh

export ORAENV_ASK=NO
. oraenv
export ORAENV_ASK=YES

dbstart \$ORACLE_HOME
EOF

cat > /home/oracle/scripts/stop_all.sh <<EOF
#!/bin/bash
. /home/oracle/scripts/setEnv.sh

export ORAENV_ASK=NO
. oraenv
export ORAENV_ASK=YES

dbshut \$ORACLE_HOME
EOF

chown -R oracle:oinstall /home/oracle/scripts
chmod u+x /home/oracle/scripts/*.sh

Once the installation is complete and you've edited the "/etc/oratab", you should be able to start/stop the database with the following scripts run from the "oracle" user.

~/scripts/start_all.sh
~/scripts/stop_all.sh

◉ Installation


Log into the oracle user. If you are using X emulation then set the DISPLAY environmental variable.

DISPLAY=<machine-name>:0.0; export DISPLAY

Switch to the ORACLE_HOME directory, unzip the software directly into this path and start the Oracle Universal Installer (OUI) by issuing one of the following commands in the ORACLE_HOME directory. The interactive mode will display GUI installer screens to allow user input, while the silent mode will install the software without displaying any screens, as all required options are already specified on the command line.

# Unzip software.
cd $ORACLE_HOME
unzip -oq /path/to/software/LINUX.X64_193000_db_home.zip

# Fake Oracle Linux 7.
export CV_ASSUME_DISTID=OEL7.6

# Interactive mode.
./runInstaller

# Silent mode.
./runInstaller -ignorePrereq -waitforcompletion -silent                        \
    -responseFile ${ORACLE_HOME}/install/response/db_install.rsp               \
    oracle.install.option=INSTALL_DB_SWONLY                                    \
    ORACLE_HOSTNAME=${ORACLE_HOSTNAME}                                         \
    UNIX_GROUP_NAME=oinstall                                                   \
    INVENTORY_LOCATION=${ORA_INVENTORY}                                        \
    SELECTED_LANGUAGES=en,en_GB                                                \
    ORACLE_HOME=${ORACLE_HOME}                                                 \
    ORACLE_BASE=${ORACLE_BASE}                                                 \
    oracle.install.db.InstallEdition=EE                                        \
    oracle.install.db.OSDBA_GROUP=dba                                          \
    oracle.install.db.OSBACKUPDBA_GROUP=dba                                    \
    oracle.install.db.OSDGDBA_GROUP=dba                                        \
    oracle.install.db.OSKMDBA_GROUP=dba                                        \
    oracle.install.db.OSRACDBA_GROUP=dba                                       \
    SECURITY_UPDATES_VIA_MYORACLESUPPORT=false                                 \
    DECLINE_SECURITY_UPDATES=true
Run the root scripts when prompted.

As a root user, execute the following script(s):
        1. /u01/app/oraInventory/orainstRoot.sh
        2. /u01/app/oracle/product/19.0.0/dbhome_1/root.sh

You are now ready to create a database.

◉ Database Creation


You create a database using the Database Configuration Assistant (DBCA). The interactive mode will display GUI screens to allow user input, while the silent mode will create the database without displaying any screens, as all required options are already specified on the command line.

# Start the listener.
lsnrctl start

# Interactive mode.
dbca

# Silent mode.
dbca -silent -createDatabase                                                   \
     -templateName General_Purpose.dbc                                         \
     -gdbname ${ORACLE_SID} -sid  ${ORACLE_SID} -responseFile NO_VALUE         \
     -characterSet AL32UTF8                                                    \
     -sysPassword SysPassword1                                                 \
     -systemPassword SysPassword1                                              \
     -createAsContainerDatabase true                                           \
     -numberOfPDBs 1                                                           \
     -pdbName ${PDB_NAME}                                                      \
     -pdbAdminPassword PdbPassword1                                            \
     -databaseType MULTIPURPOSE                                                \
     -automaticMemoryManagement false                                          \
     -totalMemory 2000                                                         \
     -storageType FS                                                           \
     -datafileDestination "${DATA_DIR}"                                        \
     -redoLogFileSize 50                                                       \
     -emConfiguration NONE                                                     \
     -ignorePreReqs

◉ Post Installation 


Edit the "/etc/oratab" file setting the restart flag for each instance to 'Y'.

cdb1:/u01/app/oracle/product/19.0.0/db_1:Y

Enable Oracle Managed Files (OMF) and make sure the PDB starts when the instance starts.

sqlplus / as sysdba <<EOF
alter system set db_create_file_dest='${DATA_DIR}';
alter pluggable database ${PDB_NAME} save state;
exit;
EOF

Sunday, March 29, 2020

Oracle Database 19c Installation On Oracle Linux 7 (OL7)

Oracle Database 19c, Oracle Database Certifications, Oracle Database Exam Prep, Oracle Database Learning

This article describes the installation of Oracle Database 19c 64-bit on Oracle Linux 7 (OL7) 64-bit. The article is based on a server installation with a minimum of 2G swap and secure Linux set to permissive.

◉ Download Software


Download the Oracle software from OTN or MOS depending on your support status.

OTN: Oracle Database 19c (19.3) Software (64-bit)
edelivery: Oracle Database 19c (19.3) Software (64-bit)

◉ Hosts File


The "/etc/hosts" file must contain a fully qualified name for the server.

<IP-address>  <fully-qualified-machine-name>  <machine-name>

For example.

127.0.0.1       localhost localhost.localdomain localhost4 localhost4.localdomain4
192.168.56.107  ol7-19.localdomain  ol7-19

Set the correct hostname in the "/etc/hostname" file.

ol7-19.localdomain

◉ Oracle Installation Prerequisites


Perform either the Automatic Setup or the Manual Setup to complete the basic prerequisites. The Additional Setup is required for all installations.

     ◉ Automatic Setup

If you plan to use the "oracle-database-preinstall-19c" package to perform all your prerequisite setup, issue the following command.

# yum install -y oracle-database-preinstall-19c

It is probably worth doing a full update as well, but this is not strictly speaking necessary.

# yum update -y

It's worth running the all the YUM commands listed in the manual setup section. Depending on the OS package groups you have selected, some additional packages might also be needed.

If you are using RHEL7 or CentOS7, you can pick up the PRM from the OL7 repository and install it. It will pull the dependencies from your normal repositories.

# yum install -y https://yum.oracle.com/repo/OracleLinux/OL7/latest/x86_64/getPackage/oracle-database-preinstall-19c-1.0-1.el7.x86_64.rpm

     ◉ Manual Setup

If you have not used the "oracle-database-preinstall-19c" package to perform all prerequisites, you will need to manually perform the following setup tasks.

Add the following lines to the "/etc/sysctl.conf" file, or in a file called "/etc/sysctl.d/98-oracle.conf".

fs.file-max = 6815744
kernel.sem = 250 32000 100 128
kernel.shmmni = 4096
kernel.shmall = 1073741824
kernel.shmmax = 4398046511104
kernel.panic_on_oops = 1
net.core.rmem_default = 262144
net.core.rmem_max = 4194304
net.core.wmem_default = 262144
net.core.wmem_max = 1048576
net.ipv4.conf.all.rp_filter = 2
net.ipv4.conf.default.rp_filter = 2
fs.aio-max-nr = 1048576
net.ipv4.ip_local_port_range = 9000 65500

Run one of the following commands to change the current kernel parameters, depending on which file you edited.

/sbin/sysctl -p
# Or
/sbin/sysctl -p /etc/sysctl.d/98-oracle.conf

Add the following lines to a file called "/etc/security/limits.d/oracle-database-preinstall-19c.conf" file.

oracle   soft   nofile    1024
oracle   hard   nofile    65536
oracle   soft   nproc    16384
oracle   hard   nproc    16384
oracle   soft   stack    10240
oracle   hard   stack    32768
oracle   hard   memlock    134217728
oracle   soft   memlock    134217728

Someone in the comments suggested you might need to add the previous lines into the "/etc/security/limits.conf" file also for CentOS7. This is definitely not needed for OL7, but worth considering if the installer gives prerequisite failures for these settings.

The following packages are listed as required. Many of the packages should be installed already.

yum install -y bc   
yum install -y binutils
yum install -y compat-libcap1
yum install -y compat-libstdc++-33
#yum install -y dtrace-modules
#yum install -y dtrace-modules-headers
#yum install -y dtrace-modules-provider-headers
yum install -y dtrace-utils
yum install -y elfutils-libelf
yum install -y elfutils-libelf-devel
yum install -y fontconfig-devel
yum install -y glibc
yum install -y glibc-devel
yum install -y ksh
yum install -y libaio
yum install -y libaio-devel
yum install -y libdtrace-ctf-devel
yum install -y libXrender
yum install -y libXrender-devel
yum install -y libX11
yum install -y libXau
yum install -y libXi
yum install -y libXtst
yum install -y libgcc
yum install -y librdmacm-devel
yum install -y libstdc++
yum install -y libstdc++-devel
yum install -y libxcb
yum install -y make
yum install -y net-tools # Clusterware
yum install -y nfs-utils # ACFS
yum install -y python # ACFS
yum install -y python-configshell # ACFS
yum install -y python-rtslib # ACFS
yum install -y python-six # ACFS
yum install -y targetcli # ACFS
yum install -y smartmontools
yum install -y sysstat

# Added by me.
yum install -y unixODBC

Create the new groups and users.

groupadd -g 54321 oinstall
groupadd -g 54322 dba
groupadd -g 54323 oper
#groupadd -g 54324 backupdba
#groupadd -g 54325 dgdba
#groupadd -g 54326 kmdba
#groupadd -g 54327 asmdba
#groupadd -g 54328 asmoper
#groupadd -g 54329 asmadmin
#groupadd -g 54330 racdba

useradd -u 54321 -g oinstall -G dba,oper oracle

Uncomment the extra groups you require.

     ◉ Additional Setup

The following steps must be performed, whether you did the manual or automatic setup.

Set the password for the "oracle" user.

passwd oracle

Set secure Linux to permissive by editing the "/etc/selinux/config" file, making sure the SELINUX flag is set as follows.

SELINUX=permissive

Once the change is complete, restart the server or run the following command.

# setenforce Permissive

If you have the Linux firewall enabled, you will need to disable or configure it, as shown here or here. To disable it, do the following.

# systemctl stop firewalld
# systemctl disable firewalld

Create the directories in which the Oracle software will be installed.

mkdir -p /u01/app/oracle/product/19.0.0/dbhome_1
mkdir -p /u02/oradata
chown -R oracle:oinstall /u01 /u02
chmod -R 775 /u01 /u02

Putting mount points directly under root without mounting separate disks to them is typically a bad idea. It's done here for simplicity, but for a real installation "/" storage should be reserved for the OS.

Unless you are working from the console, or using SSH tunnelling, login as root and issue the following command.

xhost +<machine-name>

The scripts are created using the cat command, with all the "$" characters escaped. If you want to manually create these files, rather than using the cat command, remember to remove the "\" characters before the "$" characters.

Create a "scripts" directory.

mkdir /home/oracle/scripts

Create an environment file called "setEnv.sh". The "$" characters are escaped using "\". If you are not creating the file with the cat command, you will need to remove the escape characters.

cat > /home/oracle/scripts/setEnv.sh <<EOF
# Oracle Settings
export TMP=/tmp
export TMPDIR=\$TMP

export ORACLE_HOSTNAME=ol7-19.localdomain
export ORACLE_UNQNAME=cdb1
export ORACLE_BASE=/u01/app/oracle
export ORACLE_HOME=\$ORACLE_BASE/product/19.0.0/dbhome_1
export ORA_INVENTORY=/u01/app/oraInventory
export ORACLE_SID=cdb1
export PDB_NAME=pdb1
export DATA_DIR=/u02/oradata

export PATH=/usr/sbin:/usr/local/bin:\$PATH
export PATH=\$ORACLE_HOME/bin:\$PATH

export LD_LIBRARY_PATH=\$ORACLE_HOME/lib:/lib:/usr/lib
export CLASSPATH=\$ORACLE_HOME/jlib:\$ORACLE_HOME/rdbms/jlib
EOF

Add a reference to the "setEnv.sh" file at the end of the "/home/oracle/.bash_profile" file.

echo ". /home/oracle/scripts/setEnv.sh" >> /home/oracle/.bash_profile

Create a "start_all.sh" and "stop_all.sh" script that can be called from a startup/shutdown service. Make sure the ownership and permissions are correct.

cat > /home/oracle/scripts/start_all.sh <<EOF
#!/bin/bash
. /home/oracle/scripts/setEnv.sh

export ORAENV_ASK=NO
. oraenv
export ORAENV_ASK=YES

dbstart \$ORACLE_HOME
EOF

cat > /home/oracle/scripts/stop_all.sh <<EOF
#!/bin/bash
. /home/oracle/scripts/setEnv.sh

export ORAENV_ASK=NO
. oraenv
export ORAENV_ASK=YES

dbshut \$ORACLE_HOME
EOF

chown -R oracle:oinstall /home/oracle/scripts
chmod u+x /home/oracle/scripts/*.sh

Once the installation is complete and you've edited the "/etc/oratab", you should be able to start/stop the database with the following scripts run from the "oracle" user.

~/scripts/start_all.sh
~/scripts/stop_all.sh

◉ Installation


Log into the oracle user. If you are using X emulation then set the DISPLAY environmental variable.

DISPLAY=<machine-name>:0.0; export DISPLAY

Switch to the ORACLE_HOME directory, unzip the software directly into this path and start the Oracle Universal Installer (OUI) by issuing one of the following commands in the ORACLE_HOME directory. The interactive mode will display GUI installer screens to allow user input, while the silent mode will install the software without displaying any screens, as all required options are already specified on the command line.

# Unzip software.
cd $ORACLE_HOME
unzip -oq /path/to/software/LINUX.X64_193000_db_home.zip

# Interactive mode.
./runInstaller

# Silent mode.
./runInstaller -ignorePrereq -waitforcompletion -silent                        \
    -responseFile ${ORACLE_HOME}/install/response/db_install.rsp               \
    oracle.install.option=INSTALL_DB_SWONLY                                    \
    ORACLE_HOSTNAME=${ORACLE_HOSTNAME}                                         \
    UNIX_GROUP_NAME=oinstall                                                   \
    INVENTORY_LOCATION=${ORA_INVENTORY}                                        \
    SELECTED_LANGUAGES=en,en_GB                                                \
    ORACLE_HOME=${ORACLE_HOME}                                                 \
    ORACLE_BASE=${ORACLE_BASE}                                                 \
    oracle.install.db.InstallEdition=EE                                        \
    oracle.install.db.OSDBA_GROUP=dba                                          \
    oracle.install.db.OSBACKUPDBA_GROUP=dba                                    \
    oracle.install.db.OSDGDBA_GROUP=dba                                        \
    oracle.install.db.OSKMDBA_GROUP=dba                                        \
    oracle.install.db.OSRACDBA_GROUP=dba                                       \
    SECURITY_UPDATES_VIA_MYORACLESUPPORT=false                                 \
    DECLINE_SECURITY_UPDATES=true

Run the root scripts when prompted.

As a root user, execute the following script(s):
        1. /u01/app/oraInventory/orainstRoot.sh
        2. /u01/app/oracle/product/19.0.0/dbhome_1/root.sh

You are now ready to create a database.

◉ Database Creation


You create a database using the Database Configuration Assistant (DBCA). The interactive mode will display GUI screens to allow user input, while the silent mode will create the database without displaying any screens, as all required options are already specified on the command line.

# Start the listener.
lsnrctl start

# Interactive mode.
dbca

# Silent mode.
dbca -silent -createDatabase                                                   \
     -templateName General_Purpose.dbc                                         \
     -gdbname ${ORACLE_SID} -sid  ${ORACLE_SID} -responseFile NO_VALUE         \
     -characterSet AL32UTF8                                                    \
     -sysPassword SysPassword1                                                 \
     -systemPassword SysPassword1                                              \
     -createAsContainerDatabase true                                           \
     -numberOfPDBs 1                                                           \
     -pdbName ${PDB_NAME}                                                      \
     -pdbAdminPassword PdbPassword1                                            \
     -databaseType MULTIPURPOSE                                                \
     -automaticMemoryManagement false                                          \
     -totalMemory 2000                                                         \
     -storageType FS                                                           \
     -datafileDestination "${DATA_DIR}"                                        \
     -redoLogFileSize 50                                                       \
     -emConfiguration NONE                                                     \
     -ignorePreReqs

◉ Post Installation


Edit the "/etc/oratab" file setting the restart flag for each instance to 'Y'.

cdb1:/u01/app/oracle/product/19.0.0/db_1:Y

Enable Oracle Managed Files (OMF) and make sure the PDB starts when the instance starts.

sqlplus / as sysdba <<EOF
alter system set db_create_file_dest='${DATA_DIR}';
alter pluggable database ${PDB_NAME} save state;
exit;
EOF

Saturday, March 28, 2020

Oracle Cloud Infrastructure (OCI): Create a Database VM

This article shows how to create a database virtual machine under Oracle Cloud Infrastructure (OCI).

The screens change a little with each quarterly release of Oracle Cloud. Even so, the screen shots in this article will give you a good idea of what is involved.

◉ Assumptions


This article assumes you've already defined a Virtual Cloud Network (VCN) in the same compartment as the database VM you are about to create.

This article describes the creation of a database VM on Oracle Cloud Infrastructure, similar to the Database Cloud Service on the "Classic" Oracle Public Cloud. This is not one of the autonomous database services. If that's what you want, links are provided above.

◉ Create SSH Key


Before you start, you are going to need a key pair for authentication to your service.

$ ssh-keygen -b 2048 -t rsa -f myOracleCloudKey
$ chmod 600 myOracleCloudKey*
Enter and confirm the passphrase when prompted. You will be asked to upload the public key during the service creation.

If you have any problems, or need instructions for using PuTTYgen on Windows

◉ Create a Database VM (DBaaS)


Log into the Oracle Cloud.

Oracle Cloud Infrastructure (OCI), Oracle Database Tutorial and Materials, Oracle Database Learning, Oracle Database Certifications, Oracle Database Exam Prep

Use the top-left menu to select the "Bare Metal, VM and Exadata" option.

Oracle Cloud Infrastructure (OCI), Oracle Database Tutorial and Materials, Oracle Database Learning, Oracle Database Certifications, Oracle Database Exam Prep

Select the compartment and click on the "Create DB System" button.

Oracle Cloud Infrastructure (OCI), Oracle Database Tutorial and Materials, Oracle Database Learning, Oracle Database Certifications, Oracle Database Exam Prep

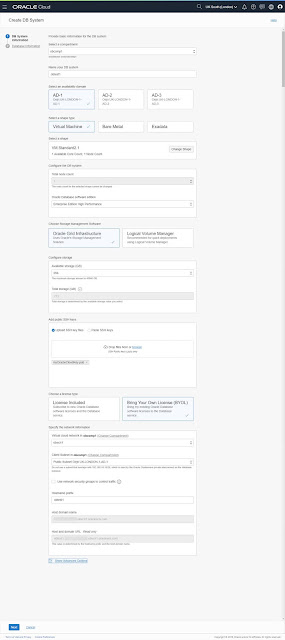
Enter the details about the system you want to provision, including the system and networking details. You will need to upload your public key for operating system access, and remember to select the Virtual Cloud Network and associated subnet you created previously. All other settings should be self explanatory. When you are ready, click the "Next" button.

Oracle Cloud Infrastructure (OCI), Oracle Database Tutorial and Materials, Oracle Database Learning, Oracle Database Certifications, Oracle Database Exam Prep

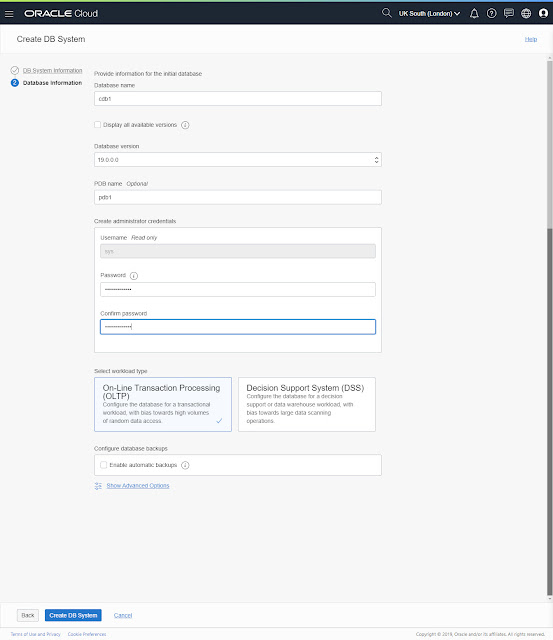
On the second page, enter the details about the database instance and click the "Create DB System" button.

Oracle Cloud Infrastructure (OCI), Oracle Database Tutorial and Materials, Oracle Database Learning, Oracle Database Certifications, Oracle Database Exam Prep

Wait for the service to be provisioned.

Oracle Cloud Infrastructure (OCI), Oracle Database Tutorial and Materials, Oracle Database Learning, Oracle Database Certifications, Oracle Database Exam Prep

Once the service is provisioned, the status will turn to available. Clicking on the "Nodes" link will display the public IP address of the server.

Oracle Cloud Infrastructure (OCI), Oracle Database Tutorial and Materials, Oracle Database Learning, Oracle Database Certifications, Oracle Database Exam Prep

◉ Connecting to the VM using SSH


Connect to the "opc" operating system user by specifying your private key and the public IP address from your DB Systems page.

$ ssh -i ./myOracleCloudKey opc@123.123.123.123

[opc@obtest1 ~]$

Once connected, you can switch to the "oracle" OS user and do all the usual stuff.

[opc@obtest1 ~]$ sudo su - oracle
[oracle@obtest1 ~]$ . oraenv
ORACLE_SID = [cdb1] ?
The Oracle base has been set to /u01/app/oracle
[oracle@obtest1 ords]$ sqlplus / as sysdba

SQL*Plus: Release 19.0.0.0.0 - Production on Fri Dec 6 12:18:51 2019
Version 19.4.0.0.0

Copyright (c) 1982, 2019, Oracle.  All rights reserved.

Connected to:
Oracle Database 19c EE High Perf Release 19.0.0.0.0 - Production
Version 19.4.0.0.0

SQL> ALTER SESSION SET CONTAINER = pdb1;

Session altered.

SQL> CREATE USER test IDENTIFIED BY TesT123456##;

User created.

SQL> GRANT CREATE SESSION TO test;

Grant succeeded.

SQL>

If you need to perform any tasks as root, you must connect to the "opc" user and run them using "sudo".

$ ssh -i ./myOracleCloudKey opc@123.123.123.123
-bash-4.1$ sudo vi /etc/hosts

Friday, March 27, 2020

Oracle 1Z0-071 Exam: Pave Your Way Towards a Successful Score

1z0-071, oracle 1z0-071, oracle database sql 1z0-071, oracle 1z0-071 exam, oracle database sql (1z0-071), 1z0-071 free practice exam, oracle database sql | 1z0-071, oracle 1z0-071 database sql exam, 1z0-071 exam, oracle sql 1z0-071, oracle exam 1z0-071, 1z0-071 study guide pdf free download, 1z0-071 practice test, oracle 1z0-071 practice test, , oracle database 12c sql certified associate 1z0-071, 1z0-071 exam dumps, 1z0-071 pdf, oracle database sql 1z0-071 practice test, oracle database 12c sql 1z0-071, 1z0-071 exam questions, sql 1z0-071, 1z0-071 practice test pdf, exam 1z0-071, oca oracle database sql exam guide (exam 1z0-071) pdf, 1z0-071 study guide, 1z0-071 oracle database sql, 1z0-071 study guide pdf, oracle database sql (1z0-071) certification exam, 1z0-071 questions, oca oracle database sql certified associate exam guide (exam 1z0-071) pdf, dbexam 1z0-071

IT certifications are considered an excellent source to launch and advance your professional career. If you compare to the past, now professionals have more options in choosing IT certifications available in the IT industry. The Oracle 1Z0-071 is one of the top IT certifications and considers a very demanding one in the IT domain.

If you are seeking a great career in Database 12c SQL as a database administrator, then choose Oracle 1Z0-071 certification. It is the best way to get a high paying job and promotions.

Passing the Oracle 1Z0-071 exam is essential for becoming an Oracle Database 11g Administrator Certified Associate, and the like professionals comprising Oracle Database 12c Administrator Certified Associate, Oracle Database SQL Certified Associate and Oracle Database SQL Certified Associate.

Oracle 1Z0-071 Exam Objective

Oracle 1Z0-071 exam purpose to prepare for tech professionals to move to the next level in their professional level. The exam makes you knowledgeable in various areas. The oracle 1z0-071 exam also imparts the skills in the Using SET Operators, Restricting and Sorting Data, Using Subqueries to Solve Queries, Using Single-Row Functions to Customize Output, and many more.

How it Helps in Making a Better Career?

If you have passed the Oracle 1Z0-071 exams, it is essential to note that it would make your resume shine as you have the benefits of respective Oracle certifications.
Read: Build a Career as a Database Developer By Passing Oracle 1Z0-071 Exam
It will help you get the necessary familiarity with the framework. It would help in achieving good job security and job satisfaction. As a database administrator (DBA), your career will continue to evolve and grow.

Thus, Oracle 1Z0-071 would help you improve not only in your expertise but also in the scope of doing it right in your professional career. You are likely to reach leadership level if you can combine your ability in leadership.

Preparing for Oracle 1Z0-071 Exam

You require to start your preparation for Oracle 1Z0-071 exams Oracle’s Database SQL course. This course includes all the objectives of the 1Z0-071 exams.

To prepare well for the exam, you require to complete the training. First of all, prepare for SQL. You need to be good sufficiently at SQL. It gives the essential skill or abilities in the basic knowledge of SQL and some crucial facets of SQL development.

You can speedily pass Oracle 1Z0-071 exams provided by DBexam.com as it helps you plan it properly and practice consistently. It will enhance your confidence the reduce stress, especially when the exam is close. There are many online materials that you obtain recourse to.


These online resources would help you not only the critical data but also get the data upgraded regularly. You should be eligible to utilize the concepts you came to know to new situations. It will further help you in the procedure of building your knowledge base.

It is essential to know that it is necessary to buy a beneficial service that could help you prepare for the exam. Keep in mind, while preparing for the exam, time is a more critical constraint that any other factor that could potentially impact your performance.

Look for the latest Oracle 1Z0-071 exam questions and look for updated and verified answered questions as well. Old questions would help you get a short idea on how to resolve the exam.

Practice, More practice, and Continuing

Practice excellent before the exam - You can get a good NO. Of questions from the official Oracle website. As you keep on practicing the questions, you would get more confidence to do your things better? You won’t face any troubles while you sit for the actual exam.

Oracle 1Z0-071 is also defined as Oracle Database SQL. The exam duration is 120 minutes. You must solve all the of the multiple-choice question within this time limit. You would get in all 78 questions in the real exam. You must obtain an equal or greater than 63% to pass the exam.

Technology is more essential than anything else. As we are busy with our core job, we rarely get some time to spare for the exam. As technology makes rapid strides to make us move forward, we can not afford to overlook the newest trends in technology.

You require to stay updated concerning getting lasts technology. An upgraded resource will be of great help if you keep on using it consistently. It’s one of the crucial tips for preparing Oracle 1Z0-071 exam.

You may find it beneficial to use online resources instead of textbooks. The online resources are natural to utilize and get upgrades regularly. Further, you can get plenty of help practicing questions. The questions are generally interactive.

If you place a question online, you possibly get an answer to it. Thus, utilizing online resources are so comfortable and manipulating. It is crucial to refer to Oracle’s official website to gain the required knowledge.

Now when it comes to preparing for the actual exam, you require to prepare for the exam well before the date of your actual exam. That is, you need to make it purposeful, have a list of questions that are likely to be the part of the upcoming exam.

The resources meant for the exam are built to provide you comprehensive guidance for you. Do not lose your confidence if you are unable to cope up with the problems concerning your language. Keep in your mind, that practice is the essential path of achieving the necessary level in the skill to pass the exam.

To know better the application of several tricks, you need to apply them in the actual exam like situations. Now you can track how far you have reached concerning your skill level.


Conclusion

Preparing for Oracle Database SQL (1Z0-071) exam is a significant challenge. You need to do it with enough amount of time and practice. You are likely to reach your target of cracking the exam if you plan well and in advance. Whenever you have started preparing for the exam, never try to stop.

Thursday, March 26, 2020

Blockchain tables in Oracle Database 20c

Blockchain tables are insert-only tables that organize rows into a number of chains and is a new concept starting with Oracle 20c. Each row in a chain, except the first row, is chained to the previous row in the chain by using a cryptographic hash. For each Oracle RAC instance a blockchain table contains thirty two chains, ranging from 0 through 31.

Oracle Database 20c, Oracle Database Tutorial and Material, Oracle Database Learning

This is an example of how a blockchain table is created in 20c:

Oracle Database 20c, Oracle Database Tutorial and Material, Oracle Database Learning

Let me first point out the main restrictions:

– Blockchain tables cannot be created in the root container and in an application root container: ORA-05729: blockchain table cannot be created in root container
– You cannot update the rows: ORA-05715: operation not allowed on the blockchain table
– In general, you cannot delete rows, truncate the table or drop the blockchain table: ORA-05723: drop blockchain table NDA_RECORDS not allowed
– Don’t even try to drop the tablespace containing blockchain tables, here is what happens:

DROP TABLESPACE BC_DATA INCLUDING CONTENTS AND DATAFILES;
ORA-00604: error occurred at recursive SQL level 1
ORA-05723: drop blockchain table NDA_RECORDS not allowed

The most important new view in 20c related to blockchain tables is DBA_BLOCKCHAIN_TABLES:

Oracle Database 20c, Oracle Database Tutorial and Material, Oracle Database Learning

The 4 (non-trivial) columns of DBA_BLOCKCHAIN_TABLES contain the following information:

1. ROW_RETENTION: The minimum number of days a row must be retained after it is inserted into the table – if the value of this column is NULL, then rows can never be deleted from the table. In the example above, the row can be deleted after 16 days. Otherwise, you will get: ORA-05715: operation not allowed on the blockchain table

2. ROW_RETENTION_LOCKED: 2 possible values (YES and NO) showing if the row retention period for the blockchain table is locked.

YES: The row retention period is locked. You cannot change the row retention period.
NO: The row retention period is not locked. You can change the row retention period to a value higher than the current value with the SQL statement ALTER TABLE … NO DELETE UNTIL n DAYS AFTER INSERT.

3. TABLE_INACTIVITY_RETENTION: Number of days for which the blockchain table must be inactive before it can be dropped, that is, the number of days that must pass after the most recent row insertion before the table can be dropped. A table with no rows can be dropped at any time, regardless of this column value. In the example above, a year of inactivity must pass before the table can be dropped.

4. HASH_ALGORITHM: The algorithm used for computing the hash value for each table row.

To each row you add/insert to the blockchain table, Oracle adds values to the hidden columns of the blockchain table. Hidden columns are populated after you commit. They are used to implement sequencing of rows and verify that data is tamper-resistant. You can create indexes on hidden columns. In order to view the values of the hidden columns, you should explicitly include their names in the SQL, just like this:

Oracle Database 20c, Oracle Database Tutorial and Material, Oracle Database Learning

Hidden Columns in Blockchain Tables will give you more details about the subject.

The following additional operations are not allowed with blockchain tables:

– Adding, dropping, and renaming columns
– Dropping partitions
– Defining BEFORE ROW triggers that fire for update operations (other triggers are allowed)
– Direct-path loading
– Inserting data using parallel DML
– Converting a regular table to a blockchain table (or vice versa)

There is a new PL/SQL procedure DBMS_BLOCKCHAIN_TABLE which contains 5 procedures, one of which VERIFY_ROWS is used to validate he data in the blockchain table.

Use DBMS_BLOCKCHAIN_TABLE.DELETE_EXPIRED_ROWS to remove rows that are beyond the retention period of the blockchain table.

For DBAs:

– For each chain in a database instance, periodically save the current hash and the corresponding sequence number outside the database.
– In an Oracle Data Guard environment, consider using the maximum protection mode or maximum availability mode to avoid loss of data.

You can use certificates to verify the signature of a blockchain table row. Check here on how to add and delete certificates to blockchain table rows.

Wednesday, March 25, 2020

Working with SQL Cursors

DB Exam Study, Database Tutorial and Materials, DB Certification, Oracle Database Prep

In SQL cursors serve as a pointer that enables application programming language to deal with query results one row at a time. This article quickly explores the concept behind and show how to declare cursors, open, retrieve data from them, and then close them.

SQL Cursors


The data in relational database are managed in the form of sets. As a result, query results return by SQL SELECT statements are referred to as result sets. The result sets are nothing but combinations of one or more rows and columns extracted from one or more tables. You can scroll through the result sets to extract the information you need. The data elements returned are used by programming languages like Java or any other for specific application purposes. But here lies the problem of impedance mismatch due to the difference in construct between database model and programming language model.

A SQL database model has three main constructs:

◉ columns (or attributes) and their data types
◉ rows (records or tuples)
◉ tables (collection of records)

Therefore, primary mismatch between two models are:

1. The attribute data types available in database model is not the same as the variable types used in programming languages. There are many host languages, and each have a different data type. For example, the data types of C/C++ and Java are different and so is SQL data types. Hence a binding mechanism is necessary to mitigate the incompatibility issue.

2. The result returned by SQL SELECT statements are multi-sets of records where each record is a collection of attributes. Host programming languages typically works on individual data values of tuple returned by the query. Therefore, it is essential that SQL query result maps with the data structure supported by the programming language. The mechanism of looping over tuples is necessary to iterate over tuples and their attribute values.

The cursor acts like an iterator variable to loop over tuples returned by the SQL query and extract individual values within each tuple which then can be mapped to appropriate type of program variables.

The cursor, therefore, serves as a pointer that enables programming language to process query result one record at a time. A cursor can traverse through all rows of a query result focusing on one row at a time. Consider the following SQL query:

SELECT emp_no, first_name, last_name, birth_date
FROM employees
WHERE MONTH(birth_date) = MONTH(CURRENT_DATE)
AND DAY(birth_date) = DAY(CURRENT_DATE);

The query result from the above statement returns employee details of all those employees whose birth date falls on the current day of a particular month. The result may contain many rows, but the host application language can deal with one row at a time. As a result, cursor is declared as an embedded SQL statement within the application programming language. The cursor then is opened much like a file and extract single row from the query result. Other rows are extracted subsequently, in sequence until the cursor is closed.

Declaring a Cursor


DB Exam Study, Database Tutorial and Materials, DB Certification, Oracle Database Prep
Cursors are declared much like a variable. A name is given, there are statements to open the cursor, retrieve the query result, and finally close the cursor. Note that, different SQL implementations support the use of cursors in a different way. But there is a general agreement on how the cursor should be written.

We must use SQL statements to fully implement cursor functionality because simply declaring a cursor is not enough to extract data from a SQL database. There are four basic steps to declare a cursor:

DECLARE CURSOR: The declaration begins by giving cursor a name and assigning the query expression to be invoked when the cursor is opened.

OPEN: The open statement executes the query expression assigned and make ready query result for subsequent FETCH.

FETCH: Retrieves data values into variables which then can be passed to host programming language or to other embedded SQL statements.

CLOSE: The cursor is closed from fetching any more query result.

The syntax is as follows:

DECLARE <cursor_name>
[SENSITIVE | INSENSITIVE | ASENSITIVE]
[SCROLL | NO SCROLL] CURSOR
[ WITH HOLD | WITHOUT HOLD]
[ WITH RETURN | WITHOUT RETURN]
FOR <sql_query_expression>
[ ORDER BY <sort_expression>]
[ FOR {READ ONLY | UPDATE [ OF <list_of_column>]}]

The essential part of a cursor declaration is as follows:

 DECLARE <cursor_name> FOR <sql_query_expression>

The optional part such as [SENSITIVE | INSENSITIVE | ASENSITIVE] signifies whether the cursor is sensitive to changes and whether to reflect them in the query result. SENSITIVE means cursor is affected by changes, INSENSITIVE means cursor is not affected and ASENSITIVE means changes may or may not be visible to the cursor. If not specified it assumes ASENSITIVE option.

The optional [SCROLL | NOSCROLL] defines the scroll ability of the cursor.  If not specified it assumes NO SCROLL option.

The optional [ WITH HOLD | WITHOUT HOLD] defines whether to hold or automatically close when the transaction due to the cursor is committed. If not specified it maintains WITHOUT HOLD option.

The optional [ WITH RETURN | WITHOUT RETURN] determines whether to return the cursor result set to the invoker such as another SQL routine or host language. If not specified it means WITHOUT RETURN.

The ORDER BY clause is used to sort the query result returned according to the specified sorting technique.

The UPDATE option refers to use of UPDATE or DELETE statement is association with the rows returned by the cursor’s SELECT statement. Any such modification is not possible if we specify READ ONLY option. If not specified, then by default UPDATE option is assumed.

Therefore, a simple cursor can be declared as follows:

DECLARE mycursor CURSOR
 FOR
SELECT emp_no, first_name, last_name, birth_date
  FROM employees
 WHERE MONTH(birth_date) = MONTH(CURRENT_DATE)
  AND DAY(birth_date) = DAY(CURRENT_DATE);

Cursors in MySQL


Typically, there are two types of cursors found in MySQL:  read-only and forward-only cursors. These cursors can be used for MySQL stored procedure. These cursors help us to iterate over query results one row at a time and fetch into variables for further processing. It is possible to declare more than one cursor and nest them in loops. Note that cursors are read-only because they are used to iterate over temporary tables. The cursor typically executes the query as we open it.

One of the problems with cursor in MySQL is that they might slow down the performance of the query due to extra I/O operations they perform. This is particularly for true large data types such as BLOB and TEXT. As cursors works with temporary tables, these types are not supported in in-memory tables. Therefore, while working with these types MySQL has to create temporary tables on disk and that requires lot of I/O operation and that too in slow devices like disks. This is the primary reason of slow performance of cursor.

MySQL also do not support client-side cursors however the client API can emulate them if necessary. But then this is not much different from fetching the result in an array in programming language like Java and manipulate them there instead.

Here is a sample on how to write cursors in MySQL.

CREATE PROCEDURE 'cursor_demo'()
BEGIN
    DECLARE done INT DEFAULT FALSE;
    DECLARE id INT(11);
    DECLARE fn varchar(14);
    DECLARE ln varchar(16);
    DECLARE bdate date;
  DECLARE mycursor CURSOR FOR
  SELECT emp_no, first_name, last_name, birth_date
    FROM employees
    WHERE MONTH(birth_date)=MONTH(CURRENT_DATE)
      AND DAY(birth_date)=DAY(CURRENT_DATE);
  DECLARE CONTINUE HANDLER FOR NOT FOUND SET done = TRUE;
    OPEN mycursor;
  fetch_loop: LOOP
    FETCH mycursor INTO id, fn, ln, bdate;
  IF done THEN
      LEAVE fetch_loop;
    END IF;
    SELECT id, fn, ln, bdate;
  END LOOP;
  CLOSE mycursor;
END

Call the is stored procedure as follows:

mysql> CALL cursor_demo

The procedure fetches the rows from a table named employee whose birth date matches the current day and month in a cursor named mycursor and simply prints them using SELECT statement.

Tuesday, March 24, 2020

Oracle Database 18c Installation On Fedora 31 (F31)

Oracle Database 18c, Oracle Database Study Materials, Oracle Guides, Oracle Java Tutorial and Material

This article describes the installation of Oracle Database 18c 64-bit on Fedora 31 (F31) 64-bit. The article is based on a server installation with a minimum of 2G swap and secure Linux set to permissive.

◉ Download Software


Download the Oracle software from OTN or MOS depending on your support status.

- OTN: Oracle Database 18c (18.3) Software (64-bit).
- edelivery: Oracle Database 18c (18.3) Software (64-bit)

◉ Hosts File

The "/etc/hosts" file must contain a fully qualified name for the server.

<IP-address>  <fully-qualified-machine-name>  <machine-name>

For example.

127.0.0.1       localhost localhost.localdomain localhost4 localhost4.localdomain4
192.168.56.141  fedora31.localdomain  fedora31

Set the correct hostname in the "/etc/hostname" file.

fedora31.localdomain

◉ Set Kernel Parameters


Add the following lines to the "/etc/sysctl.conf" file, or in a file called "/etc/sysctl.d/98-oracle.conf".

fs.file-max = 6815744
kernel.sem = 250 32000 100 128
kernel.shmmni = 4096
kernel.shmall = 1073741824
kernel.shmmax = 4398046511104
kernel.panic_on_oops = 1
net.core.rmem_default = 262144
net.core.rmem_max = 4194304
net.core.wmem_default = 262144
net.core.wmem_max = 1048576
net.ipv4.conf.all.rp_filter = 2
net.ipv4.conf.default.rp_filter = 2
fs.aio-max-nr = 1048576
net.ipv4.ip_local_port_range = 9000 65500

Run one of the following commands to change the current kernel parameters, depending on which file you edited.

/sbin/sysctl -p
# Or
/sbin/sysctl -p /etc/sysctl.d/98-oracle.conf

Add the following lines to a file called "/etc/security/limits.d/oracle-database-server-18c-preinstall.conf" file.

oracle   soft   nofile    1024
oracle   hard   nofile    65536
oracle   soft   nproc    16384
oracle   hard   nproc    16384
oracle   soft   stack    10240
oracle   hard   stack    32768
oracle   hard   memlock    134217728
oracle   soft   memlock    134217728

Stop and disable the firewall. You can configure it later if you wish.

# systemctl stop firewalld
# systemctl disable firewalld

Set SELinux to permissive by editing the "/etc/selinux/config" file, making sure the SELINUX flag is set as follows.

SELINUX=permissive

The server will need a reboot for the change to take effect.

◉ Setup


Before we consider the packages required by the Oracle installation, it's probably worth making sure some basic package groups are installed.

# Use desktop of your choice.
dnf groupinstall -y GNOME

dnf groupinstall -y "Development Tools"
dnf groupinstall -y "Administration Tools"
dnf groupinstall -y "System Tools"
dnf install -y firefox

If you have installed the suggested package groups, the majority of the necessary packages will already be installed. The following packages are listed as required, including the 32-bit version of some of the packages. Many of the packages should be installed already.

dnf install -y bc   
dnf install -y binutils
# Next package will fail. Ignore it.
dnf install -y compat-libcap1
dnf install -y compat-libstdc++-33
dnf install -y compat-libstdc++-33.i686
dnf install -y elfutils-libelf.i686
dnf install -y elfutils-libelf
dnf install -y elfutils-libelf-devel.i686
dnf install -y elfutils-libelf-devel
dnf install -y fontconfig-devel
dnf install -y glibc.i686
dnf install -y glibc
dnf install -y glibc-devel.i686
dnf install -y glibc-devel
dnf install -y ksh
dnf install -y libaio.i686
dnf install -y libaio
dnf install -y libaio-devel.i686
dnf install -y libaio-devel
dnf install -y libX11.i686
dnf install -y libX11
dnf install -y libXau.i686
dnf install -y libXau
dnf install -y libXi.i686
dnf install -y libXi
dnf install -y libXtst.i686
dnf install -y libXtst
dnf install -y libgcc.i686
dnf install -y libgcc
dnf install -y librdmacm-devel
dnf install -y libstdc++.i686
dnf install -y libstdc++
dnf install -y libstdc++-devel.i686
dnf install -y libstdc++-devel
dnf install -y libxcb.i686
dnf install -y libxcb
dnf install -y make
dnf install -y nfs-utils
dnf install -y net-tools
dnf install -y python
dnf install -y python-configshell
dnf install -y python-rtslib
dnf install -y python-six
dnf install -y smartmontools
dnf install -y sysstat
dnf install -y targetcli
dnf install -y unixODBC

# New for F31
dnf install -y libnsl2
dnf install -y libnsl2.i686
dnf install -y libxcrypt-compat

dnf install -y http://rpmfind.net/linux/fedora/linux/development/rawhide/Everything/x86_64/os/Packages/c/compat-libpthread-nonshared-2.30.9000-18.fc32.x86_64.rpm

#dnf update -y

Create the new groups and users.

groupadd -g 54321 oinstall
groupadd -g 54322 dba
groupadd -g 54323 oper
#groupadd -g 54324 backupdba
#groupadd -g 54325 dgdba
#groupadd -g 54326 kmdba
#groupadd -g 54328 asmdba
#groupadd -g 54328 asmoper
#groupadd -g 54329 asmadmin

useradd -u 54321 -g oinstall -G dba,oper oracle
passwd oracle

We are not going to use the extra groups, but include them if you do plan on using them.

Create the directories in which the Oracle software will be installed.

mkdir -p /u01/app/oracle/product/18.0.0/dbhome_1
mkdir -p /u02/oradata
chown -R oracle:oinstall /u01 /u02
chmod -R 775 /u01 /u02

Putting mount points directly under root without mounting separate disks to them is typically a bad idea. It's done here for simplicity, but for a real installation "/" storage should be reserved for the OS.

If you are using X Emulation, login as root and issue the following command.

xhost +<machine-name>

Edit the "/etc/redhat-release" file replacing the current release information "Fedora release 31 (Thirty One)" with the following.

redhat release 7

You will need to add the following symbolic links or the Oracle Universal Installer (OUI) will not start.

# Fix for Oracle on F31.
rm -f /usr/lib64/libnsl.so.1
rm -f /usr/lib/libnsl.so.1
ln -s /usr/lib64/libnsl.so.2.0.0 /usr/lib64/libnsl.so.1
ln -s /usr/lib/libnsl.so.2.0.0 /usr/lib/libnsl.so.1

Set up the environment for the "oracle" user.

mkdir -p /home/oracle/scripts

cat > /home/oracle/scripts/setEnv.sh <<EOF
# Oracle Settings
export TMP=/tmp
export TMPDIR=\$TMP

export ORACLE_HOSTNAME=fedora31.localdomain
export ORACLE_UNQNAME=cdb1
export ORACLE_BASE=/u01/app/oracle
export ORACLE_HOME=\$ORACLE_BASE/product/18.0.0/dbhome_1
export ORA_INVENTORY=/u01/app/oraInvenotry
export ORACLE_SID=cdb1
export PDB_NAME=pdb1
export DATA_DIR=/u02/oradata

export PATH=/usr/sbin:/usr/local/bin:\$PATH
export PATH=\$ORACLE_HOME/bin:\$PATH

export LD_LIBRARY_PATH=\$ORACLE_HOME/lib:/lib:/usr/lib
export CLASSPATH=\$ORACLE_HOME/jlib:\$ORACLE_HOME/rdbms/jlib
EOF

echo ". /home/oracle/scripts/setEnv.sh" >> /home/oracle/.bash_profile

chown -R oracle:oinstall /home/oracle/scripts

◉ Installation


Log into the oracle user. If you are using X emulation then set the DISPLAY environmental variable.

DISPLAY=<machine-name>:0.0; export DISPLAY

Perform a software-only installation either using interactive mode (GUI) or silent mode and run the root scripts when prompted.

# Unzip software.
cd $ORACLE_HOME
unzip -oq /path/to/software/LINUX.X64_180000_db_home.zip

# Interactive mode.
#./runInstaller

# Silent mode.
./runInstaller -ignorePrereq -waitforcompletion -silent                        \
    -responseFile ${ORACLE_HOME}/install/response/db_install.rsp               \
    oracle.install.option=INSTALL_DB_SWONLY                                    \
    ORACLE_HOSTNAME=${ORACLE_HOSTNAME}                                         \
    UNIX_GROUP_NAME=oinstall                                                   \
    INVENTORY_LOCATION=${ORA_INVENTORY}                                        \
    SELECTED_LANGUAGES=en,en_GB                                                \
    ORACLE_HOME=${ORACLE_HOME}                                                 \
    ORACLE_BASE=${ORACLE_BASE}                                                 \
    oracle.install.db.InstallEdition=EE                                        \
    oracle.install.db.OSDBA_GROUP=dba                                          \
    oracle.install.db.OSBACKUPDBA_GROUP=dba                                    \
    oracle.install.db.OSDGDBA_GROUP=dba                                        \
    oracle.install.db.OSKMDBA_GROUP=dba                                        \
    oracle.install.db.OSRACDBA_GROUP=dba                                       \
    SECURITY_UPDATES_VIA_MYORACLESUPPORT=false                                 \
    DECLINE_SECURITY_UPDATES=true

Run the root scripts when prompted.

As a root user, execute the following script(s):
        1. /u01/app/oraInvenotry/orainstRoot.sh
        2. /u01/app/oracle/product/18.0.0/dbhome_1/root.sh

You are now ready to create a database.

◉ Database Creation

You create a database using the Database Configuration Assistant (DBCA). The interactive mode will display GUI screens to allow user input, while the silent mode will create the database without displaying any screens, as all required options are already specified on the command line.

# Start the listener.
lsnrctl start

# Interactive mode.
# dbca

# Silent mode.
dbca -silent -createDatabase                                                   \
     -templateName General_Purpose.dbc                                         \
     -gdbname ${ORACLE_SID} -sid  ${ORACLE_SID} -responseFile NO_VALUE         \
     -characterSet AL32UTF8                                                    \
     -sysPassword SysPassword1                                                 \
     -systemPassword SysPassword1                                              \
     -createAsContainerDatabase true                                           \
     -numberOfPDBs 1                                                           \
     -pdbName ${PDB_NAME}                                                      \
     -pdbAdminPassword PdbPassword1                                            \
     -databaseType MULTIPURPOSE                                                \
     -automaticMemoryManagement false                                          \
     -totalMemory 2000                                                         \
     -storageType FS                                                           \
     -datafileDestination "${DATA_DIR}"                                        \
     -redoLogFileSize 50                                                       \
     -emConfiguration NONE                                                     \
     -ignorePreReqs

◉ Post Installation


Edit the "/etc/redhat-release" file restoring the original release information.

Fedora release 31 (Thirty One)

Edit the "/etc/oratab" file setting the restart flag for each instance to 'Y'.

cdb1:/u01/app/oracle/product/18.0.0/dbhome_1:Y