Wednesday, June 29, 2022

Oracle Graph Server and Client 22.2: Subgraph Loading and More

Oracle Graph Server, Oracle Database, Oracle Database Exam, Oracle Database Career, Oracle Database Skills, Oracle Database Jobs, Oracle Database Prep, Oracle Database Preparation Exam, Oracle Database Tutorial and Material

Oracle Graph Server and Client 22.2, the second release in 2022, has several exciting new features. All features work with Oracle Database 12.2 onward, with the download of Graph Server and Client.

Feature Highlights

Subgraph Loading

The in-memory Graph Server (PGX) enables extremely fast, scalable graph analytics. Developers often ask, “Should I load the whole graph into memory?” With Oracle Graph Server and Client 22.2, the answer is that now you can load only the subgraph you want and dynamically expand it as needed. So, an application might require less memory.

Here is an example of the API:

PgxGraph graph = session.readSubgraph()

         .fromPgView(pgViewName)

         .asOfScn(“1234”)

         .queryPgql(“MATCH (a:person)”)

         .queryPgql(“MATCH (b:car)”)

         .load();

Then, to dynamically expand the graph:

PgxGraph expandedGraph = g.expandGraph()

         .withPgql()

         .fromPgView(pgViewName)

         .queryPgql(“MATCH (a:person)-[:owns]>(b:car) WHERE a.age > 33”)

         .vertexPropertiesMergingStrategy(UPDATE_WITH_NEW_VALUES)

         .edgePropertiesMergingStrategy(KEEP_CURRENT_VALUES)

         .expand()

More details are available here.

PGQL on PG Views: INSERT, UPDATE, and DELETE

One of the significant advantages of Property Graph views (PG views) is using SQL to insert new vertices or edges into the graph or update existing properties. Such updates to graph data can be made on the underlying tables using SQL – making it easy for applications to continue to insert/update data as before to the tables – and the updates will be instantly available in the PG view graph.

However, it is also advantageous to have the ability to make updates to the graph using PGQL, which is a graph query language, so that the same language can be used for queries and updates of PG view graphs. With this release, developers can update PG view graphs using PGQL INSERT, UPDATE, and DELETE statements. Note that this is already supported for graphs loaded into memory in the Graph Server.

Examples:

INSERT EDGE t

         BETWEEN a1 AND a2

         LABELS ( transaction )

         PROPERTIES ( t.amount = 20.00 )

  FROM MATCH (a1:Account),

              MATCH (a2:Account)

  WHERE a1.number = 2090 AND a2.number = 8021

UPDATE t SET ( t.amount = 990.00 )

FROM MATCH (a1:Account) -[t:transaction]-> (a2:Account)

WHERE a1.number = 2090 AND a2.number = 10039

DELETE a

FROM MATCH (a:Account)

WHERE a.number = 2090

More details are available here.

The ALL Keyword when Using PGQL with PG Views

Another feature for graphs in the Graph Server and is now added to PG views graphs is the keyword ALL to find all paths between a pair of vertices. When the graph is a tree, ALL can be used instead of SHORTEST (since there is only one path between vertices in trees) for a significant performance boost.

Example:

SELECT LISTAGG(e.amount, ' + ') || ' = ', SUM(e.amount) AS total_amount

    FROM MATCH ALL (a:Account) -[e:transaction]->{,7} (b:Account)

   WHERE a.number = 10039 AND b.number = 2090

ORDER BY total_amount

More information on ALL, and other PGQL features that work with PG views, are here.

Graph Visualization Enhancements

Developers can use simple syntax to fetch all properties of a vertex/edge (instead of listing each of them) using the SELECT n.* syntax in the graph visualization tool.

PROPERTY_GRAPH_METADATA

Oracle Graph Server, Oracle Database, Oracle Database Exam, Oracle Database Career, Oracle Database Skills, Oracle Database Jobs, Oracle Database Prep, Oracle Database Preparation Exam, Oracle Database Tutorial and Material
A metadata graph, called PROPERTY_GRAPH_METADATA will contain information about PG view graphs in the database and is itself a graph. To get all vertex property names of the graph BANK_GRAPH:

SELECT p.property_name

FROM MATCH (g:property_graph)

             -[:has_vertex_table]-> (:vertex_table)

             -[:has_label]-> (:label)

             -[:has_property]-> (p:property)

     ON property_graph_metadata

WHERE g.graph_name = 'BANK_GRAPH'

Source: oracle.com

Monday, June 27, 2022

MySQL Support in Database Tools in OCI

The Oracle Database Development Tools team launched the Database Tools service in OCI providing instance web browser SQL access to Oracle Cloud Databases via REST. The service consolidates all the pieces of information you need to connect to an Oracle database and stores them in a secure, encrypted, single location that can be used and reused across applications, tools, and services.

Today, we expand this service with the ability to create connections to the MySQL Database Service in OCI.

Creating a connection is just as easy as before; give it a name and select a database type.

Oracle Database, Oracle Database Exam, Oracle Database Certification, Oracle Database Tutorial and Materials, Oracle Database Guides, Oracle Database Learning, Oracle Database Preparation, Oracle Database Career, Oracle Database Skills, Oracle Database Jobs, Oracle Database Tools

But you can see, among the three Oracle database types, we now have MySQL. Just select MySQL Database to start creating a Database Tools connection.

Oracle Database, Oracle Database Exam, Oracle Database Certification, Oracle Database Tutorial and Materials, Oracle Database Guides, Oracle Database Learning, Oracle Database Preparation, Oracle Database Career, Oracle Database Skills, Oracle Database Jobs, Oracle Database Tools

And just as we do with Oracle Database, we find the MySQL Database Services you have in your tenancy and pre-fill a select list so you can choose the one you want to connect to; no hunting for connection details.

Oracle Database, Oracle Database Exam, Oracle Database Certification, Oracle Database Tutorial and Materials, Oracle Database Guides, Oracle Database Learning, Oracle Database Preparation, Oracle Database Career, Oracle Database Skills, Oracle Database Jobs, Oracle Database Tools

Once the connection is created, you will see similar options as to what we offer with Oracle Database connections. Of notice, is the Launch MySQL shell. Use this to connect to a MySQL Database Service right from cloud shell.

Oracle Database, Oracle Database Exam, Oracle Database Certification, Oracle Database Tutorial and Materials, Oracle Database Guides, Oracle Database Learning, Oracle Database Preparation, Oracle Database Career, Oracle Database Skills, Oracle Database Jobs, Oracle Database Tools

The service will also help you create a bastion to connect to the private IPs of the service.

Oracle Database, Oracle Database Exam, Oracle Database Certification, Oracle Database Tutorial and Materials, Oracle Database Guides, Oracle Database Learning, Oracle Database Preparation, Oracle Database Career, Oracle Database Skills, Oracle Database Jobs, Oracle Database Tools

Lastly, once the connection is created, you can use the SQL Worksheet to interact with the MySQL Database Service from directly in your browser. This eliminates the need for bastions or SSH tunnels because it uses the REST enabled SQL endpoint the Database Tools Service created.

Oracle Database, Oracle Database Exam, Oracle Database Certification, Oracle Database Tutorial and Materials, Oracle Database Guides, Oracle Database Learning, Oracle Database Preparation, Oracle Database Career, Oracle Database Skills, Oracle Database Jobs, Oracle Database Tools

Source: oracle.com

Friday, June 24, 2022

Cloud Database Services for Every Workload

Cloud Database Services, Oracle Database, Oracle Database Certification, Oracle Database Career, Oracle Database Skills, Oracle Database Jobs, Oracle Database News, Oracle Database Prep, Oracle Database Exam Prep, Oracle Database Preparation

Visited the database page on Oracle.com lately? If so, you may have noticed a few new cloud database services, and missed a few familiar names belonging to our most popular and powerful services. What’s going on?

Don’t worry, we haven’t abandoned your favorite cloud database services. Rather, we’ve renamed these services to better reflect our overall portfolio of services, making it easier to see where they are the same, and where they are different.

Cloud Database Services, Oracle Database, Oracle Database Certification, Oracle Database Career, Oracle Database Skills, Oracle Database Jobs, Oracle Database News, Oracle Database Prep, Oracle Database Exam Prep, Oracle Database Preparation

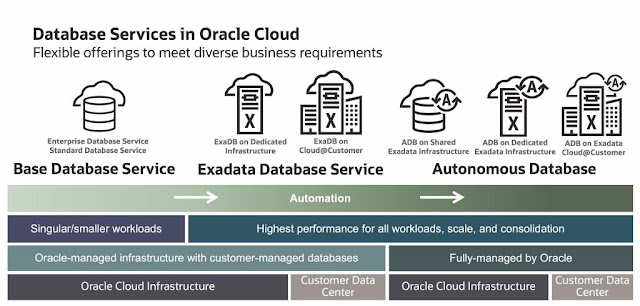
Oracle offers three cloud database service families that are 100% compatible with the industry leading Oracle Database:

◉ Oracle Autonomous Database
◉ Oracle Exadata Database Service
◉ Oracle Base Database Service

Each family provides a suite of cloud database services with different capabilities, deployment options, and price points. These services give you the freedom to choose the best database service to meet your specific needs, whether it’s features, SLAs, or even data residency requirements.

Let’s take a closer look at these three database service families, how they relate to each other, and how they map to the old familiar services.

Oracle Autonomous Database


Autonomous Database is the simplest cloud database service for running any application, at any scale or criticality. It uses machine learning driven automation to eliminate human labor, human error, and manual tuning, thereby reducing deployment costs and administrative complexities while ensuring the highest reliability, security, and operational efficiency.

Autonomous Database Shared is only available in the public cloud in Oracle Cloud Infrastructure (OCI), whereas Autonomous Database Dedicated provides a choice to deploy on-premises or in the public cloud. You can free yourself from managing data centers and the database itself by running Autonomous Database in OCI. Those with data residency requirements or other complexities that prevent moving databases to the public cloud can deploy on Exadata Cloud@Customer, giving you all the benefits of Autonomous Database with all your data securely located behind your firewall in your data center.

Service Name Description 
Autonomous Database Shared   Autonomous Database running in a PDB in a shared container database in the public cloud (OCI)
Autonomous Database on Dedicated Exadata Infrastructure  Autonomous Database running on dedicated Exadata Infrastructure in the public cloud (OCI) 
Autonomous Database on Exadata Cloud@Customer  Autonomous Database running on Exadata Cloud@Customer in your data center 

Oracle Exadata Database Service


Looking for a bit more control, and willing to put in a little more effort in exchange for that control? Exadata Database Service provides all the power of Oracle Database running as a cloud database service on the Exadata platform. What differentiates this service from Autonomous Database is that you, not Oracle, manage the virtual machines (VMs) and databases, allowing you to customize your environment with root access to the VMs. You can install software agents, patches specific to your environment, and fully control database versions and release updates. You also have complete control over access to the VMs, providing secure isolation for the databases you manage. Oracle experts manage the underlying compute and storage infrastructure, and powerful automation you control simplifies managing the VMs and databases.

Exadata Database Service also provides a choice of deployment models. As with Autonomous Database Dedicated, you can run the service on dedicated servers in the public cloud in OCI, or in your own data center on Exadata Cloud@Customer. With Exadata Cloud@Customer a single system can run both Exadata Database Service and Autonomous Database, making it easy to share that investment across both services. Exadata Database Service has been available since 2016, but under different names depending on the deployment model, either public cloud or cloud@customer.

Service Name Old Service Name Description 
Exadata Database Service on Dedicated Infrastructure Exadata Cloud Service Exadata Database Service running in the public cloud(OCI)
Exadata Database Service on Cloud@Customer Exadata Cloud@Customer Exadata Database Service running on Exadata Cloud@Customer in your data center

Oracle Base Database Service


What about those workloads that don’t need the power of Exadata, but where you still require control over the virtual machine and database? For these workloads, we offer Base Database Service in VMs on standard compute servers with network-attached block storage. The cloud infrastructure is still managed by Oracle and you still get the control (root access) and benefits of cloud automation for deployment, maintenance, backup, and disaster protection. Base Database Service starts with as little as 1 OCPU and offers a variety of feature levels/price points including Enterprise Database Service and Standard Database Service. 2-node RAC is also available as an option for those who require high-availability.

Base Database Service is deployed in the public cloud (OCI) and supports a wide variety of feature levels and corresponding price points.

Service Name Old Service Name Description 
Oracle Enterprise Database Service Database Cloud Service (DBCS) Virtual Machine Base Database Service running Oracle Database Enterprise Edition
Oracle Standard Database Service Database Cloud Service (DBCS) Virtual Machine Base Database Service running Oracle Database Standard Edition 2

And, to give you a bit more control over the pricing and feature set, Oracle Enterprise Database Service comes in three different feature levels:

◉ Oracle Enterprise Database Service: Includes the features of Oracle Enterprise Database, plus Real Application Testing, Data Masking and Subsetting Pack, Tuning Pack and Diagnostics Pack

◉ Oracle Enterprise Database Service—high performance: Includes all the features of Oracle Enterprise Database Service plus Partitioning, Advanced Compression, Advanced Security, Multitenant, OLAP, Label Security, Database Vault, Cloud Management Pack and Lifecycle Management Pack

◉ Oracle Enterprise Database Service—extreme performance: Includes all the features of Enterprise Database Service—high performance plus Real Application Clusters, Active Data Guard and Database In-Memory

All the services include Transparent Data Encryption. Bring your own license (BYOL) is also available in case you want to use existing Oracle Database licenses when you migrate to one of the cloud database services.

What to Choose?


While you are probably excited by all these options, you just want to deploy your database in the cloud—which service is best for you?

The first consideration is where you want to run your database services. Can you run in OCI, or must you run inside your data center? This is likely driven by data residency requirements and the need to integrate with on-premises applications. If you have a choice, we always recommend deploying in OCI to save yourself the cost of managing data centers. With OCI you have your choice of any database service. If you need to run your databases inside your data center, Exadata Cloud@Customer is a popular deployment option that supports Exadata Database Service and Autonomous Database Dedicated. Dedicated Region Cloud@Customer (DRCC) provides you your own cloud region and also supports any database service.

Now, let’s take a close look at the services. We recommend always starting with Autonomous Database. The best way to gain value from your IT investments is to focus your energy on enhancing your business and informational insights. Autonomous Database eliminates infrastructure and database management, freeing you to invest in your business, not in maintenance, backups, high availability features, disaster protection, performance tuning, and security of your databases. That’s all taken care of for you automatically with Autonomous Database. If running in OCI or DRCC, you can also choose between Autonomous Database Shared and Dedicated deployments. It’s simple to get started with a shared deployment, but dedicated deployments provide better isolation as well as control over the timing of underlying maintenance activities.

If you or your application is not ready for Autonomous Database, perhaps because you just want to lift and shift to cloud, need to install your own software agents, or you want to run legacy applications, you can choose between Exadata Database Service or Base Database Service. To gain the most value, start with Exadata Database Service, and look to reduce your TCO through consolidation. Consolidation with Exadata Database Service can reduce costs dramatically, while leveraging the power of Exadata to improve performance, security, online scalability, and availability. However, if you are running in OCI or DRCC and have a singular or smaller workload that won’t benefit from Exadata, Base Database Service is an attractive option and still provides good performance while balancing cost.

Oracle strives to provide the best options for deploying databases. We recognize one size does not fit all and offer a complete portfolio of cloud database services to meet your specific requirements. From Autonomous Database to Exadata Database Service to Base Database Service, you can choose from a wide variety of feature sets, with different levels of automation and customization. All provide the core benefits of deploying in the cloud—cloud infrastructure management, cloud automation, and cloud economics. And, all are 100% compatible with the Oracle Database, giving you the confidence to adopt the cloud with minimal investment and no cloud vendor lock-in.

Source: oracle.com

Saturday, June 11, 2022

Multitenant : Unplug/Plugin PDB Upgrade to Oracle Database 21c (AutoUpgrade)

Multitenant, Unplug/Plugin PDB, Oracle Database 21c (AutoUpgrade), Oracle Database Certification, Oracle Database Certification Exam, Oracle Database Career, Oracle Database Skills, Oracle Database Jobs, Oracle Database Preparation

This article provides an overview of upgrading an existing PDB to Oracle 21c on the same server using AutoUpgrade Unplug/Plugin. Upgrades can be very complicated, so you must always read the upgrade manual, and test thoroughly before considering an upgrade of a production environment.

◉ Assumptions

This article is focused on upgrading a pluggable database using unplug/plugin. If you want to upgrade a CDB and all PDBs directly, you need to follow this article.

- Multitenant : Upgrade to Oracle Database 21c (AutoUpgrade)

This article assumes your source database is of a version supported for direct upgrade to 21c.

19c, 18c, 12.2

In this example we are doing an upgrade from 19c multitenant to 21c. The process is very similar for all supported versions.

It's important to have backups of everything before you start! Some of these steps are destructive, and if something goes wrong you have no alternative but to restore from backups and start again.

Remember, this article is not a replacement for reading the upgrade documentation. Each upgrade has the potential to be different, depending on what options are installed.

◉ Prerequisities

Make sure you have all the OS prerequisites in place by running the 21c preinstall package. On Oracle Linux you can do this by installing the preinstall package. It probably makes sense to update the remaining packages also.

yum install -y oracle-database-preinstall-21c

yum update -y

◉ Install 21c Software

You can read about the installation process in more detail here (OL7, OL8), but for this example we'll keep it brief. The following commands will perform a silent installation of the 21c software.

export ORACLE_HOME=$ORACLE_BASE/product/21.0.0/dbhome_1

export SOFTWARE_DIR=/vagrant/software

export ORA_INVENTORY=/u01/app/oraInventory

mkdir -p ${ORACLE_HOME}

cd $ORACLE_HOME

/bin/unzip -oq ${SOFTWARE_DIR}/LINUX.X64_213000_db_home.zip

./runInstaller -ignorePrereq -waitforcompletion -silent                        \

    -responseFile ${ORACLE_HOME}/install/response/db_install.rsp               \

    oracle.install.option=INSTALL_DB_SWONLY                                    \

    ORACLE_HOSTNAME=${ORACLE_HOSTNAME}                                         \

    UNIX_GROUP_NAME=oinstall                                                   \

    INVENTORY_LOCATION=${ORA_INVENTORY}                                        \

    SELECTED_LANGUAGES=en,en_GB                                                \

    ORACLE_HOME=${ORACLE_HOME}                                                 \

    ORACLE_BASE=${ORACLE_BASE}                                                 \

    oracle.install.db.InstallEdition=EE                                        \

    oracle.install.db.OSDBA_GROUP=dba                                          \

    oracle.install.db.OSBACKUPDBA_GROUP=dba                                    \

    oracle.install.db.OSDGDBA_GROUP=dba                                        \

    oracle.install.db.OSKMDBA_GROUP=dba                                        \

    oracle.install.db.OSRACDBA_GROUP=dba                                       \

    SECURITY_UPDATES_VIA_MYORACLESUPPORT=false                                 \

    DECLINE_SECURITY_UPDATES=true

Run the root scripts when prompted.

As a root user, execute the following script(s):

        1. /u01/app/oracle/product/21.0.0/dbhome_1/root.sh

At this point you should also patch the new Oracle home, but in this case we will forgo that step to keep things simple.

◉ Create 21c Container Database

We need to create a container database (CDB) as the destination for the resulting PDB. The following example create a CDB called "cdb2" with no PDBs.

#dbca -silent -deleteDatabase -sourceDB cdb2 -sysDBAUserName sys -sysDBAPassword SysPassword1

dbca -silent -createDatabase \

 -templateName General_Purpose.dbc \

 -gdbname cdb2 -sid cdb2 -responseFile NO_VALUE \

 -characterSet AL32UTF8 \

 -sysPassword SysPassword1 \

 -systemPassword SysPassword1 \

 -createAsContainerDatabase true \

 -numberOfPDBs 0 \

 -databaseType MULTIPURPOSE \

 -memoryMgmtType auto_sga \

 -totalMemory 1536 \

 -storageType FS \

 -datafileDestination "/u02/oracle/" \

 -redoLogFileSize 50 \

 -emConfiguration NONE \

 -ignorePreReqs

Prepare for db operation

10% complete

Copying database files

40% complete

Creating and starting Oracle instance

42% complete

46% complete

52% complete

56% complete

60% complete

Completing Database Creation

66% complete

69% complete

70% complete

Executing Post Configuration Actions

100% complete

Database creation complete. For details check the logfiles at:

 /u01/app/oracle/cfgtoollogs/dbca/cdb2.

Database Information:

Global Database Name:cdb2

System Identifier(SID):cdb2

Look at the log file "/u01/app/oracle/cfgtoollogs/dbca/cdb2/cdb2.log" for further details.

$

We enable the fast recovery area, Oracle Managed Files (OMF) and archivelog mode.

sqlplus / as sysdba <<EOF

alter system set db_recovery_file_dest_size=40g;

alter system set db_recovery_file_dest='/u01/app/oracle/fast_recovery_area';

alter system set db_create_file_dest = '/u02/oradata';

shutdown immediate;

startup mount;

alter database archivelog;

alter database open;

exit;

EOF

You will need to adjust the instance parameters to make sure the container can cope with the demands of the final PDB, but for this example we will ignore that.

◉ Run AutoUpgrade Analyze

Download the latest "autoupgrade.jar" file from MOS 2485457.1. If you don't have MOS access you can miss out the next step.

cd $ORACLE_BASE/product/21.0.0/dbhome_1/rdbms/admin

mv autoupgrade.jar autoupgrade.jar.`date +"%Y"-"%m"-"%d"`

cp /tmp/autoupgrade.jar .

Make sure you are using the original Oracle home before running the "autoupgrade.jar" commands.

export ORACLE_SID=cdb1

export ORAENV_ASK=NO

. oraenv

export ORAENV_ASK=YES

export ORACLE_HOME=$ORACLE_BASE/product/19.0.0/dbhome_1

Generate a sample file for a full database upgrade.

$ORACLE_BASE/product/21.0.0/dbhome_1/jdk/bin/java \

  -jar $ORACLE_BASE/product/21.0.0/dbhome_1/rdbms/admin/autoupgrade.jar \

  -create_sample_file config /tmp/config.txt unplug

Edit the resulting "/tmp/config.txt" file, setting the details for your required upgrade. In this case we used the following parameters. We are only upgrading a single PDB, but if we had multiple we could use a comma-separated list of PDBs.

upg1.log_dir=/u01/app/oracle/cfgtoollogs/autoupgrade/pdb1

upg1.sid=cdb1

upg1.source_home=/u01/app/oracle/product/19.0.0/dbhome_1

upg1.target_cdb=cdb2

upg1.target_home=/u01/app/oracle/product/21.0.0/dbhome_1

upg1.pdbs=pdb1                              # Comma delimited list of pdb names that will be upgraded and moved to the target CDB

#upg1.target_pdb_name.mypdb1=altpdb1        # Optional. Name of the PDB to be created on the target CDB

#upg1.target_pdb_copy_option.mypdb1=file_name_convert=('mypdb1', 'altpdb1')  # Optional. file_name_convert option used when creating the PDB on the target CDB

#upg1.target_pdb_name.mypdb2=altpdb2

upg1.start_time=NOW                        # Optional. [NOW | +XhYm (X hours, Y minutes after launch) | dd/mm/yyyy hh:mm:ss]

upg1.upgrade_node=localhost                # Optional. To find out the name of your node, run the hostname utility. Default is 'localhost'

upg1.run_utlrp=yes                         # Optional. Whether or not to run utlrp after upgrade

upg1.timezone_upg=yes                      # Optional. Whether or not to run the timezone upgrade

upg1.target_version=21                     # Oracle version of the target ORACLE_HOME.  Only required when the target Oracle database version is 12.2

Run the upgrade in analyze mode to see if there are any expected issues with the upgrade.

$ORACLE_BASE/product/21.0.0/dbhome_1/jdk/bin/java \

  -jar $ORACLE_BASE/product/21.0.0/dbhome_1/rdbms/admin/autoupgrade.jar \

  -config /tmp/config.txt -mode analyze

AutoUpgrade tool launched with default options

Processing config file ...

+--------------------------------+

| Starting AutoUpgrade execution |

+--------------------------------+

1 databases will be analyzed

Type 'help' to list console commands

upg> Job 100 completed

------------------- Final Summary --------------------

Number of databases            [ 1 ]

Jobs finished                  [1]

Jobs failed                    [0]

Jobs pending                   [0]

Please check the summary report at:

/u01/app/oracle/cfgtoollogs/autoupgrade/cfgtoollogs/upgrade/auto/status/status.html

/u01/app/oracle/cfgtoollogs/autoupgrade/cfgtoollogs/upgrade/auto/status/status.log

The output files list the status of the analysis, and any manual intervention that is needed before an upgrade can take place. The output of the "status.log" file is shown below. The detail section gives a file containing the details of the steps in the upgrade process. If you've seen the output from the "preupgrade.jar", it will look familiar. If there are any required manual actions in the main log file, the detail file should give more information.

==========================================

          Autoupgrade Summary Report

==========================================

[Date]           Sun Aug 22 14:49:01 UTC 2021

[Number of Jobs] 1

==========================================

[Job ID] 100

==========================================

[DB Name]                cdb1

[Version Before Upgrade] 19.12.0.0.0

[Version After Upgrade]  21.3.0.0.0

------------------------------------------

[Stage Name]    PRECHECKS

[Status]        SUCCESS

[Start Time]    2021-08-22 14:48:44

[Duration]      0:00:16

[Log Directory] /u01/app/oracle/cfgtoollogs/autoupgrade/pdb1/cdb1/100/prechecks

[Detail]        /u01/app/oracle/cfgtoollogs/autoupgrade/pdb1/cdb1/100/prechecks/cdb1_preupgrade.log

                Precheck passed and no manual intervention needed

------------------------------------------

The log directory contains a number of files, including a HTML format of the detailed report. It's the same information as the log file, but some people my prefer reading this format.

Once any required manual fixups are complete, run the analysis again and you should see a clean analysis report.

◉ Run AutoUpgrade Deploy

We are now ready to run the database upgrade with the following command. The upgrade takes some time, so you will be left at the "upg" prompt until it's complete.

$ORACLE_BASE/product/21.0.0/dbhome_1/jdk/bin/java \

  -jar $ORACLE_BASE/product/21.0.0/dbhome_1/rdbms/admin/autoupgrade.jar \

  -config /tmp/config.txt -mode deploy

AutoUpgrade tool launched with default options

Processing config file ...

+--------------------------------+

| Starting AutoUpgrade execution |

+--------------------------------+

1 databases will be processed

Type 'help' to list console commands

upg>

Use the "help" command to see the command line options. We can list the current jobs and check on the job status using the following commands.

upg> lsj

+----+-------+---------+---------+-------+--------------+--------+----------------+

|Job#|DB_NAME|    STAGE|OPERATION| STATUS|    START_TIME| UPDATED|         MESSAGE|

+----+-------+---------+---------+-------+--------------+--------+----------------+

| 101|   cdb1|DBUPGRADE|EXECUTING|RUNNING|21/08/22 14:51|14:56:28|22%Upgraded PDB1|

+----+-------+---------+---------+-------+--------------+--------+----------------+

Total jobs 1

upg> status -job 101

Progress

-----------------------------------

Start time:      21/08/22 14:51

Elapsed (min):   5

End time:        N/A

Last update:     2021-08-22T14:56:28.019

Stage:           DBUPGRADE

Operation:       EXECUTING

Status:          RUNNING

Pending stages:  7

Stage summary:

    SETUP             <1 min

    PREUPGRADE        <1 min

    PRECHECKS         <1 min

    PREFIXUPS         1 min

    DRAIN             <1 min

    DBUPGRADE         3 min (IN PROGRESS)

Job Logs Locations

-----------------------------------

Logs Base:    /u01/app/oracle/cfgtoollogs/autoupgrade/pdb1/cdb1

Job logs:     /u01/app/oracle/cfgtoollogs/autoupgrade/pdb1/cdb1/101

Stage logs:   /u01/app/oracle/cfgtoollogs/autoupgrade/pdb1/cdb1/101/dbupgrade

TimeZone:     /u01/app/oracle/cfgtoollogs/autoupgrade/pdb1/cdb1/temp

Additional information

-----------------------------------

Details:

[Upgrading] is [22%] completed for [cdb1-pdb1]

                 +---------+-------------+

                 |CONTAINER|   PERCENTAGE|

                 +---------+-------------+

                 |     PDB1|UPGRADE [22%]|

                 +---------+-------------+

Error Details:

None

upg>

Once the job completes a summary message is displayed.

upg> Job 101 completed

------------------- Final Summary --------------------

Number of databases            [ 1 ]

Jobs finished                  [1]

Jobs failed                    [0]

Jobs pending                   [0]

Please check the summary report at:

/u01/app/oracle/cfgtoollogs/autoupgrade/cfgtoollogs/upgrade/auto/status/status.html

/u01/app/oracle/cfgtoollogs/autoupgrade/cfgtoollogs/upgrade/auto/status/status.log

The "status.log" contains the top-level information about the upgrade process.

==========================================

          Autoupgrade Summary Report

==========================================

[Date]           Sun Aug 22 15:15:50 UTC 2021

[Number of Jobs] 1

==========================================

[Job ID] 101

==========================================

[DB Name]                cdb1

[Version Before Upgrade] 19.12.0.0.0

[Version After Upgrade]  21.3.0.0.0

------------------------------------------

[Stage Name]    PREUPGRADE

[Status]        SUCCESS

[Start Time]    2021-08-22 14:51:03

[Duration]      0:00:00

[Log Directory] /u01/app/oracle/cfgtoollogs/autoupgrade/pdb1/cdb1/101/preupgrade

------------------------------------------

[Stage Name]    PRECHECKS

[Status]        SUCCESS

[Start Time]    2021-08-22 14:51:03

[Duration]      0:00:20

[Log Directory] /u01/app/oracle/cfgtoollogs/autoupgrade/pdb1/cdb1/101/prechecks

[Detail]        /u01/app/oracle/cfgtoollogs/autoupgrade/pdb1/cdb1/101/prechecks/cdb1_preupgrade.log

                Precheck passed and no manual intervention needed

------------------------------------------

[Stage Name]    PREFIXUPS

[Status]        SUCCESS

[Start Time]    2021-08-22 14:51:24

[Duration]      0:01:43

[Log Directory] /u01/app/oracle/cfgtoollogs/autoupgrade/pdb1/cdb1/101/prefixups

------------------------------------------

[Stage Name]    DRAIN

[Status]        SUCCESS

[Start Time]    2021-08-22 14:53:08

[Duration]      0:00:12

[Log Directory] /u01/app/oracle/cfgtoollogs/autoupgrade/pdb1/cdb1/101/drain

------------------------------------------

[Stage Name]    DBUPGRADE

[Status]        SUCCESS

[Start Time]    2021-08-22 14:53:20

[Duration]      0:15:56

[Log Directory] /u01/app/oracle/cfgtoollogs/autoupgrade/pdb1/cdb1/101/dbupgrade

------------------------------------------

[Stage Name]    NONCDBTOPDBXY

[Status]        SUCCESS

[Start Time]    2021-08-22 15:09:16

[Duration]      0:00:00

------------------------------------------

[Stage Name]    POSTCHECKS

[Status]        SUCCESS

[Start Time]    2021-08-22 15:09:16

[Duration]      0:00:09

[Log Directory] /u01/app/oracle/cfgtoollogs/autoupgrade/pdb1/cdb1/101/postchecks

[Detail]        /u01/app/oracle/cfgtoollogs/autoupgrade/pdb1/cdb1/101/postchecks/cdb1_postupgrade.log

------------------------------------------

[Stage Name]    POSTFIXUPS

[Status]        SUCCESS

[Start Time]    2021-08-22 15:09:26

[Duration]      0:06:23

[Log Directory] /u01/app/oracle/cfgtoollogs/autoupgrade/pdb1/cdb1/101/postfixups

------------------------------------------

[Stage Name]    POSTUPGRADE

[Status]        SUCCESS

[Start Time]    2021-08-22 15:15:49

[Duration]      0:00:00

[Log Directory] /u01/app/oracle/cfgtoollogs/autoupgrade/pdb1/cdb1/101/postupgrade

------------------------------------------

[Stage Name]    SYSUPDATES

[Status]        SUCCESS

[Start Time]    2021-08-22 15:15:50

[Duration]      0:00:00

[Log Directory] /u01/app/oracle/cfgtoollogs/autoupgrade/pdb1/cdb1/101/sysupdates

------------------------------------------

Upgrade Summary: /u01/app/oracle/cfgtoollogs/autoupgrade/pdb1/cdb1/101/dbupgrade/upg_summary.log

Check out the "upg_summary.log" file, and if anything looks wrong, check out the associated log files. At this point I do a shutdown and startup to make sure everything is running in the correct mode.

export ORACLE_HOME=$ORACLE_BASE/product/21.0.0/dbhome_1

export PATH=$ORACLE_HOME/bin:$PATH

export ORACLE_SID=cdb2

sqlplus / as sysdba <<EOF

alter pluggable database PDB1 save state;

shutdown immediate;

startup;

show pdbs

exit;

EOF

◉ Final Steps

If you've finished with the 19c CDB1 instance, you can remove it.

export ORACLE_HOME=/u01/app/oracle/product/19.0.0/dbhome_1

export PATH=$ORACLE_HOME/bin:$PATH

export ORACLE_SID=cdb1

dbca -silent -deleteDatabase -sourceDB mydb -sysDBAUserName sys -sysDBAPassword SysPassword1

Edit the "/etc/oratab" file and any environment files as required.

If you are using APEX or ORDS, you probably want to validate them (validate APEX, validate ORDS).

◉ Appendix

The following commands are used to rebuild the databases if you want to rerun the examples.

Rebuild the 21c CDB1 multitenant database with no PDBS.

export ORACLE_HOME=/u01/app/oracle/product/21.0.0/dbhome_1

export PATH=$ORACLE_HOME/bin:$PATH

export ORACLE_SID=cdb2

#dbca -silent -deleteDatabase -sourceDB cdb2 -sysDBAUserName sys -sysDBAPassword SysPassword1

dbca -silent -createDatabase \

 -templateName General_Purpose.dbc \

 -gdbname cdb2 -sid cdb2 -responseFile NO_VALUE \

 -characterSet AL32UTF8 \

 -sysPassword SysPassword1 \

 -systemPassword SysPassword1 \

 -createAsContainerDatabase true \

 -numberOfPDBs 0 \

 -databaseType MULTIPURPOSE \

 -memoryMgmtType auto_sga \

 -totalMemory 1536 \

 -storageType FS \

 -datafileDestination "/u02/oradata/" \

 -redoLogFileSize 50 \

 -emConfiguration NONE \

 -ignorePreReqs

sqlplus / as sysdba <<EOF

alter system set db_recovery_file_dest_size=40g;

alter system set db_recovery_file_dest='/u01/app/oracle/fast_recovery_area';

alter system set db_create_file_dest = '/u02/oradata';

shutdown immediate;

startup mount;

alter database archivelog;

alter database open;

exit;

EOF

Rebuild the 19c CDB1 multitenant database with one PDB.

export ORACLE_HOME=/u01/app/oracle/product/19.0.0/dbhome_1

export PATH=$ORACLE_HOME/bin:$PATH

export ORACLE_SID=cdb1

#dbca -silent -deleteDatabase -sourceDB mydb -sysDBAUserName sys -sysDBAPassword SysPassword1

dbca -silent -createDatabase \

 -templateName General_Purpose.dbc \

 -gdbname cdb1 -sid cdb1 -responseFile NO_VALUE \

 -characterSet AL32UTF8 \

 -sysPassword SysPassword1 \

 -systemPassword SysPassword1 \

 -createAsContainerDatabase true \

 -numberOfPDBs 1 \

 -pdbName pdb1 \

 -pdbAdminPassword SysPassword1 \

 -databaseType MULTIPURPOSE \

 -memoryMgmtType auto_sga \

 -totalMemory 1536 \

 -storageType FS \

 -datafileDestination "/u02/oradata/" \

 -redoLogFileSize 50 \

 -emConfiguration NONE \

 -ignorePreReqs

sqlplus / as sysdba <<EOF

alter pluggable database pdb1 save state;

alter system set db_recovery_file_dest_size=40g;

alter system set db_recovery_file_dest='/u01/app/oracle/fast_recovery_area';

alter system set db_create_file_dest = '/u02/oradata';

shutdown immediate;

startup mount;

alter database archivelog;

alter database open;

exit;

EOF

Source: oracle-base.com

Friday, June 10, 2022

Multitenant : Upgrade to Oracle Database 21c (AutoUpgrade)

Oracle Multitenant, Oracle Database 21c, Oracle Database, Oracle Database Exam Prep, Oracle Database Certification, Oracle Database Learning, Oracle Database Certification Exam, Oracle Database Skills, Oracle Database Jobs, Database News

This article provides an overview of upgrading an existing multitenant database to Oracle 21c on the same server using AutoUpgrade. Upgrades can be very complicated, so you must always read the upgrade manual, and test thoroughly before considering an upgrade of a production environment.

◉ Assumptions

This article is focused on upgrading a multitenant database. If your starting point is a non-CDB database, you should be reading the following article.

- Upgrade Non-CDB to Oracle Database 21c (AutoUpgrade)

This article assumes your source database is of a version supported for direct upgrade to 21c.

19c, 18c, 12.2

In this example we are doing an upgrade from 19c multitenant to 21c. The process is very similar for all supported versions.

It's important to have backups of everything before you start! Some of these steps are destructive, and if something goes wrong you have no alternative but to restore from backups and start again.

Remember, this article is not a replacement for reading the upgrade documentation. Each upgrade has the potential to be different, depending on what options are installed.

◉ Prerequisities

Make sure you have all the OS prerequisites in place by running the 21c preinstall package. On Oracle Linux you can do this by installing the preinstall package. It probably makes sense to update the remaining packages also.

yum install -y oracle-database-preinstall-21c

yum update -y

◉ Install 21c Software

You can read about the installation process in more detail here (OL7, OL8), but for this example we'll keep it brief. The following commands will perform a silent installation of the 21c software.

export ORACLE_HOME=$ORACLE_BASE/product/21.0.0/dbhome_1

export SOFTWARE_DIR=/vagrant/software

export ORA_INVENTORY=/u01/app/oraInventory

mkdir -p ${ORACLE_HOME}

cd $ORACLE_HOME

/bin/unzip -oq ${SOFTWARE_DIR}/LINUX.X64_213000_db_home.zip

./runInstaller -ignorePrereq -waitforcompletion -silent                        \

    -responseFile ${ORACLE_HOME}/install/response/db_install.rsp               \

    oracle.install.option=INSTALL_DB_SWONLY                                    \

    ORACLE_HOSTNAME=${ORACLE_HOSTNAME}                                         \

    UNIX_GROUP_NAME=oinstall                                                   \

    INVENTORY_LOCATION=${ORA_INVENTORY}                                        \

    SELECTED_LANGUAGES=en,en_GB                                                \

    ORACLE_HOME=${ORACLE_HOME}                                                 \

    ORACLE_BASE=${ORACLE_BASE}                                                 \

    oracle.install.db.InstallEdition=EE                                        \

    oracle.install.db.OSDBA_GROUP=dba                                          \

    oracle.install.db.OSBACKUPDBA_GROUP=dba                                    \

    oracle.install.db.OSDGDBA_GROUP=dba                                        \

    oracle.install.db.OSKMDBA_GROUP=dba                                        \

    oracle.install.db.OSRACDBA_GROUP=dba                                       \

    SECURITY_UPDATES_VIA_MYORACLESUPPORT=false                                 \

    DECLINE_SECURITY_UPDATES=true

Run the root scripts when prompted.

As a root user, execute the following script(s):

        1. /u01/app/oracle/product/21.0.0/dbhome_1/root.sh

At this point you should also patch the new Oracle home, but in this case we will forgo that step to keep things simple.

◉ Run AutoUpgrade Analyze

Download the latest "autoupgrade.jar" file from MOS 2485457.1. If you don't have MOS access you can miss out the next step.

cd $ORACLE_BASE/product/21.0.0/dbhome_1/rdbms/admin

mv autoupgrade.jar autoupgrade.jar.`date +"%Y"-"%m"-"%d"`

cp /tmp/autoupgrade.jar .

Make sure you are using the original Oracle home before running the "autoupgrade.jar" commands.

export ORACLE_SID=cdb1

export ORAENV_ASK=NO

. oraenv

export ORAENV_ASK=YES

export ORACLE_HOME=$ORACLE_BASE/product/19.0.0/dbhome_1

Generate a sample file for a full database upgrade.

$ORACLE_BASE/product/21.0.0/dbhome_1/jdk/bin/java \

  -jar $ORACLE_BASE/product/21.0.0/dbhome_1/rdbms/admin/autoupgrade.jar \

  -create_sample_file config /tmp/config.txt full

Edit the resulting "/tmp/config.txt" file, setting the details for your required upgrade. In this case we used the following parameters.

upg1.log_dir=/u01/app/oracle/cfgtoollogs/autoupgrade/cdb1  # Path of the log directory for the upgrade job

upg1.sid=cdb1                                              # ORACLE_SID of the source DB/CDB

upg1.source_home=/u01/app/oracle/product/19.0.0/dbhome_1   # Path of the source ORACLE_HOME

upg1.target_home=/u01/app/oracle/product/21.0.0/dbhome_1   # Path of the target ORACLE_HOME

upg1.start_time=NOW                                        # Optional. [NOW | +XhYm (X hours, Y minutes after launch) | dd/mm/yyyy hh:mm:ss]

upg1.upgrade_node=localhost.localdomain                    # Optional. To find out the name of your node, run the hostname utility. Default is 'localhost'

upg1.run_utlrp=yes                                         # Optional. Whether or not to run utlrp after upgrade

upg1.timezone_upg=yes                                      # Optional. Whether or not to run the timezone upgrade

upg1.target_version=21                                     # Oracle version of the target ORACLE_HOME.  Only required when the target Oracle database version is 12.2

Run the upgrade in analyze mode to see if there are any expected issues with the upgrade.

$ORACLE_BASE/product/21.0.0/dbhome_1/jdk/bin/java \

  -jar $ORACLE_BASE/product/21.0.0/dbhome_1/rdbms/admin/autoupgrade.jar \

  -config /tmp/config.txt -mode analyze

AutoUpgrade tool launched with default options

Processing config file ...

+--------------------------------+

| Starting AutoUpgrade execution |

+--------------------------------+

1 databases will be analyzed

Type 'help' to list console commands

upg> Job 100 completed

------------------- Final Summary --------------------

Number of databases            [ 1 ]

Jobs finished                  [1]

Jobs failed                    [0]

Jobs pending                   [0]

Please check the summary report at:

/u01/app/oracle/cfgtoollogs/autoupgrade/cfgtoollogs/upgrade/auto/status/status.html

/u01/app/oracle/cfgtoollogs/autoupgrade/cfgtoollogs/upgrade/auto/status/status.log

The output files list the status of the analysis, and any manual intervention that is needed before an upgrade can take place. The output of the "status.log" file is shown below. The detail section gives a file containing the details of the steps in the upgrade process. If you've seen the output from the "preupgrade.jar", it will look familiar. If there are any required manual actions in the main log file, the detail file should give more information.

==========================================

          Autoupgrade Summary Report

==========================================

[Date]           Sun Aug 22 11:36:28 UTC 2021

[Number of Jobs] 1

==========================================

[Job ID] 100

==========================================

[DB Name]                cdb1

[Version Before Upgrade] 19.12.0.0.0

[Version After Upgrade]  21.3.0.0.0

------------------------------------------

[Stage Name]    PRECHECKS

[Status]        SUCCESS

[Start Time]    2021-08-22 11:36:01

[Duration]      0:00:27

[Log Directory] /u01/app/oracle/cfgtoollogs/autoupgrade/cdb1/cdb1/100/prechecks

[Detail]        /u01/app/oracle/cfgtoollogs/autoupgrade/cdb1/cdb1/100/prechecks/cdb1_preupgrade.log

                Precheck passed and no manual intervention needed

------------------------------------------

The log directory contains a number of files, including a HTML format of the detailed report. It's the same information as the log file, but some people my prefer reading this format.

Once any required manual fixups are complete, run the analysis again and you should see a clean analysis report.

◉ Run AutoUpgrade Fixups (Optional)

The analysis phase identifies fixups that are needed before the upgrade. For an upgrade on the same server it is best to use deploy mode to apply the fixups and upgrade the database in a single action, so this step is not necessary.

Here is an example of running the fixups separately.

$ORACLE_BASE/product/21.0.0/dbhome_1/jdk/bin/java \

  -jar $ORACLE_BASE/product/21.0.0/dbhome_1/rdbms/admin/autoupgrade.jar \

  -config /tmp/config.txt -mode fixups

AutoUpgrade tool launched with default options

Processing config file ...

+--------------------------------+

| Starting AutoUpgrade execution |

+--------------------------------+

1 databases will be processed

Type 'help' to list console commands

upg> Job 101 completed

------------------- Final Summary --------------------

Number of databases            [ 1 ]

Jobs finished                  [1]

Jobs failed                    [0]

Jobs pending                   [0]

Please check the summary report at:

/u01/app/oracle/cfgtoollogs/autoupgrade/cfgtoollogs/upgrade/auto/status/status.html

/u01/app/oracle/cfgtoollogs/autoupgrade/cfgtoollogs/upgrade/auto/status/status.log

The output of the "status.log" file is show below.

==========================================

          Autoupgrade Summary Report

==========================================

[Date]           Sun Aug 22 11:38:28 UTC 2021

[Number of Jobs] 1

==========================================

[Job ID] 101

==========================================

[DB Name]                cdb1

[Version Before Upgrade] 19.12.0.0.0

[Version After Upgrade]  21.3.0.0.0

------------------------------------------

[Stage Name]    PRECHECKS

[Status]        SUCCESS

[Start Time]    2021-08-22 11:37:31

[Duration]      0:00:29

[Log Directory] /u01/app/oracle/cfgtoollogs/autoupgrade/cdb1/cdb1/101/prechecks

[Detail]        /u01/app/oracle/cfgtoollogs/autoupgrade/cdb1/cdb1/101/prechecks/cdb1_preupgrade.log

                Precheck passed and no manual intervention needed

------------------------------------------

[Stage Name]    PREFIXUPS

[Status]        SUCCESS

[Start Time]    2021-08-22 11:38:00

[Duration]      0:00:28

[Log Directory] /u01/app/oracle/cfgtoollogs/autoupgrade/cdb1/cdb1/101/prefixups

------------------------------------------

◉ Run AutoUpgrade Deploy

We are now ready to run the database upgrade with the following command. The upgrade takes some time, so you will be left at the "upg" prompt until it's complete.

$ORACLE_BASE/product/21.0.0/dbhome_1/jdk/bin/java \

  -jar $ORACLE_BASE/product/21.0.0/dbhome_1/rdbms/admin/autoupgrade.jar \

  -config /tmp/config.txt -mode deploy

AutoUpgrade tool launched with default options

Processing config file ...

+--------------------------------+

| Starting AutoUpgrade execution |

+--------------------------------+

1 databases will be processed

Type 'help' to list console commands

upg>

Use the "help" command to see the command line options. We can list the current jobs and check on the job status using the following commands.

upg> lsj

+----+-------+---------+---------+-------+--------------+--------+--------------------+

|Job#|DB_NAME|    STAGE|OPERATION| STATUS|    START_TIME| UPDATED|             MESSAGE|

+----+-------+---------+---------+-------+--------------+--------+--------------------+

| 102|   cdb1|DBUPGRADE|EXECUTING|RUNNING|21/08/22 11:40|11:45:22|10%Upgraded CDB$ROOT|

+----+-------+---------+---------+-------+--------------+--------+--------------------+

Total jobs 1

upg> status -job 102

Progress

-----------------------------------

Start time:      21/08/22 11:40

Elapsed (min):   6

End time:        N/A

Last update:     2021-08-22T11:45:22.805

Stage:           DBUPGRADE

Operation:       EXECUTING

Status:          RUNNING

Pending stages:  7

Stage summary:

    SETUP             <1 min

    GRP               <1 min

    PREUPGRADE        <1 min

    PRECHECKS         <1 min

    PREFIXUPS         <1 min

    DRAIN             <1 min

    DBUPGRADE         3 min (IN PROGRESS)

Job Logs Locations

-----------------------------------

Logs Base:    /u01/app/oracle/cfgtoollogs/autoupgrade/cdb1/cdb1

Job logs:     /u01/app/oracle/cfgtoollogs/autoupgrade/cdb1/cdb1/102

Stage logs:   /u01/app/oracle/cfgtoollogs/autoupgrade/cdb1/cdb1/102/dbupgrade

TimeZone:     /u01/app/oracle/cfgtoollogs/autoupgrade/cdb1/cdb1/temp

Additional information

-----------------------------------

Details:

[Upgrading] is [10%] completed for [cdb1-cdb$root]

                 +---------+---------------+

                 |CONTAINER|     PERCENTAGE|

                 +---------+---------------+

                 | CDB$ROOT|  UPGRADE [10%]|

                 | PDB$SEED|UPGRADE PENDING|

                 |     PDB1|UPGRADE PENDING|

                 +---------+---------------+

Error Details:

None

upg>

Once the job completes a summary message is displayed.

upg> Job 102 completed

------------------- Final Summary --------------------

Number of databases            [ 1 ]

Jobs finished                  [1]

Jobs failed                    [0]

Jobs pending                   [0]

---- Drop GRP at your convenience once you consider it is no longer needed ----

Drop GRP from cdb1: drop restore point AUTOUPGRADE_9212_CDB11912000

Please check the summary report at:

/u01/app/oracle/cfgtoollogs/autoupgrade/cfgtoollogs/upgrade/auto/status/status.html

/u01/app/oracle/cfgtoollogs/autoupgrade/cfgtoollogs/upgrade/auto/status/status.log

The "status.log" contains the top-level information about the upgrade process.

==========================================

          Autoupgrade Summary Report

==========================================

[Date]           Sun Aug 22 12:48:49 UTC 2021

[Number of Jobs] 1

==========================================

[Job ID] 102

==========================================

[DB Name]                cdb1

[Version Before Upgrade] 19.12.0.0.0

[Version After Upgrade]  21.3.0.0.0

------------------------------------------

[Stage Name]    GRP

[Status]        SUCCESS

[Start Time]    2021-08-22 11:40:35

[Duration]      0:00:00

[Detail]        Please drop the following GRPs after Autoupgrade completes:

                 AUTOUPGRADE_9212_CDB11912000

------------------------------------------

[Stage Name]    PREUPGRADE

[Status]        SUCCESS

[Start Time]    2021-08-22 11:40:36

[Duration]      0:00:00

[Log Directory] /u01/app/oracle/cfgtoollogs/autoupgrade/cdb1/cdb1/102/preupgrade

------------------------------------------

[Stage Name]    PRECHECKS

[Status]        SUCCESS

[Start Time]    2021-08-22 11:40:36

[Duration]      0:00:31

[Log Directory] /u01/app/oracle/cfgtoollogs/autoupgrade/cdb1/cdb1/102/prechecks

[Detail]        /u01/app/oracle/cfgtoollogs/autoupgrade/cdb1/cdb1/102/prechecks/cdb1_preupgrade.log

                Precheck passed and no manual intervention needed

------------------------------------------

[Stage Name]    PREFIXUPS

[Status]        SUCCESS

[Start Time]    2021-08-22 11:41:07

[Duration]      0:00:30

[Log Directory] /u01/app/oracle/cfgtoollogs/autoupgrade/cdb1/cdb1/102/prefixups

------------------------------------------

[Stage Name]    DRAIN

[Status]        SUCCESS

[Start Time]    2021-08-22 11:41:37

[Duration]      0:00:34

[Log Directory] /u01/app/oracle/cfgtoollogs/autoupgrade/cdb1/cdb1/102/drain

------------------------------------------

[Stage Name]    DBUPGRADE

[Status]        SUCCESS

[Start Time]    2021-08-22 11:42:12

[Duration]      0:53:11

[Log Directory] /u01/app/oracle/cfgtoollogs/autoupgrade/cdb1/cdb1/102/dbupgrade

------------------------------------------

[Stage Name]    POSTCHECKS

[Status]        SUCCESS

[Start Time]    2021-08-22 12:35:24

[Duration]      0:00:12

[Log Directory] /u01/app/oracle/cfgtoollogs/autoupgrade/cdb1/cdb1/102/postchecks

[Detail]        /u01/app/oracle/cfgtoollogs/autoupgrade/cdb1/cdb1/102/postchecks/cdb1_postupgrade.log

------------------------------------------

[Stage Name]    POSTFIXUPS

[Status]        SUCCESS

[Start Time]    2021-08-22 12:35:36

[Duration]      0:13:03

[Log Directory] /u01/app/oracle/cfgtoollogs/autoupgrade/cdb1/cdb1/102/postfixups

------------------------------------------

[Stage Name]    POSTUPGRADE

[Status]        SUCCESS

[Start Time]    2021-08-22 12:48:39

[Duration]      0:00:09

[Log Directory] /u01/app/oracle/cfgtoollogs/autoupgrade/cdb1/cdb1/102/postupgrade

------------------------------------------

[Stage Name]    SYSUPDATES

[Status]        SUCCESS

[Start Time]    2021-08-22 12:48:49

[Duration]      0:00:00

[Log Directory] /u01/app/oracle/cfgtoollogs/autoupgrade/cdb1/cdb1/102/sysupdates

------------------------------------------

Upgrade Summary: /u01/app/oracle/cfgtoollogs/autoupgrade/cdb1/cdb1/102/dbupgrade/upg_summary.log

Check out the "upg_summary.log" file, and if anything looks wrong, check out the associated log files. At this point I do a shutdown and startup to make sure everything is running in the correct mode.

export ORACLE_HOME=$ORACLE_BASE/product/21.0.0/dbhome_1

export PATH=$ORACLE_HOME/bin:$PATH

export ORACLE_SID=cdb1

sqlplus / as sysdba <<EOF

shutdown immediate;

startup;

show pdbs

exit;

EOF

◉ Final Steps

Edit the "/etc/oratab" file and any environment files as required.

If you are using APEX or ORDS, you probably want to validate them (validate APEX, validate ORDS).

◉ Appendix

The following commands are used to rebuild the databases if you want to rerun the examples.

Remove the 21c CDB1 multitenant database.

export ORACLE_HOME=/u01/app/oracle/product/21.0.0/dbhome_1

export PATH=$ORACLE_HOME/bin:$PATH

export ORACLE_SID=cdb1

dbca -silent -deleteDatabase -sourceDB cdb1 -sysDBAUserName sys -sysDBAPassword SysPassword1

Rebuild the 19c CDB1 multitenant database.

export ORACLE_HOME=/u01/app/oracle/product/19.0.0/dbhome_1

export PATH=$ORACLE_HOME/bin:$PATH

export ORACLE_SID=cdb1

#dbca -silent -deleteDatabase -sourceDB mydb -sysDBAUserName sys -sysDBAPassword SysPassword1

dbca -silent -createDatabase \

 -templateName General_Purpose.dbc \

 -gdbname cdb1 -sid cdb1 -responseFile NO_VALUE \

 -characterSet AL32UTF8 \

 -sysPassword SysPassword1 \

 -systemPassword SysPassword1 \

 -createAsContainerDatabase true \

 -numberOfPDBs 1 \

 -pdbName pdb1 \

 -pdbAdminPassword SysPassword1 \

 -databaseType MULTIPURPOSE \

 -memoryMgmtType auto_sga \

 -totalMemory 1536 \

 -storageType FS \

 -datafileDestination "/u02/oradata/" \

 -redoLogFileSize 50 \

 -emConfiguration NONE \

 -ignorePreReqs

sqlplus / as sysdba <<EOF

alter pluggable database pdb1 save state;

alter system set db_recovery_file_dest_size=40g;

alter system set db_recovery_file_dest='/u01/app/oracle/fast_recovery_area';

alter system set db_create_file_dest = '/u02/oradata';

shutdown immediate;

startup mount;

alter database archivelog;

alter database open;

exit;

EOF

Source: oracle-base.com

Wednesday, June 8, 2022

Oracle Database 21c Installation On Fedora 36 (F36)

Oracle Database 21c, Oracle Fedora 36 (F36), Oracle Database Certification, Oracle Database Tutorial and Materials, Oracle Database Career, Oracle Database Skills, Oracle Database Jobs, Oracle Database News, Oracle Database Preparation Exam

This article describes the installation of Oracle Database 21c 64-bit on Fedora 36 (F36) 64-bit. The article is based on a server installation with a minimum of 2G swap and secure Linux set to permissive. 

◉ Download Software

Download the Oracle software from OTN or MOS depending on your support status.

- OTN: Oracle Database 21c (21.3) Software (64-bit).

- edelivery: Oracle Database 21c (21.3) Software (64-bit)

◉ Hosts File

The "/etc/hosts" file must contain a fully qualified name for the server.

<IP-address>  <fully-qualified-machine-name>  <machine-name>

For example.

127.0.0.1       localhost localhost.localdomain localhost4 localhost4.localdomain4

192.168.56.141  fedora36.localdomain  fedora36

Set the correct hostname in the "/etc/hostname" file.

fedora36.localdomain

◉ Set Kernel Parameters

Add the following lines to the "/etc/sysctl.conf" file, or in a file called "/etc/sysctl.d/98-oracle.conf".

fs.file-max = 6815744

kernel.sem = 250 32000 100 128

kernel.shmmni = 4096

kernel.shmall = 1073741824

kernel.shmmax = 4398046511104

kernel.panic_on_oops = 1

net.core.rmem_default = 262144

net.core.rmem_max = 4194304

net.core.wmem_default = 262144

net.core.wmem_max = 1048576

net.ipv4.conf.all.rp_filter = 2

net.ipv4.conf.default.rp_filter = 2

fs.aio-max-nr = 1048576

net.ipv4.ip_local_port_range = 9000 65500

Run one of the following commands to change the current kernel parameters, depending on which file you edited.

/sbin/sysctl -p

# Or

/sbin/sysctl -p /etc/sysctl.d/98-oracle.conf

Add the following lines to a file called "/etc/security/limits.d/oracle-database-server-21c-preinstall.conf" file.

oracle   soft   nofile    1024

oracle   hard   nofile    65536

oracle   soft   nproc    16384

oracle   hard   nproc    16384

oracle   soft   stack    10240

oracle   hard   stack    32868

oracle   hard   memlock    134217728

oracle   soft   memlock    134217728

oracle   soft   data    unlimited

oracle   hard   data    unlimited

Stop and disable the firewall. You can configure it later if you wish.

# systemctl stop firewalld

# systemctl disable firewalld

Set SELinux to permissive by editing the "/etc/selinux/config" file, making sure the SELINUX flag is set as follows.

SELINUX=permissive

The server will need a reboot for the change to take effect.

◉ Setup

The following packages are listed as required. Some are commented out as they are not present in the Fedora repository.

dnf install -y bc

dnf install -y binutils

dnf install -y compat-openssl10

dnf install -y elfutils-libelf

dnf install -y glibc

dnf install -y glibc-devel

dnf install -y ksh

dnf install -y libaio

dnf install -y libXrender

dnf install -y libX11

dnf install -y libXau

dnf install -y libXi

dnf install -y libXtst

dnf install -y libgcc

dnf install -y libnsl

dnf install -y libstdc++

dnf install -y libxcb

dnf install -y libibverbs

dnf install -y make

dnf install -y policycoreutils

dnf install -y policycoreutils-python-utils

dnf install -y smartmontools

dnf install -y sysstat

# Added by me.

yum install -y unixODBC

# compat-libpthread-nonshared.

dnf install -y libnsl2

dnf install -y libnsl2.i686

dnf install -y libxcrypt-compat

dnf install -y http://rpmfind.net/linux/fedora/linux/development/rawhide/Everything/x86_64/os/Packages/c/compat-libpthread-nonshared-2.35.9000-17.fc37.x86_64.rpm

#dnf update -y

Create the new groups and users.

groupadd -g 54321 oinstall

groupadd -g 54322 dba

groupadd -g 54323 oper

#groupadd -g 54324 backupdba

#groupadd -g 54325 dgdba

#groupadd -g 54326 kmdba

#groupadd -g 54328 asmdba

#groupadd -g 54328 asmoper

#groupadd -g 54329 asmadmin

useradd -u 54321 -g oinstall -G dba,oper oracle

passwd oracle

We are not going to use the extra groups, but include them if you do plan on using them.

Create the directories in which the Oracle software will be installed.

mkdir -p /u01/app/oracle/product/21.0.0/dbhome_1

mkdir -p /u02/oradata

chown -R oracle:oinstall /u01 /u02

chmod -R 775 /u01 /u02

Putting mount points directly under root without mounting separate disks to them is typically a bad idea. It's done here for simplicity, but for a real installation "/" storage should be reserved for the OS.

If you are using X Emulation, login as root and issue the following command.

xhost +<machine-name>

You will need to add the following symbolic links or the Oracle Universal Installer (OUI) will not start.

# Fix for Oracle on Fedora.

rm -f /usr/lib64/libnsl.so.1

rm -f /usr/lib/libnsl.so.1

ln -s /usr/lib64/libnsl.so.3.0.0 /usr/lib64/libnsl.so.1

ln -s /usr/lib/libnsl.so.3.0.0 /usr/lib/libnsl.so.1

Set up the environment for the "oracle" user. The "$" characters are escaped using "\". If you are not creating the file with the cat command, you will need to remove the escape characters.

mkdir -p /home/oracle/scripts

cat > /home/oracle/scripts/setEnv.sh <<EOF

# Oracle Settings

export TMP=/tmp

export TMPDIR=\$TMP

export ORACLE_HOSTNAME=fedora36.localdomain

export ORACLE_UNQNAME=cdb1

export ORACLE_BASE=/u01/app/oracle

export ORACLE_HOME=\$ORACLE_BASE/product/21.0.0/dbhome_1

export ORA_INVENTORY=/u01/app/oraInvenotry

export ORACLE_SID=cdb1

export PDB_NAME=pdb1

export DATA_DIR=/u02/oradata

export PATH=/usr/sbin:/usr/local/bin:\$PATH

export PATH=\$ORACLE_HOME/bin:\$PATH

export LD_LIBRARY_PATH=\$ORACLE_HOME/lib:/lib:/usr/lib

export CLASSPATH=\$ORACLE_HOME/jlib:\$ORACLE_HOME/rdbms/jlib

EOF

echo ". /home/oracle/scripts/setEnv.sh" >> /home/oracle/.bash_profile

chown -R oracle:oinstall /home/oracle/scripts

◉ Installation

Log into the oracle user. If you are using X emulation then set the DISPLAY environmental variable.

DISPLAY=<machine-name>:0.0; export DISPLAY

Perform a software-only installation either using interactive mode (GUI) or silent mode and run the root scripts when prompted. Notice the setting of the CV_ASSUME_DISTID environment variable, so fake the OS.

# Unzip software.

cd $ORACLE_HOME

unzip -oq /path/to/software/LINUX.X64_193000_db_home.zip

# Fix for linking error suggested by Steven Kennedy.

cd $ORACLE_HOME/lib/stubs

mv libc.so libc.so.hide

mv libc.so.6 libc.so.6.hide

# Fake OS.

export CV_ASSUME_DISTID=OEL7.8

# Interactive mode.

#./runInstaller

# Silent mode.

./runInstaller -ignorePrereq -waitforcompletion -silent                        \

    -responseFile ${ORACLE_HOME}/install/response/db_install.rsp               \

    oracle.install.option=INSTALL_DB_SWONLY                                    \

    ORACLE_HOSTNAME=${ORACLE_HOSTNAME}                                         \

    UNIX_GROUP_NAME=oinstall                                                   \

    INVENTORY_LOCATION=${ORA_INVENTORY}                                        \

    SELECTED_LANGUAGES=en,en_GB                                                \

    ORACLE_HOME=${ORACLE_HOME}                                                 \

    ORACLE_BASE=${ORACLE_BASE}                                                 \

    oracle.install.db.InstallEdition=EE                                        \

    oracle.install.db.OSDBA_GROUP=dba                                          \

    oracle.install.db.OSBACKUPDBA_GROUP=dba                                    \

    oracle.install.db.OSDGDBA_GROUP=dba                                        \

    oracle.install.db.OSKMDBA_GROUP=dba                                        \

    oracle.install.db.OSRACDBA_GROUP=dba                                       \

    SECURITY_UPDATES_VIA_MYORACLESUPPORT=false                                 \

    DECLINE_SECURITY_UPDATES=true

Run the root scripts when prompted.

As a root user, execute the following script(s):

        1. /u01/app/oraInvenotry/orainstRoot.sh

        2. /u01/app/oracle/product/21.0.0/dbhome_1/root.sh

You are now ready to create a database.

◉ Database Creation

You create a database using the Database Configuration Assistant (DBCA). The interactive mode will display GUI screens to allow user input, while the silent mode will create the database without displaying any screens, as all required options are already specified on the command line.

# Start the listener.

lsnrctl start

# Interactive mode.

# dbca

# Silent mode.

dbca -silent -createDatabase                                                   \

     -templateName General_Purpose.dbc                                         \

     -gdbname ${ORACLE_SID} -sid  ${ORACLE_SID} -responseFile NO_VALUE         \

     -characterSet AL32UTF8                                                    \

     -sysPassword SysPassword1                                                 \

     -systemPassword SysPassword1                                              \

     -createAsContainerDatabase true                                           \

     -numberOfPDBs 1                                                           \

     -pdbName ${PDB_NAME}                                                      \

     -pdbAdminPassword PdbPassword1                                            \

     -databaseType MULTIPURPOSE                                                \

     -memoryMgmtType auto_sga                                                  \

     -totalMemory 2000                                                         \

     -storageType FS                                                           \

     -datafileDestination "${DATA_DIR}"                                        \

     -redoLogFileSize 50                                                       \

     -emConfiguration NONE                                                     \

     -ignorePreReqs

◉ Post Installation

Edit the "/etc/oratab" file setting the restart flag for each instance to 'Y'.

cdb1:/u01/app/oracle/product/21.0.0/dbhome_1:Y