Oracle Autonomous Database is the world’s first self-driving, self-repairing and self-securing database in the cloud. The steps below show - how to easily migrate Oracle Database on AWS RDS to Oracle Autonomous Database running in Oracle Cloud Infrastructure (OCI) using Data Pump. The migration in this example uses Amazon S3 and an internet connection for transferring data to Oracle Autonomous Database on OCI.
Migration process
Step 1 - Identify the Source ORACLE DATABASE on AWS RDS
Step 2 - Prepare target Autonomous Database on Oracle Cloud
To provision an Oracle Autonomous Database, refer to link below
Step 3 - Before migrating to Autonomous Database we first need to validate compatibility using CPAT (Cloud Premigration Advisory Tool)
CPAT is a Java-based tool to help assess the ease of migration of your database to Oracle Autonomous Database. CPAT will assess your source database instance, checking for potentially problematic content and other factors that could impede a successful migration.The advisor will work against the following source database versions: Oracle Database 11.2.0.4 and higher, including 12c, 18c, and 19c.
◉ Install CPAT on Compute instance from where we can be able to access the database. Both Oracle Autonomous database and AWS RDS don’t have direct access to the Database. You need a compute instance that has Java 7 (or higher) to run CPAT. We need a wallet file of Oracle Autonomous Database for connecting Database. For more details on CPAT kindly refer to Doc ID 2758371.1.
◉ Generate properties file on the target Autonomous Database using the below command:
./premigration.sh --gettargetprops -username ADMIN --connectstring 'jdbc:oracle:thin:@targetdb_tpurgent'
Use right-click->Open image in new tab if you are facing difficulties to reading.
◉ Using the premigration advisor properties file execute the below command to validate the AWS RDS schema object against Autonomous Database. For example, a schema is verified below.
./premigration.sh --connectstring jdbc:oracle:thin:@database-1.ctp37njtad3p.us-east-1.rds.amazonaws.com:1521:orcl --targetcloud ATPS --username admin --schemas SATYA --analysisprops premigration_advisor_analysis.properties --reportformat text
Use right-click->Open image in new tab if you are facing difficulties to reading.
Note: Analyze the report and fix any blockers as well as verify the warning and information. For example, a blocker can be data in the user tablespace. Autonomous Database supports only the DATA tablespace. To fix the blocker we have to map the tablespace
Step 4 - Start the export of the source schema
◉ Verify the directory using dba_directories, where you will be going to keep the dump & log file.
◉ Export the schema using the below procedure.
◉ Verify the dump file & log have been created successfully.
◉ Verify the export log content using the below query.
Step 5 - Create an Amazon S3 bucket to upload the dump file.
https://docs.aws.amazon.com/AmazonS3/latest/userguide/create-bucket-overview.html
◉ Integrate the AWS ORACLE RDS with Amazon S3 Bucket using the below link.
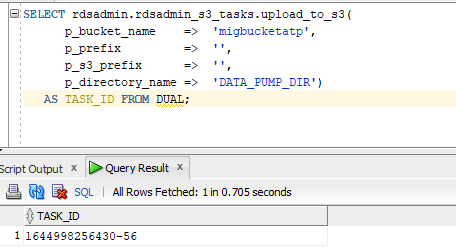
◉ Upload the data file from directory to bucket.
◉ Verify the upload task log.
Step 6 - Import the dump file from the Amazon S3 bucket to Autonomous Database.
◉ We need to create a cloud credential in Oracle Autonomous Database, containing username and password for the connection to the object store. Go to AWS Identity access management to create an access key.
◉ Import the dump file using above credential
impdp admin/WElcome##12345@targetdb_tpurgent directory=DATA_PUMP_DIR job_name=imp_job credential=OBJ_STORE_CRED dumpfile=https://migbucketatp.s3.amazonaws.com/SATYA.dmp parallel=2 encryption_pwd_prompt=yes transform=segment_attributes:n transform=dwcs_cvt_iots:y transform=constraint_use_default_index:y exclude=cluster,indextype,db_link
Use right-click->Open image in new tab if you are facing difficulties to reading.
Cheers!! Migration successfully completed
Source: oracle.com


0 comments:
Post a Comment