Monday, December 21, 2020

How to Create a Database Link from an Autonomous Data Warehouse to a Database Cloud Service Instance

Oracle Database Tutorial and Material, Oracle Database Exam Prep, Oracle Database Learning, Database Career

Autonomous Data Warehouse (ADW) now supports outgoing database links to any database that is accessible from an ADW instance including Database Cloud Service (DBCS) and other ADW/ATP instances. To use database links with ADW, the target database must be configured to use TCP/IP with SSL (TCPS) authentication. Since both ADW and ATP use TCPS authentication by default, setting up a database link between these services is pretty easy and takes only a few steps. On the other hand, enabling TCPS authentication in a database that doesn't have it configured (e.g. in DBCS) requires some additional steps that need to be followed carefully. In this blog post, I will try to demonstrate how to create a database link from an ADW instance to a DBCS instance including the steps to enable TCPS authentication. Here is an outline of the steps that we are going to follow:

◉ Enable TCPS Authentication in DBCS

◉ Connect to DBCS Instance from Client via TCPS

◉ Create a DB Link from ADW to DBCS

Enable TCPS Authentication in DBCS

A DBCS instance uses TCP/IP protocol by default. Configuring TCPS in DBCS involves several steps that need to performed manually. Since we are going to modify the default listener to use TCPS and it's configured under the grid user, we will be using both oracle and grid users. Here are the steps needed to enable TCPS in DBCS:

◉ Create wallets with self signed certificates for server and client

◉ Exchange certificates between server and client wallets (Export/import certificates)

◉ Add wallet location in the server and the client network files

◉ Add TCPS endpoint to the database listener

Create wallets with self signed certificates for server and client

As part of enabling TCPS authentication, we need to create individual wallets for the server and the client. Each of these wallets has to have their own certificates that they will exchange with one another. For the sake of this example, I will be using a self signed certificate. The client wallet and certificate can be created in the client side; however, I'll be creating my client wallet and certificate in the server and moving them to my local system later on.

Set up wallet directories with the root user

[root@dbcs0604 u01]$ mkdir -p /u01/server/wallet

[root@dbcs0604 u01]$ mkdir -p /u01/client/wallet

[root@dbcs0604 u01]$ mkdir /u01/certificate

[root@dbcs0604 /]# chown -R oracle:oinstall /u01/server

[root@dbcs0604 /]# chown -R oracle:oinstall /u01/client

[root@dbcs0604 /]# chown -R oracle:oinstall /u01/certificate

Create a server wallet with the oracle user

[oracle@dbcs0604 ~]$ cd /u01/server/wallet/

[oracle@dbcs0604 wallet]$ orapki wallet create -wallet ./ -pwd Oracle123456 -auto_login

Oracle PKI Tool Release 18.0.0.0.0 - Production

Version 18.1.0.0.0

Copyright (c) 2004, 2017, Oracle and/or its affiliates. All rights reserved.

Operation is successfully completed.

Create a server certificate with the oracle user

[oracle@dbcs0604 wallet]$ orapki wallet add -wallet ./ -pwd Oracle123456 -dn "CN=dbcs" -keysize 1024 -self_signed -validity 3650 -sign_alg sha256

Oracle PKI Tool Release 18.0.0.0.0 - Production

Version 18.1.0.0.0

Copyright (c) 2004, 2017, Oracle and/or its affiliates. All rights reserved.

Operation is successfully completed.

Create a client wallet with the oracle user

[oracle@dbcs0604 wallet]$ cd /u01/client/wallet/

[oracle@dbcs0604 wallet]$ orapki wallet create -wallet ./ -pwd Oracle123456 -auto_login

Oracle PKI Tool Release 18.0.0.0.0 - Production

Version 18.1.0.0.0

Copyright (c) 2004, 2017, Oracle and/or its affiliates. All rights reserved.

Operation is successfully completed.

Create a client certificate with the oracle user

[oracle@dbcs0604 wallet]$ orapki wallet add -wallet ./ -pwd Oracle123456 -dn "CN=ctuzla-mac" -keysize 1024 -self_signed -validity 3650 -sign_alg sha256

Oracle PKI Tool Release 18.0.0.0.0 - Production

Version 18.1.0.0.0

Copyright (c) 2004, 2017, Oracle and/or its affiliates. All rights reserved.

Operation is successfully completed.

Exchange certificates between server and client wallets (Export/import certificates)

Export the server certificate with the oracle user

[oracle@dbcs0604 wallet]$ orapki wallet export -wallet ./ -pwd Oracle123456 -dn "CN=dbcs" -cert /tmp/server.crt

Oracle PKI Tool Release 18.0.0.0.0 - Production

Version 18.1.0.0.0

Copyright (c) 2004, 2017, Oracle and/or its affiliates. All rights reserved.

Operation is successfully completed.

Export the client certificate with the oracle user

[oracle@dbcs0604 wallet]$ orapki wallet export -wallet ./ -pwd Oracle123456 -dn "CN=ctuzla-mac" -cert /tmp/client.crt

Oracle PKI Tool Release 18.0.0.0.0 - Production

Version 18.1.0.0.0

Copyright (c) 2004, 2017, Oracle and/or its affiliates. All rights reserved.

Operation is successfully completed.

Import the client certificate into the server wallet with the oracle user

[oracle@dbcs0604 wallet]$ cd /u01/server/wallet/

[oracle@dbcs0604 wallet]$ orapki wallet add -wallet ./ -pwd Oracle123456 -trusted_cert -cert /tmp/client.crt

Oracle PKI Tool Release 18.0.0.0.0 - Production

Version 18.1.0.0.0

Copyright (c) 2004, 2017, Oracle and/or its affiliates. All rights reserved.

Operation is successfully completed.

Import the server certificate into the client wallet with the oracle user

[oracle@dbcs0604 wallet]$ cd /u01/client/wallet/

[oracle@dbcs0604 wallet]$ orapki wallet add -wallet ./ -pwd Oracle123456 -trusted_cert -cert /tmp/server.crt 

Oracle PKI Tool Release 18.0.0.0.0 - Production

Version 18.1.0.0.0

Copyright (c) 2004, 2017, Oracle and/or its affiliates. All rights reserved.

Operation is successfully completed.

Change permissions for the server wallet with the oracle user

We need to set the permissions for the server wallet so that it can be accessed when we restart the listener after enabling TCPS endpoint.

[oracle@dbcs0604 wallet]$ cd /u01/server/wallet

[oracle@dbcs0604 wallet]$ chmod 640 cwallet.sso

Add wallet location in the server and the client network files

Creating server and client wallets with self signed certificates and exchanging certificates were the initial steps towards the TCPS configuration. We now need to modify both the server and client network files so that they point to their corresponding wallet location and they are ready to use the TCPS protocol. Here's how those files look in my case:

Server-side $ORACLE_HOME/network/admin/sqlnet.ora under the grid user

# sqlnet.ora Network Configuration File: /u01/app/18.0.0.0/grid/network/admin/sqlnet.ora

# Generated by Oracle configuration tools.

NAMES.DIRECTORY_PATH= (TNSNAMES, EZCONNECT)

wallet_location =

 (SOURCE=

  (METHOD=File)

  (METHOD_DATA=

   (DIRECTORY=/u01/server/wallet)))

SSL_SERVER_DN_MATCH=(ON)

Server-side $ORACLE_HOME/network/admin/listener.ora under the grid user

wallet_location =

 (SOURCE=

  (METHOD=File)

  (METHOD_DATA=

   (DIRECTORY=/u01/server/wallet)))

LISTENER=(DESCRIPTION=(ADDRESS_LIST=(ADDRESS=(PROTOCOL=IPC)(KEY=LISTENER))))            # line added by Agent

ASMNET1LSNR_ASM=(DESCRIPTION=(ADDRESS_LIST=(ADDRESS=(PROTOCOL=IPC)(KEY=ASMNET1LSNR_ASM))))              # line added by Agent

ENABLE_GLOBAL_DYNAMIC_ENDPOINT_ASMNET1LSNR_ASM=ON               # line added by Agent

VALID_NODE_CHECKING_REGISTRATION_ASMNET1LSNR_ASM=SUBNET         # line added by Agent

ENABLE_GLOBAL_DYNAMIC_ENDPOINT_LISTENER=ON              # line added by Agent

VALID_NODE_CHECKING_REGISTRATION_LISTENER=SUBNET                # line added by Agent

Server-side $ORACLE_HOME/network/admin/tnsnames.ora under the oracle user

# tnsnames.ora Network Configuration File: /u01/app/oracle/product/18.0.0.0/dbhome_1/network/admin/tnsnames.ora

# Generated by Oracle configuration tools.

LISTENER_CDB1 =

  (ADDRESS = (PROTOCOL = TCPS)(HOST = dbcs0604)(PORT = 1521))

CDB1_IAD1W9 =

  (DESCRIPTION =

    (ADDRESS = (PROTOCOL = TCPS)(HOST = dbcs0604)(PORT = 1521))

    (CONNECT_DATA =

      (SERVER = DEDICATED)

      (SERVICE_NAME = cdb1_iad1w9.sub05282047220.vcnctuzla.oraclevcn.com)

    )

    (SECURITY= (SSL_SERVER_CERT_DN="CN=dbcs"))

  )


PDB1 =

  (DESCRIPTION =

    (ADDRESS = (PROTOCOL = TCPS)(HOST = dbcs0604)(PORT = 1521))

    (CONNECT_DATA =

      (SERVER = DEDICATED)

      (SERVICE_NAME = pdb1.sub05282047220.vcnctuzla.oraclevcn.com)

    )

    (SECURITY= (SSL_SERVER_CERT_DN="CN=dbcs"))

  )

Add TCPS endpoint to the database listener

Now that we are done with configuring our wallets and network files, we can move onto the next step, which is configuring the TCPS endpoint for the database listener. Since our listener is configured under grid, we will be using srvctl command to modify and restart it. Here are the steps:

[grid@dbcs0604 ~]$ srvctl modify listener -p "TCPS:1521"

[grid@dbcs0604 ~]$ srvctl stop listener

[grid@dbcs0604 ~]$ srvctl start listener

[grid@dbcs0604 ~]$ srvctl stop database -database cdb1_iad1w9

[grid@dbcs0604 ~]$ srvctl start database -database cdb1_iad1w9

[grid@dbcs0604 ~]$ lsnrctl status

LSNRCTL for Linux: Version 18.0.0.0.0 - Production on 05-JUN-2019 16:07:24

Copyright (c) 1991, 2018, Oracle.  All rights reserved.

Connecting to (DESCRIPTION=(ADDRESS=(PROTOCOL=IPC)(KEY=LISTENER)))

STATUS of the LISTENER

------------------------

Alias                     LISTENER

Version                   TNSLSNR for Linux: Version 18.0.0.0.0 - Production

Start Date                05-JUN-2019 16:05:50

Uptime                    0 days 0 hr. 1 min. 34 sec

Trace Level               off

Security                  ON: Local OS Authentication

SNMP                      OFF

Listener Parameter File   /u01/app/18.0.0.0/grid/network/admin/listener.ora

Listener Log File         /u01/app/grid/diag/tnslsnr/dbcs0604/listener/alert/log.xml

Listening Endpoints Summary...

  (DESCRIPTION=(ADDRESS=(PROTOCOL=ipc)(KEY=LISTENER)))

  (DESCRIPTION=(ADDRESS=(PROTOCOL=tcps)(HOST=10.0.0.4)(PORT=1521)))

Services Summary...

Service "867e3020a52702dee053050011acf8c0.sub05282047220.vcnctuzla.oraclevcn.com" has 1 instance(s).

  Instance "cdb1", status READY, has 2 handler(s) for this service...

Service "8a8e0ea41ac27e2de0530400000a486a.sub05282047220.vcnctuzla.oraclevcn.com" has 1 instance(s).

  Instance "cdb1", status READY, has 2 handler(s) for this service...

Service "cdb1XDB.sub05282047220.vcnctuzla.oraclevcn.com" has 1 instance(s).

  Instance "cdb1", status READY, has 1 handler(s) for this service...

Service "cdb1_iad1w9.sub05282047220.vcnctuzla.oraclevcn.com" has 1 instance(s).

  Instance "cdb1", status READY, has 2 handler(s) for this service...

Service "pdb1.sub05282047220.vcnctuzla.oraclevcn.com" has 1 instance(s).

  Instance "cdb1", status READY, has 2 handler(s) for this service...

The command completed successfully

Please note that in the first step we added the TCPS endpoint to the port 1521 of the default listener. It's also possible to keep the port 1521 as is and add TCPS endpoint to a different port (e.g. 1523).

Connect to DBCS Instance from Client via TCPS

We should have TCPS authentication configured now. Before we move onto testing, let's take a look at the client-side network files (Please note the public IP address of the DBCS instance in tnsnames.ora):

Client-side tnsnames.ora

CDB1 =

  (DESCRIPTION =

    (ADDRESS = (PROTOCOL = TCPS)(HOST = 132.145.151.208)(PORT = 1521))

    (CONNECT_DATA =

      (SERVER = DEDICATED)

      (SERVICE_NAME = cdb1_iad1w9.sub05282047220.vcnctuzla.oraclevcn.com)

    )

    (SECURITY= (SSL_SERVER_CERT_DN="CN=dbcs"))

  )

PDB1 =

  (DESCRIPTION =

    (ADDRESS = (PROTOCOL = TCPS)(HOST = 132.145.151.208)(PORT = 1521))

    (CONNECT_DATA =

      (SERVER = DEDICATED)

      (SERVICE_NAME = pdb1.sub05282047220.vcnctuzla.oraclevcn.com)

    )

    (SECURITY= (SSL_SERVER_CERT_DN="CN=dbcs"))

   )

Client-side sqlnet.ora

WALLET_LOCATION =

   (SOURCE =

     (METHOD = FILE)

     (METHOD_DATA =

       (DIRECTORY = /Users/cantuzla/Desktop/wallet)

     )

   )

SSL_SERVER_DN_MATCH=(ON)

In order to connect to the DBCS instance from the client, you need to add an ingress rule for the port that you want to use (e.g. 1521) in the security list of your virtual cloud network (VCN) in OCI as shown below:

Oracle Database Tutorial and Material, Oracle Database Exam Prep, Oracle Database Learning, Database Career

We can now try to establish a client connection to PDB1 in our DBCS instance (CDB1):

ctuzla-mac:~ cantuzla$ cd Desktop/InstantClient/instantclient_18_1/
ctuzla-mac:instantclient_18_1 cantuzla$ ./sqlplus /nolog
 
SQL*Plus: Release 18.0.0.0.0 Production on Wed Jun 5 09:39:56 2019
Version 18.1.0.0.0
 
Copyright (c) 1982, 2018, Oracle.  All rights reserved.
 
SQL> connect c##dbcs/DBcs123_#@PDB1
Connected.
SQL> select * from dual;
 
D
-
X

Create a DB Link from ADW to DBCS


We now have a working TCPS authentication in our DBCS instance.

◉ Copy your target database wallet (the client wallet cwallet.sso that we created in /u01/client/wallet) for the target database to Object Store.
◉ Create credentials to access your Object Store where you store the cwallet.sso.
◉ Upload the target database wallet to the data_pump_dir directory on ADW using DBMS_CLOUD.GET_OBJECT:

SQL> BEGIN
  DBMS_CLOUD.GET_OBJECT(
    credential_name => 'OBJ_STORE_CRED',
    object_uri => 'https://objectstorage.us-phoenix-1.oraclecloud.com/n/adwctraining8/b/target-wallet/o/cwallet.sso',
    directory_name => 'DATA_PUMP_DIR'); 
END;
/    
 
PL/SQL procedure successfully completed.

◉ On ADW create credentials to access the target database. The username and password you specify with DBMS_CLOUD.CREATE_CREDENTIAL are the credentials for the target database that you use to create the database link. Make sure the username consists of all uppercase letters. For this example, I will be using the C##DBCS common user that I created in my DBCS instance:

SQL> BEGIN
  DBMS_CLOUD.CREATE_CREDENTIAL(
    credential_name => 'DBCS_LINK_CRED',
    username => 'C##DBCS',
    password => 'DBcs123_#');
END;
/    
 
PL/SQL procedure successfully completed.

◉ Create the database link to the target database using DBMS_CLOUD_ADMIN.CREATE_DATABASE_LINK:

SQL> BEGIN
  DBMS_CLOUD_ADMIN.CREATE_DATABASE_LINK(
    db_link_name => 'DBCSLINK', 
    hostname => '132.145.151.208', 
    port => '1521',
    service_name => 'pdb1.sub05282047220.vcnctuzla.oraclevcn.com',
    ssl_server_cert_dn => 'CN=dbcs',
    credential_name => 'DBCS_LINK_CRED');
END;
/   
 
PL/SQL procedure successfully completed.

◉ Use the database link you created to access data on the target database:

SQL> select * from dual@DBCSLINK;
 
D
-
X

That's it! In this blog post, we covered how to enable TCPS authentication in DBCS and create an outgoing database link from ADW to our DBCS instance. Even though we focused on the DBCS configuration, these steps can be applied when setting up a database link between ADW and any other Oracle database.

Friday, December 18, 2020

Get Started Building Low-Code Apps in Oracle Cloud with Oracle APEX Application Development (APEX Service)

Oracle Database Tutorial and Material, Oracle Database Certification, Oracle Database Exam Prep, DB Tutorial and Material

Oracle APEX Application Development, also known as “APEX Service,” provides citizen and professional developers with a fully managed, low-code application development and deployment platform in Oracle Cloud Infrastructure. You not only get Oracle APEX, but also an underlying Oracle Autonomous Database - Shared Infrastructure (ADB) database. With APEX Service, you can create powerful apps quickly and easily right in your browser - no additional tools required.

This tutorial will help you get started using APEX Service. If you already have a service instance pre-provisioned and have received a welcome message in your email inbox, then skip down to the section titled Executing Instance Lifecycle Operations. Otherwise, it is recommended to follow this tutorial from the beginning. If you do not finish it, you can come back later and return to where you left-off using the links below.

Signing Into Oracle Cloud Infrastructure

First, you need to have an OCI tenancy and a user account to sign-in with. If you have this, go ahead and sign in now. If you do not have this, begin by following this blog post about signing up for a tenancy in Oracle Cloud Free Tier. Return here once you able to sign in and see the OCI Console homepage (pictured below).


Oracle Database Tutorial and Material, Oracle Database Certification, Oracle Database Exam Prep, DB Tutorial and Material

Creating an APEX Service Instance


At the top left corner of the OCI Console homepage, click the hamburger icon to open the OCI Service Navigation Menu. Scroll down in this menu until you see a service category named Database Related Services. Expand the category to see APEX Application Development > APEX Instances. This is your main entry point into APEX in OCI. Click on APEX Instances to proceed.

Oracle Database Tutorial and Material, Oracle Database Certification, Oracle Database Exam Prep, DB Tutorial and Material

You now enter into a new user experience that allows you to see APEX on any ADB-derived service, quickly create a new APEX Service instance, or directly launch into APEX or SQL Developer Web on a running instance. Below is an example where APEX already is running on two Always Free Autonomous Database instances, and there are no instances of APEX Service yet. Continue by clicking the button Create APEX Service. It is located right above the instances list.

Oracle Database Tutorial and Material, Oracle Database Certification, Oracle Database Exam Prep, DB Tutorial and Material

This displays the APEX Service instance creation dialog. Fill in the dialog as follows:
  1. Enter basic information:
    • Compartment - Choose a compartment within your OCI tenancy. You can use the default "root" compartment or change to a different compartment if needed.
    • Display Name - Enter a user-friendly name to help you easily identify the service instance. The display name does not have to be unique.
    • Database Name - Enter a name for the underlying database. It must consist of letters and numbers only. The maximum length is 14 characters. The same database name cannot be used for multiple Autonomous Databases in the same tenancy in the same region.
  2. Select service settings:
    • Database Version - Displays the available database version (e.g. 19c).
    • OCPU Count - Specify the number of OCPU cores for your database.
    • Storage (TB) - Specify the storage, in terabytes, you wish to make available to your database.
    • Auto Scaling - By default auto scaling is enabled to allow the system to automatically use up to three times more CPU and IO resources to meet workload demand. If you do not want to use auto scaling, then deselect this option to disable it.
  3. Create administrator credentials:
    • Username - The default database administrator username is ADMIN. This option is read-only and is not editable.
    • Password - Enter a password.
    • Confirm Password - Enter the password again.
    • Tip: Make a note of this credential. You will need the passowrd to sign into APEX Administration Services later.
  4. Choose network access:
    • Allow secure access from everywhere - Choose this to expose APEX Service on the public internet over HTTPS, with optional settings to restrict access to certain IP addresses, CIDR blocks, and Virtual Cloud Networks (VCN).
    • Virtual cloud network - Choose this to place APEX Service within a VCN and allow HTTPS access only from clients that are added to the same VCN.
Once you finish filling in the dialog, click Create APEX Service at the bottom to commence instance creation.

Oracle Database Tutorial and Material, Oracle Database Certification, Oracle Database Exam Prep, DB Tutorial and Material

You immediately are taken to an APEX-specific page that shows helpful details about your new APEX Service instance including its name, version information, and usage metrics. This is the same detail page you would see if you drilled into an APEX instance from the prior instances list screen. Notice that the state of your new APEX Service instance initially displays as Provisioning. After approximately 1-3 minutes, the state should change to Available.

Oracle Database Tutorial and Material, Oracle Database Certification, Oracle Database Exam Prep, DB Tutorial and Material

Soon after the state changes to Available, you will receive a welcome message in the email inbox of the administrator for the OCI tenancy. This message contains important information about your new APEX Service instance including direct links to its APEX Administration Services, APEX Application Development Services, and SQL Developer Web. It also contains a link to this tutorial.

Oracle Database Tutorial and Material, Oracle Database Certification, Oracle Database Exam Prep, DB Tutorial and Material

Executing Instance Lifecycle Operations


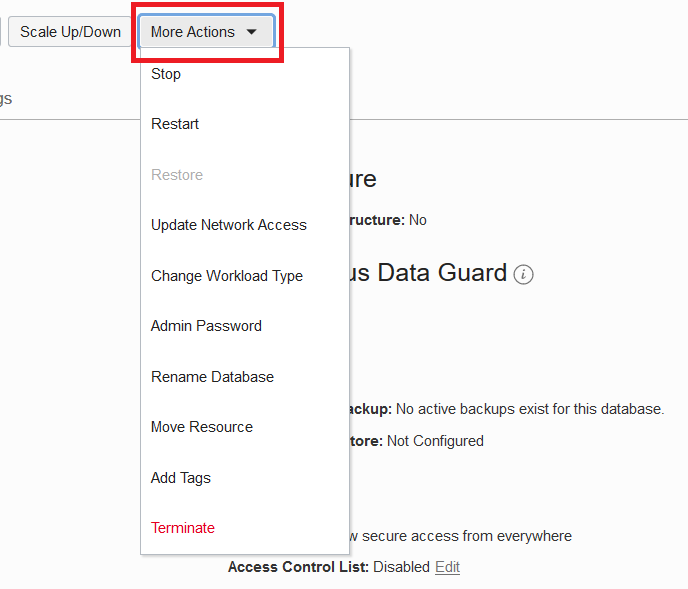
Now is a good time to learn about lifecycle operations for APEX Service instances. These operations include instance start, stop, and terminate - to name a few. They are useful for several reasons. For example, you may wish to stop a running QA instance while testing activities are paused, and then start it again when testing resumes. Or, you may need to terminate an instance after its APEX applications and data have been decommissioned and the instance is no longer needed. The most important thing you need to know is that these instance lifecycle operations are avilable only on the details page of the underlying database, and although they are invoked against the database, they apply to the whole APEX Service instance. Let's take a closer look.

If you are not already viewing the details page of the APEX Service instance that you created previously, first sign back into your OCI tenancy and navigate to this page. After it loads, locate the text Database that has a link adjacent to it. This link opens a details page for the database included with your APEX Service instance. Click it to proceed.

Oracle Database Tutorial and Material, Oracle Database Certification, Oracle Database Exam Prep, DB Tutorial and Material

Here you see the details page of the database. Notice helpful database information displayed here. For example, you can see the exact database version number.

Oracle Database Tutorial and Material, Oracle Database Certification, Oracle Database Exam Prep, DB Tutorial and Material

To see a list of instance lifecycle operations that are available, click the More Actions button at the top of this page. Notice how different opertions are enabled or disabled depending on the current running state of your database.

Oracle Database Tutorial and Material, Oracle Database Certification, Oracle Database Exam Prep, DB Tutorial and Material

Ensure that your database has been started (is in Available state) before proceding to the next section. After reviewing the list of lifecycle operations, click somewhere else on the screen to hide it again. There is no need to execute an instance restart at this time.

Back on the database details page, locate the link at APEX Instance > Instance Name, and then click on it. This takes you back to the APEX instance details page where you started.

Oracle Database Tutorial and Material, Oracle Database Certification, Oracle Database Exam Prep, DB Tutorial and Material

First-Time APEX Workspace Setup


Before you start developing APEX apps, you must first create an initial APEX workspace and user account. You can do this using APEX Administration Services. This is the main console for managing APEX workspaces, user accounts, and more. The workspace you will create becomes your main pallet for building and deploying apps. The new user account will serve mulitple purposes: we will use it to sign into the workspace for app development and also use it as an end-user of a running app. While this setup is sufficient for demonstration purposes, in production APEX environments, it is recommended to separate duties into distinct APEX user accounts with minimum privileges.

There are a multiple ways to get to APEX Administration Services. With your APEX Service instance running, proceed by clicking Launch APEX on the instance details page or instance list screen (both pictured below), or by opening the APEX Administration Services link contained in your welcome email. If you recently provisioned or restarted the instance, it is recommended to wait an extra 1-3 minutes before opening APEX Administration Services to ensure that everything related to APEX is running properly.

Oracle Database Tutorial and Material, Oracle Database Certification, Oracle Database Exam Prep, DB Tutorial and Material

Upon entering APEX Administration Services, you will be prompted to sign in using the database administrator acocunt. Enter the ADMIN password you set when creating the APEX Service instance.

Oracle Database Tutorial and Material, Oracle Database Certification, Oracle Database Exam Prep, DB Tutorial and Material

Soon you will see an APEX Administration Services welcome screen that looks like the one below. Review the message text, and click the button to proceed.

Oracle Database Tutorial and Material, Oracle Database Certification, Oracle Database Exam Prep, DB Tutorial and Material

Next, you are prompted for an APEX workspace name, a database user name, and a password. This new workspace will be your shared work area where one or more low-code developers can build and run APEX applications. After you finish this step, an APEX workspace, a database user, and a database schema (with same name as your database user) will be automatically created. Later, when we create an APEX app, it will run against database objects in your schema.

For our example, enter DEMO as the database user name and workspace name. Make sure to remember your password. Click the Create Workspace button to continue.

Oracle Database Tutorial and Material, Oracle Database Certification, Oracle Database Exam Prep, DB Tutorial and Material

Here you see the APEX Administration Services main page. Notice a message at the top indicating your workspace has been created.

Oracle Database Tutorial and Material, Oracle Database Certification, Oracle Database Exam Prep, DB Tutorial and Material

Before you do anything else, bookmark this page in your browser so you have an easy way to open APEX Administration Services in the future with a single click. The bookmark should look something like what is shown below. It also is available in the welcome email that was sent upon creating your APEX Service instance.

https://<db-id>.adb.<data-region>.oraclecloudapps.com/ords/apex_admin

Now we are going to sign out of APEX Administration Services and go to the sign-in page for APEX workspaces, also known as APEX Application Development Services. In the message at the top of your screen, notice it contains a link with the name of your new APEX workspace (in our example, DEMO). Click this link to continue.

Oracle Database Tutorial and Material, Oracle Database Certification, Oracle Database Exam Prep, DB Tutorial and Material

You are signed out of APEX Administration Services and redirected to the APEX workspace sign in page with your workspace name automatically filled in. Enter your workspace password, then click Sign In to continue.

Oracle Database Tutorial and Material, Oracle Database Certification, Oracle Database Exam Prep, DB Tutorial and Material

We now see the APEX Workspace homepage. It gives you easy access to the four main areas of APEX: App Builder, SQL Workshop, Team Development, and App Gallery. App Builder is where you go to create and edit APEX apps. SQL Workshop provides a full database object explorer plus an interface to run SQL queries and see query results. Team Development gives you access to the rich collaborative development features of APEX. App Gallery includes a suite of predefined productivity applications you can install and use. For this tutorial, we will work mainly in App Builder.

Oracle Database Tutorial and Material, Oracle Database Certification, Oracle Database Exam Prep, DB Tutorial and Material

Bookmark this page in your browser so you have an easy way to sign into your APEX workspace in the future with a single click. The bookmark should look something like what is shown below. It also is available in the welcome email that was sent upon creating your APEX Service instance.

https://<db-id>.adb.<data-region>.oraclecloudapps.com/ords/apex

At this point, you can stop and pat yourself on the back because you’ve finished a major milestone. You have an instance of APEX Service running in Oracle Cloud and a shiny new APEX development workspace. Now you are ready to create your very first APEX app!

About Creating APEX Apps


There are several ways to quickly create APEX apps. You can import spreadsheet-type data from a file, adapt an existing app from the APEX App Gallery, or create an app from scratch. APEX App Builder makes all of these options available in a single wizard. In the interest of time, we’re not going to cover all of the options here. We will focus on creating an app from sample data because it is probably the most common way to kickstart a new APEX app.

The reminder of this tutorial is divided into four distinct sections. In Part I, we will launch the app creation wizard and load a sample data set. In Part II, we will finish the wizard and automatically generate an APEX app. In Part III, we will run the app and sign into it. Lastly, in Part IV, we will explore the app, make two small changes, and then re-run it.

Part I: Loading Sample Data


1. From the APEX workspace homepage, click App Builder.

2. Click Create a New App.

Oracle Database Tutorial and Material, Oracle Database Certification, Oracle Database Exam Prep, DB Tutorial and Material

3. Click From a File.

Oracle Database Tutorial and Material, Oracle Database Certification, Oracle Database Exam Prep, DB Tutorial and Material

When creating an application from a file, APEX allows you to upload CSV, XLSX, XML, or JSON files and then build the app based on this data. Alternatively, you can also copy and paste CSV data or use sample data sets that are included with APEX.

4. Within the Load Data dialog, click the Copy and Paste option at the top.

Oracle Database Tutorial and Material, Oracle Database Certification, Oracle Database Exam Prep, DB Tutorial and Material

5. Click the dropdown box that shows a list of sample data sets, and select Project and Tasks. Notice a sample data set is automatically pasted for you into the text area below. From here, you can simply click Next.

Oracle Database Tutorial and Material, Oracle Database Certification, Oracle Database Exam Prep, DB Tutorial and Material

6. Review the parsed data. At the bottom of this page is a sampling of actual table data that will be created in the database.

Oracle Database Tutorial and Material, Oracle Database Certification, Oracle Database Exam Prep, DB Tutorial and Material

7. Set Table Name to PROJECT_TASKS and click Load Data to proceed. You can ignore the prompt to select individual columns because we will be loading all columns (default behavior).

Oracle Database Tutorial and Material, Oracle Database Certification, Oracle Database Exam Prep, DB Tutorial and Material

After clicking Load Data you will see a spinner until the wizard finishes loading data. Continue to Part II at that point.

Part II: Creating the App


The data loading step has created a new database table and populated it with records from the sample data. Now you can create an APEX app based on this table.

1. In the final Load Data screen, verify that 73 rows have been loaded into the PROJECT_TASKS table, then click Create Application.

Oracle Database Tutorial and Material, Oracle Database Certification, Oracle Database Exam Prep, DB Tutorial and Material

2. In the Create Application page, review the new app pages that will be generated. Click the Edit button for a given page if you want to review details about it.

Click Check All next to Features, and then click Create Application.

Oracle Database Tutorial and Material, Oracle Database Certification, Oracle Database Exam Prep, DB Tutorial and Material

When the wizard finishes creating the app, you will be redirected to the new app’s homepage in App Builder.

Part III: Running the App


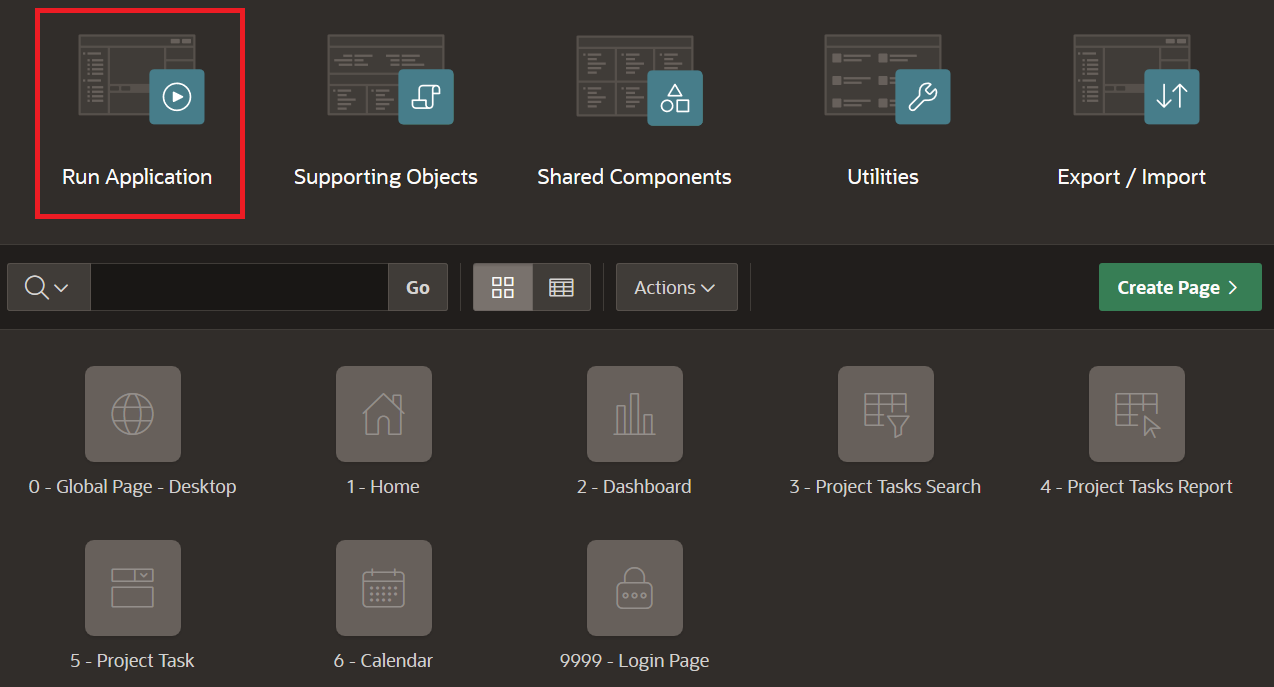
1. Click Run Application. This will open the runtime app in a new browser tab, allowing you to see how end users will view the app.

Oracle Database Tutorial and Material, Oracle Database Certification, Oracle Database Exam Prep, DB Tutorial and Material

2. Enter your user credentials and click Sign In. So far we have created only a single APEX user: the user generated when we created an APEX workspace. Use this same Username and Password now to sign into the app.

Oracle Database Tutorial and Material, Oracle Database Certification, Oracle Database Exam Prep, DB Tutorial and Material

3. Explore the application a little. Click Dashboard (in the home menu or navigation menu) to view charts that were created. Click Project Tasks Search (in the navigation menu) to experiment with faceted searches. Click Project Tasks Report to view an interactive report, then click the Edit icon for a given record to display details in an editable form. Next, navigate to the Calendar page and review the data displayed (you may need to scroll back a few months to see data). Finally, review the options available under Administration.

Oracle Database Tutorial and Material, Oracle Database Certification, Oracle Database Exam Prep, DB Tutorial and Material

Congratulations, you have a live APEX app! This app was generated almost entirely for you by APEX. All you had to do was load pre-packaged sample data and make a few simple settings.

Part IV: Exploring, Changing, and Re-Running the App


In this final section, you will learn how to enhance your app. We will improve the app’s faceted search page for better clarity and improved usability.

Start by reviewing the Project Tasks Search page in this app. See that you can check and uncheck various search facets. When you check a facet, the counts on all remaining facets are updated to show the number of records that meet your search criteria. Note the Status facets, which are commonly used to report on project status, are located down the page instead of at the top. Also, users are allowed to select multiple values for Status, when most likely they will be reporting only one project status at a time. Let’s improve this user experience a bit.

1. From the runtime application, go to the search page by clicking Project Tasks Search. Given you ran this app from the App Builder, a special Developer Toolbar is displayed at the bottom of the screen. Note: end users who log directly into the app will not see this toolbar.

In Developer Toolbar, click Edit Page 3.

Oracle Database Tutorial and Material, Oracle Database Certification, Oracle Database Exam Prep, DB Tutorial and Material

Alternatively, you can also navigate back to App Builder in your browser manually by selecting the appropriate browser tab or window. Once you are in App Builder, click the page 3 - Project Tasks Search.

Oracle Database Tutorial and Material, Oracle Database Certification, Oracle Database Exam Prep, DB Tutorial and Material

You should now be in APEX Page Designer. This is where you will spend the majority of your time improving the application. There are three panes within Page Designer. The left pane displays a hierarchical list of page components called the Rendering Tree. The middle pane displays page Layout (a high-level representation of the rendered page) and Gallery (from which you can drag and drop app components into the Layout). The right pane is the Property Editor, where you can change attributes for a selected component.

2. Status is a very common search criteria, so you want to reorder facets so that Status is higher up in the page between Project and Assigned To.

In the Rendering Tree (left pane), under Search, within Facets, click and hold P3_STATUS. Drag it up until it is immediately under P3_PROJECT, then release the mouse.

Oracle Database Tutorial and Material, Oracle Database Certification, Oracle Database Exam Prep, DB Tutorial and Material

3. Currently the Status facet is a series of checkboxes. However, it is unlikely users will want to select more than one status at a time, so you want to convert this into a radio group.

Continuing with P3_STATUS selected, within the Property Editor (right pane), for Identification > Type, select Radio Group. Scroll down the properties in Property Editor, and for List Entries > Zero Count Entries, select Show Last.

Oracle Database Tutorial and Material, Oracle Database Certification, Oracle Database Exam Prep, DB Tutorial and Material

4. At the top right of the page, click Save and Run Page to save changes made to the facets and review the app.

Oracle Database Tutorial and Material, Oracle Database Certification, Oracle Database Exam Prep, DB Tutorial and Material

5. In the runtime environment, click one of the statuses. See how the counts on other facets are updated based on your selection. Also, notice how you can still select one of the other statuses or click Clear within Status to clear your selection and again show all status counts.

Oracle Database Tutorial and Material, Oracle Database Certification, Oracle Database Exam Prep, DB Tutorial and Material

You have just finished the final part of this tutorial. You implemented a few changes to a live APEX app and then re-ran the app to verify them. Great work!

Wednesday, December 16, 2020

Oracle ATP Ranked Highest in Gartner Critical Capabilities for Cloud DBMS Operational Use Cases

In the 2020 Gartner report, 'Critical Capabilities for Cloud Database Management Systems for Operational Use Cases', Oracle Autonomous Transaction Processing (ATP) service received the highest scores in all four Use Cases. The operational Use Cases analyzed by Gartner are Traditional Transactions, Augmented Transactions, Stream/Event Processing and Operational Intelligence. Click any Use Case image (below) to read the full report.

Oracle Database Tutorial and Material, Oracle Database Learning, Oracle Database Exam Prep, Database Guides

Oracle Database Tutorial and Material, Oracle Database Learning, Oracle Database Exam Prep, Database Guides

Oracle Database Tutorial and Material, Oracle Database Learning, Oracle Database Exam Prep, Database Guides

Oracle Database Tutorial and Material, Oracle Database Learning, Oracle Database Exam Prep, Database Guides

The Gartner analysis "synthesizes product information provided by vendors and information gathered from interactions with Gartner clients over the past 12 months".

Source: oracle.com

Monday, December 14, 2020

Oracle 19c, Autonomous or not Autonomous?

Oracle has adopted a new version numbering scheme. In addition, they have begun offering a new set of Autonomous Database services. With all the changes that have happened, it makes sense to step back and look at the offerings to determine what may be suitable for your Oracle database deployment.

In this article, we’ll demystify the version numbering changes, explore the Autonomous database solutions and differentiate between the two.

ORACLE DATABASE VERSION NUMBERING AND RELEASE CYCLE

Starting in 2018, Oracle has introduced a new version numbering schema that coincides with the year of the database software release. Oracle Database 18c was released in February 2018. In January of 2019, the Oracle 19c database was released.

It would be easy to be concerned that 18c and 19c represent major upgrades. However, this is not the case. 18c and 19c are both 12.2 releases of the Oracle database. Oracle Database 18c is Oracle 12c Release 2 (12.2.0.2). Oracle Database 19c is the long-term support release, with premier support planned through March 2023 and extended support through March 2026. Oracle 19c is essentially Oracle 12c Release 2 (12.2.0.3). Therefore, if you are considering an Oracle 12.2 Database deployment, you should consider an upgrade to the latest 12.2 release, which turns out to be Oracle 19c.

The new version numbering scheme utilizes a 3-tier designation and carries 2 digits for other purposes.

1. The first number in the version string designates the major release

2. The second a release update (RU)

3. The third a release update revision (RUR)

4. The fourth a release increment version

5. The fifth is reserved for future use

Major releases occur annually, corresponding to the year of release. The release update happens quarterly, numbered sequentially. Finally, the release update revision happens on as needed basis. An example version number, 19.3.0, would signify 19c as the major release, 3 as a third RU and 0 indicates the absence of an RUR. Oracle 18.6.0 is the 5th quarterly release and the 6th release overall.

ORACLE DATABASE VERSION UPGRADE MATRIX

The matrix below details the upgrade path from legacy database releases to 19c. For the reader who is interested in upgrading directly to 19c, or plans an intermediate stop prior, this matrix is meant to provide information for planning.

The rows of the chart represent the major / point database release levels and communicate the GA release date. The columns contain release levels, represented as time moves forward.

The black arrow provides the minimum release level required to perform a direct upgrade to the next release level in relation to the initial release on the row. Then, any following green arrow shows the minimum release required to get to its direct upgrade version.

Oracle 19c, Oracle Database Certification, Oracle Database Study Material, Oracle Database Tutorial and Material, DB Exam Prep

For example, a database at major release 11.2 at 11.2.0.2 or higher to upgrade to release 12.1. After upgrading to 12.1, that database would have to be 12.1.0.1 or higher to have the possibility of being directly upgraded to a higher version and release levels. Alternatively, the 11.2.0.2 database could be upgraded to 11.2.0.3 or higher and directly upgraded to any higher version 12.1 up to 19c.

ORACLE AUTONOMOUS DATABASE


Coinciding with the 18c release in 2018, Oracle introduced the Autonomous Database. Autonomous is a self-driving database, self-securing, and self-repairing database.

The Autonomous Database is consumed through 2 database offerings. Introduced first, in March 2018, Autonomous Data Warehouse is a data warehouse implementation that supports business intelligence and analytics use cases. Next, in August 2018, the Autonomous Transaction Processing database was introduced. It is a purpose-built OLTP database implementation that supports mixed workloads, including 3rd-party and custom applications.

At the time of the Autonomous announcement from Oracle, 18c was advertised as the database that would power it. Time flies and now that we are in 2019. The 19c database has been released and provides the foundation for Autonomous Database services. Given that 19c database that powers ATP and ADW, this may raise the question - will my 19c database be Autonomous? And conversely, can I provision a 19c database that is not Autonomous?

AUTONOMOUS DATABASE IS A CHOICE


Autonomous database may be 19c-based, but that doesn’t mean that all 19c databases are Autonomous. 19c is GA in OCI for Autonomous and non-Autonomous databases. To deploy an Autonomous Database, it must be explicitly selected as the deployment option.

This becomes evident when looking at the list of services available within your OCI tenancy. To deploy an Autonomous DB, one must explicitly choose either the Autonomous Data Warehouse or and Autonomous Transaction Processing service. This graphic is from my tenancy - the green rectangle from the hamburger dropdown shows ADW and ATP. 

Oracle 19c, Oracle Database Certification, Oracle Database Study Material, Oracle Database Tutorial and Material, DB Exam Prep

As previously mentioned, 19c is a GA release and can be deployed as non-Autonomous by choosing a DBS service – Bare Metal, VM, or Exadata. These choices are highlighted by the red rectangle.

Choosing the Autonomous Data Warehouse or Autonomous Transaction Processing service will lead to the Autonomous Database service console where an Autonomous Database can be created, and the list of existing ones will appear. The following graphic is displayed from my tenancy and can be used as a comparison reference.

Oracle 19c, Oracle Database Certification, Oracle Database Study Material, Oracle Database Tutorial and Material, DB Exam Prep

As we see, the choice to deploy an Autonomous Database is intentional and must be selected at service creation time.

Saturday, December 12, 2020

New Exadata Cloud Service Resource Model in Oracle Cloud Infrastructure

Oracle Database Tutorial and Material, Oracle Database Exam Prep, Oracle Database Career, DB Exam Guides

Exadata Cloud Service X8M redefines performance, elasticity, and scalability for a cloud database service.

With the announcement comes a new Exadata Cloud Service resource model in Oracle Cloud Infrastructure. The new resource model splits the existing DB System resource into two resources, the Exadata Infrastructure resource and the VM Clusters resource. This simplifies the manageability of the resources in Exadata Cloud Service.

The Exadata Infrastructure resource is the top-level (parent) resource. It’s used to manage the hardware configuration and maintenance schedule at the infrastructure level. The VM Clusters resource is a lower level (child) resource of the Exadata Infrastructure resource. Networking, OCPU count, Oracle Grid Infrastructure, and Oracle Database are all configured and managed within the VM Clusters resource.

Exadata Cloud Service X8M is provisioned with the new resource model. Older generation Exadata X6, X7, and X8 systems that were provisioned with the Exadata Cloud Service DB System resource model can be easily switched to the new resource model with no downtime. Switching to the new resource model does not impact existing databases or client connections. However, if you have created automation that uses the existing DB system API, your applications may need to be updated to use the API associated with the new resource model. Switching to the new Exadata Cloud Service resource model cannot be reversed.

Five steps to switch to the new Exadata resource model

1. Open the navigation menu. Under Oracle Database, click Bare Metal, VM, and Exadata.

2. Choose your Compartment.

3. In the list of DB systems, find the Exadata DB system you want to switch to the new resource model, and click its highlighted name to view the system details.

4. In the Switch to the New Exadata API and User Experience information box, click Switch.

5. In the displayed confirmation page, read the What to expect after switching section. When you are ready to switch to the new resource model and APIs, click Start.

Oracle Database Tutorial and Material, Oracle Database Exam Prep, Oracle Database Career, DB Exam Guides

Support for the Exadata Cloud Service DB System APIs will end on May 15th 2021. We recommend you start planning to migrate your Exadata Cloud Service instances to the new resource model.

Note: This only impacts Exadata Cloud Service systems in Oracle’s Gen 2 Cloud, Oracle Cloud Infrastructure.