Monday, January 31, 2022

2021 Year in Review for Autonomous Database Dedicated

Oracle Autonomous Database Dedicated, Oracle Database Preparation, Oracle Database Career, Oracle Database Skills, Oracle Database Job

First, a very happy new year to all ! I wanted to start my first blog post of the year thanking our customers and partners for adopting the Oracle Autonomous Database and believing in our vision of providing a fully automated, enterprise class database platform service. When we embarked on this journey 6 years ago, little did we know how time would change so quickly and that automation would become the ultimate driver of business success in a short period of time. Every database customer and prospect I have talked with in the past year has been super excited about what we are building and most decided to try out autonomous as an enabler in their digital transformation journey.  So, once again, a big thank you to all our customers! We are fully committed to supporting you on your journey and building the most amazing database platform service ever.

Here's a quick recap of top features we added to the Autonomous Database on Dedicated Infrastructure in our public cloud regions and Cloud@Customer deployments.

Key Management Service ( OCI Vault) support for Cross region Data Guard deployments

We added support for Data Guard deployments across regions to use an external, HSM based key management service in OCI for database encryption keys. This enabled customers to deploy their tier 1 mission critical database deployment with cross-region dataguard standby while retaining database encryption keys in an external key management system. Deployment of Data Guard configuration and TDE key configuration is completely automated through console, API and SDKs.

Integration with local Key Vault for Autonomous on Cloud@Customer deployments

Customers who choose to run autonomous databases in their own data centers like to retain the encryption keys locally within their network. Therefore, cloud@customer deployments of autonomous have built-in integration with Oracle Key Vault out-of-the-box. Customers can on-board their existing key vault and it simply shows up as a cloud resource on their console. Autonomous databases can then source encryption keys from this customer provided key vault. We added support for cross data center deployments to use a clustered OKV deployment for disaster management.

PDB level Access Control Lists (ACLs)

Security is everything in a vendor managed cloud service. Therefore, we added an additional layer of network security by providing ACLs at a PDB level. Customers can now control access to each PDB by IP address / CIDR ranges. 

PCI and FedRAMP certification

Autonomous database on dedicated infrastructure achieved PCI certification in OCI commercial regions and FedRamp High certification in OCI Gov regions.

Fractional OCPU and 32 GB min storage allocation

This was a much-awaited feature for hyper dev/test consolidation at lower costs. Customer can now deploy databases with 0.1 OCPU and a 32 GB Exadata storage unit providing a 10x multiple on the number of databases that can be deployed per Exadata cluster for the same cost.

Operator Access Control

An industry first, Operator Access Control for autonomous database dedicated provides customers with near real-time control and visibility into Oracle operator actions as they work on customer systems. Customers approve/deny access requests, get streams of operator commands directly into their local or cloud SIEM and can terminate operator session with a button click.

Integration with Database Management Service

This OCI native service provides seamless monitoring of Autonomous, non-autonomous, on-premises or cloud databases deployed by customers through a single pane. 

X9M Exadata Systems for Cloud@Customer

With 496 cores, 10 TB of DRAM on a rack you can now run 600+ TB data warehouses on a single (unexpanded) 8-node cluster or densely consolidate your workloads for cost, power, cooling, and space savings.

Support for Goldengate Capture and Replicat

Oracle Goldengate is a widely used data replication tool with many active-active sites worldwide. Autonomous dedicated now fully supports bi-directional replication using Goldengate

Oracle Database Actions

Database Actions is a web-based interface that provides development tools, data tools, administration, and monitoring features for Autonomous Database. Developers can now load data,  write and execute SQL & PL/SQL code, and carry out many functions similar to SQL*Developer through a web UI. So, one more addition to some great tools in Autonomous for developers

We released numerous other features such as support for one-off patching, shared server support for high session count per core, support for utl_http / utl_smtp packages and various other UX improvements. Its been a busy year and our development teams have been going full throttle. A big thank you to them as well, they are one of the most amazing, customer focused teams I've worked with.

Here's how we did in the 2021 Gartner magic quadrant, released December 2021 - among 16 vendors, Oracle  Autonomous Transaction Processing (ATP) ranked highest for all four use cases in Gartner Critical Capabilities for Cloud DBMS for Operational Use Cases. Among 18 vendors, Oracle Autonomous Datawarehouse (ADW) ranked in the top three for all the analytical use cases.

We announced many new regions around the world, as you may have read in various posts. Autonomous is now available in 30 commercial regions worldwide. We have also been expanding on our partnership with Azure and expanded the list of Azure connected regions - so, if you are an Azure customer, you should check out what's now possible with Azure and OCI Autonomous service. 

We also did Database World, our annual customer event,  online this year. How times have changed! There are many informative session recordings from product managers across the database org if you are interested. I did a best practices session on migrating to Autonomous with useful tips on all the 'gotchas' to watch out for when you move workloads to autonomous

We also added many new hands-on-labs for Autonomous dedicated - there are 40+ lab guides with step-by-step instructions on provisioning, security management and developing applications.

For those looking to upskill for career advancement, we made OCI certification free. You can now train to be an Autonomous Database specialist using our LiveLabs free training platform and then pass the certification exam at no cost. The free certification offer is until Feb 28, 2022 so you may need to put a rush order on that one!

Me and my PM colleagues also did an Autonomous Master class session at the All India Oracle User Group late last year and they graciously allowed me to share the session recording even though it's for AIOUG members only. Many thanks AIOUG!

So once again, thank you all. We will continue to work to make the Autonomous services easy to use, move existing workloads and most importantly, help build your next generation applications. 

Source: oracle.com

Wednesday, January 26, 2022

The new CS_SESSION package and DB_NOTIFICATIONS view in the Autonomous Database

Two new objects have been recently introduced in the Oracle Autonomous Database on Shared Exadata Infrastructure.

1. The first one is the CS_SESSION package.

When you open a connection to the Autonomous Database, that session is assigned a consumer group. But consumer groups affect the concurrency and the DOP (degree of parallelism). HIGH service is run in parallel while LOW service runs in serial. So for example, if you have a PL/SQL procedure or function that has to execute statements in the same session with changing consumer groups, the way is to use the new CS_SESSION.SERVICE_NAME procedure.

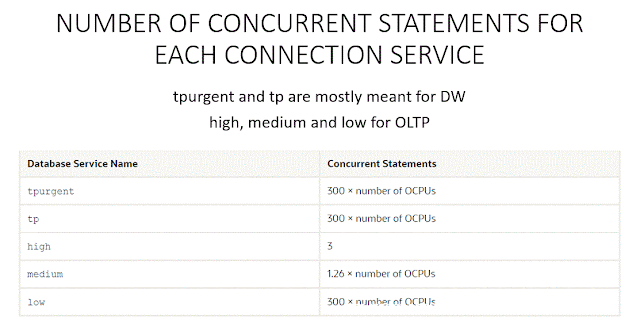
The number of concurrent statements run in the database depends on 2 factors: the type of the service name and the numbers of the Oracle CPUs provisioned for the ADB:

Autonomous Database, Oracle Database, Oracle Database Preparation, Database Career, Database Learning, Database Skill, Database Jobs

The new package CS_SESSION contains only one procedure: SERVICE_NAME. My current version is 19.14, I am not sure if the package/procedure is included in all lower RUs. Most likely it is.

Autonomous Database, Oracle Database, Oracle Database Preparation, Database Career, Database Learning, Database Skill, Database Jobs

The valid values accepted as an IN parameter are: HIGH, MEDIUM, LOW, TP and TPURGENT.

After running the procedure, Oracle does not reset any session attributes. Anything the user set for their session before calling this procedure will continue as-is. 

The ADMIN user is granted EXECUTE privilege on CS_SESSION with GRANT OPTION. The privilege is also granted to DWROLE without the GRANT OPTION.

Here is how to change the consumer group from LOW to TPURGENT:

Autonomous Database, Oracle Database, Oracle Database Preparation, Database Career, Database Learning, Database Skill, Database Jobs

You might get the following error:

ORA-02097: parameter cannot be modified because specified value is invalid ORA-01031: insufficient privileges ORA-06512: at “C##CLOUD$SERVICE.CS_SESSION”, line 142

Note there is an open bug for this.

You can create an AFTER SET CONTAINER trigger if you would like to limit the values a user can set for the consumer group session. You might not want that all users can set to TPURGENT but allow them go with TP only.

2. The second new object is the DB_NOTIFICATIONS view which stores information about maintenance status notifications and timezone version upgrade notifications for the ADB instance. Let us describe the view

Autonomous Database, Oracle Database, Oracle Database Preparation, Database Career, Database Learning, Database Skill, Database Jobs

and check what is in it:

Autonomous Database, Oracle Database, Oracle Database Preparation, Database Career, Database Learning, Database Skill, Database Jobs

As we can see there was a patch run on the data dictionary and there is another maintenance scheduled for the 19th of January.

3. Good to know that we can now use GitHub Raw URLs with DBMS_CLOUD APIs to access source files that reside on a GitHub Repository.

4. Also, the DBMS_PIPE package is now available in the Autonomous Database.

Source: juliandontcheff.wordpress.com

Monday, January 24, 2022

Oracle (Autonomous Transaction Processing) Ranked Highest in Gartner® Critical Capabilities for Cloud DBMS Operational Use Cases

In the 2021 Gartner Report, "Critical Capabilities for Cloud Database Management Systems (DBMS) Operational Use Cases", Oracle (Autonomous Transaction Processing) received the highest scores in all four use cases. This is the fourth year in a row that Oracle Autonomous Database optimized for transaction processing and mixed workloads (ATP) has achieved the highest scores for all four operational use cases. 

The Cloud DBMS operational use cases analyzed by Gartner are, Traditional Transactions, Augmented Transaction Processing, Stream/Event Processing and Operational Intelligence. Gartner’s analysis synthesizes insight gleaned from product information provided by vendors, information gathered from interactions with Gartner clients, and information gathered through various other sources, including Gartner Peer insights and secondary research. Click any Use Case image featured below to read the full report.

Oracle Cloud DBMS, Oracle Database Tutorial and Materials, Oracle Database Certification, Database Career, Database Skills, Database Jobs, Database Guides

Oracle Cloud DBMS, Oracle Database Tutorial and Materials, Oracle Database Certification, Database Career, Database Skills, Database Jobs, Database Guides

Oracle Cloud DBMS, Oracle Database Tutorial and Materials, Oracle Database Certification, Database Career, Database Skills, Database Jobs, Database Guides

Oracle Cloud DBMS, Oracle Database Tutorial and Materials, Oracle Database Certification, Database Career, Database Skills, Database Jobs, Database Guides

Source: "Critical Capabilities for Cloud Database Management Systems for Operational Use Cases" , Merv Adrian, Rick Greenwald, Adam Ronthal, Henry Cook, Philip Russom, 14 December 2021

Gartner Disclaimer


Gartner does not endorse any vendor, product or service depicted in its research publications, and does not advise technology users to select only those vendors with the highest ratings or other designation. Gartner research publications consist of the opinions of Gartner’s research organization and should not be construed as statements of fact. Gartner disclaims all warranties, express or implied, with respect to this research, including any warranties of merchantability or fitness for a particular purpose.

The graphics (above) were published by Gartner, Inc. as part of a larger research document and should be evaluated in the context of the entire document. The Gartner document is available upon request from Oracle.

GARTNER is a registered trademark and service mark of Gartner, Inc. and/or its affiliates in the U.S. and internationally, and is used herein with permission. All rights reserved.

Source: oracle.com

Friday, January 21, 2022

Easy Oracle Database Migration with SQLcl

Database migration is not a fun or easy activity. It is often a significant hurdle in working with databases for developers unfamiliar with the process. It turns into this looming task that hangs over you like a black cloud. It must be done, but you are not looking forward to it.

While there are many tools to help with Oracle Database Migration, can’t we just get it down to a simple command? And can that same mythical tools help move these exports to other magical lands like the cloud?

Does such a tool exist to slay this ever-foreboding specter of simple database migration? 

It’s SQLcl, of course (you probably guessed that from the title of this article), and with the 21.4 release of SQLcl in December of 2021, we added Data Pump functionality to help aid in this quest. 

Easy Does It

Imagine a common migration scenario; you need to move a local database from one server to another for some reason or another. Why not use Data Pump? Even better, why not use Data Pump in SQLcl to connect to any database on the fly and issue 2 simple commands to perform this task?

You simply call Data Pump at the SQLcl prompt with dp.

Connecting to a database uses the conn command and a JDBC connect string:

conn dpdemo@cooldemo:1521/demodatabase.demos.oraclevcn.comconn dpdemo@cooldemo:1521/demodatabase.demos.oraclevcn.com

So, you can see how you can connect into a database, run some commands, and instantly connect to another database to run more commands.

Let’s start with a simple local export. The command is as follows:

SQL> dp export -dumpfile db_dumpfile.dmp

That’s it; this will export the current schema you logged on as. 

And if you wanted to do a simple local import:

SQL> dp import -dumpfile db_dumpfile.dmp

That’s all there is to it. The goal of including Data Pump functionality into SQLcl was to make the commands simply integrate directly into your workflows. Also remember, SQLcl is great to use for running batch programs and this new Data Pump functionality opens up many new doors.

To the Cloud!

Now that the basics are out of the way, let’s set up a scenario. Say you are tasked with moving a database from your local data center into Oracle’s cloud. The final target could be a VM DB, an Autonomous Database, or even an Exadata Cloud Service; you just need to get it migrated over. 

We will jump right into the scenario but included at the end of this article are some setup steps you can use to get your environment ready to perform the same operations.

The Export

Using SQLcl, we are going to start with the /nolog option.

sql /nolog

This will start SQLcl but not log us into a database.

Oracle Database Migration, Oracle Database Preparation, Oracle Database Certification, Oracle Database Skills, Oracle Database Career

Next, connect to a database with a JDBC connection string. JDBC connection strings use the format of:

username@host_name:port/sid_or_service_name_of_the_database

Oracle Database Migration, Oracle Database Preparation, Oracle Database Certification, Oracle Database Skills, Oracle Database Career

In my example:

◉ the username is dpdemo
◉ the hostname of where the database lives is cooldemo
◉ the port is 1521
◉ and the servicename of my database is cooldatabase.publicsubnet.demos.oraclevcn.com

Put it all together and tell SQLcl to connect, and I get:

conn dpdemo@cooldemo:1521/cooldatabase.publicsubnet.demos.oraclevcn.com

Next, it asks for the password for the dpdemo user. Supply that, and you will connect to the database. For folks familiar with connection strings, yes, you can include the password, but it’s not always wise to do so for security/privacy reasons.

Now that we are connected to the database, we can perform the export. But remember, we want to have this export go straight to the OCI Object Store. First, we tell SQLcl what OCI profile to use. Using the DEFAULT profile in our OCI config file, we issue the following command:

with the output being:

Region set to: eu-frankfurt-1
OCI Profile set to DEFAULT
Transfer method set to oci

Next, we tell SQLcl what object store bucket we want to use for the export. The command syntax is as follows:

The bucket I want to use is called datapumpDemo, and my OCI tenancy is cooltenancy, therefore my command would be:

SQL> cs https://swiftobjectstorage.eu-frankfurt-1.oraclecloud.com/v1/cooltenancy/datapumpDemo/

with the output being:

DBMS_CLOUD Credential: Not Set
OCI Profile: DEFAULT
Transfer Method: oci
URI as specified: https://swiftobjectstorage.eu-frankfurt-1.oraclecloud.com/v1/cooltenancy/datapumpDemo/

Oracle Database Migration, Oracle Database Preparation, Oracle Database Certification, Oracle Database Skills, Oracle Database Career

We are now ready to create the Data Pump export and automatically store it on the cloud. The export command is as follows:

SQL> dp export -copycloud -dumpfile dpdemo.dmp

and the output would be:

** Datapump Command Start ** at 2022.01.12-12.55.22
Initiating DATA PUMP
DATABASE TIME ZONE: VERSION:32 CON_ID:0
Log Location: DATA_PUMP_DIR:ESQL_1738.LOG
Starting "DPDEMO"."ESQL_1738":  
Processing object type SCHEMA_EXPORT/TABLE/TABLE_DATA


DataPump Operation Status 'COMPLETED'
Jobname = ESQL_1738
File DATA_PUMP_DIR/dpdemo.dmp copied to https://swiftobjectstorage.eu-frankfurt-1.oraclecloud.com/v1/cooltenancy/datapumpDemo/dpdemo.dmp
** Datapump Command End ** at 2022.01.12-12.57.21

The -copycloud flag tells SQLcl to stream the export file from the database to the client then immediately put the file into object store in the cloud using the bucket we supplied earlier. 

This is the part where your mileage will vary. If you have a very robust connection to OCI and the export is of reasonable size (a few GB), then this process will be quite fast. There are a few variables at play here with networks and please be cognizant of speed and size to that expectations are set correctly.

Over in the OCI Web Console, if I bring up the datapumpDemo bucket’s contents, I can see the export.

Oracle Database Migration, Oracle Database Preparation, Oracle Database Certification, Oracle Database Skills, Oracle Database Career

That was easy. Now let’s import the file into a cloud database.

The Import


We can handle the import in a few ways. For one, we could continue our SQLcl session with all the OCI locations/profiles set and just log into a cloud database, or we could start from a new session and set our OCI variables again. For this example, let’s remember what we set and the commands used, but continue using the same SQLcl session.

As promised, here are the prerequisites we used when we started the initial SQLcl session with the export:

# set the OCI profile
SQL> oci profile DEFAULT

and

# set the OCI Object Store bucket location we want to use
SQL> cs https://swiftobjectstorage.eu-frankfurt-1.oraclecloud.com/v1/cooltenancy/datapumpDemo/

The cloud database we are going to connect to is an Always Free Autonomous Database with mTLS enabled; requiring clients connecting to the database to use a trusted client CA certificate.

To use this certificate in our SQLcl session, specify a wallet location using set cloudconfig:

 SQL> set cloudconfig /Users/bspendol/Keys/Wallet_dpdemo.zip

Oracle Database Migration, Oracle Database Preparation, Oracle Database Certification, Oracle Database Skills, Oracle Database Career

Once we have the cloudconfig set for our Autonomous Database, we can connect using the service name, the admin user, and the high consumer group:

SQL> conn admin@dpdemo_high

Supply the Admin user’s password, and you have connected to the database.

Oracle Database Migration, Oracle Database Preparation, Oracle Database Certification, Oracle Database Skills, Oracle Database Career

Just as when we did the export, we can immediately run the import. Seeing we are in an autonomous database as the admin user, we can run this import, and the schema and objects will be created for us.

To import the Data Pump export from OCI Object Store, use the following command. We are passing the -rt (remap tablespace) flag because this schema was using the USERS tablespace in our original database, but in the Autonomous Database, we are using the DATA tablespace. The remap tablespace option tells the Data Pump import job to do this conversion for us.

SQL> dp import -copycloud -dumpuri dpdemo.dmp -rt USERS=DATA

With the output being:

** Datapump Command Start ** at 2022.01.12-13.36.18
File https://swiftobjectstorage.eu-frankfurt-1.oraclecloud.com/v1/adexacs2/datapumpDemo/dpdemo.dmp copied to DATA_PUMP_DIR/ISQL_454.DMP
Initiating DATA PUMP


Processing object type SCHEMA_EXPORT/TABLE/INDEX/STATISTICS/INDEX_STATISTICS
Processing object type SCHEMA_EXPORT/TABLE/STATISTICS/TABLE_STATISTICS
Processing object type SCHEMA_EXPORT/STATISTICS/MARKER
DataPump Operation Status 'COMPLETED'
Jobname = ISQL_454
** Datapump Command End ** at 2022.01.12-13.40.50

We have just moved a database from a local, on-premises data center into an Oracle Cloud Database in just a couple of simple steps.

But Wait... There's More!


CICD

The easy database migration is one use case, but what else can I do with Data Pump in SQLcl? With the ease of installing SQLcl from just about anywhere, one use case is to include it into your CICD pipelines. Imagine a pipeline that executes when a database developer commits their code or makes a pull request. In the build scripts, download and use SQLcl to import a Data Pump export to bring the database to a level similar to what is in production so that the CICD tests reflect a more realistic environment.

 If I were using OCI DevOps and a build runner, in my build_spec.yml file, I could include something similar to:

- type: Command
   name: "terraform work"
   command: |
      wget https://download.oracle.com/otn_software/java/sqldeveloper/sqlcl-latest.zip
      unzip sqlcl-latest.zip

I can then use SQLcl in a Terraform script to log into the test database, import the Data Pump export, then apply the code the developer just committed:

resource "null_resource" "sqlcl-liquibase" {

   provisioner "local-exec" {    
       command = <<-EOT
                ./sqlcl/bin/sql -cloudconfig wallet.zip admin/${random_string.password.result}@TESTDB_high @lb.sql
       EOT
   }

OCI Database Tools Service

The Database Tools Service in OCI allows you to create connections to any Oracle Cloud database you have access to. It stores all the needed information to connect to this database and keeps the password in an OCI Vault encrypted. If you remember from the above example, when we connected to each of the DBs, we needed to know some information about that database (host, port, servicename, user, and password). The Tools Service can help here by allowing you to pass a pointer to this stored connection and let SQLcl take care of the rest; there are no passwords or connect strings to remember.

This quick tutorial will create a Database Tools Service connection and use it with SQLcl. For this, all you need is a free OCI account and an always-free Autonomous Database. The Database Tools Service is also free.

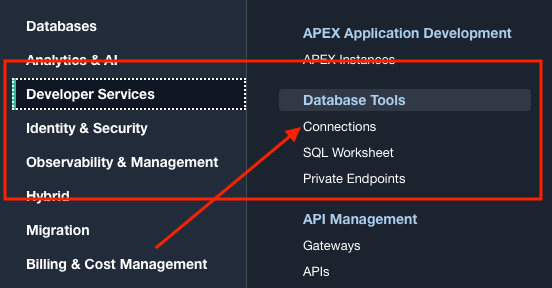
In the OCI web console, Developer Services, find the Database Tools sections and click on Connections. 

Oracle Database Migration, Oracle Database Preparation, Oracle Database Certification, Oracle Database Skills, Oracle Database Career

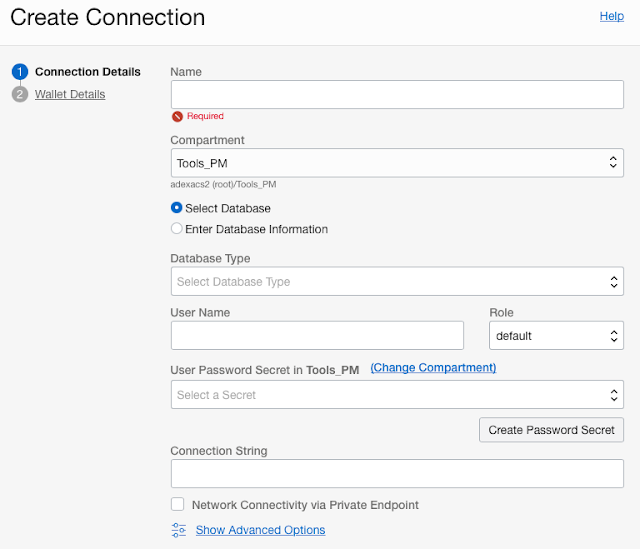
On this page, click the Create Connection button, and using the Create Connection slider, we can start creating the connection.

Oracle Database Migration, Oracle Database Preparation, Oracle Database Certification, Oracle Database Skills, Oracle Database Career

Give the connection a name and find the compartment your always free Autonomous Database is in. Then, once the radio button for Select Database has been selected, use the Database Type dropdown and choose Autonomous Database.

Here is where the magic happens. The service will automatically find all the Autonomous Database you have in this compartment and fill in the Database select list for you. In fact, if you only have a single database, the UI will pre-fill the value for you.

Oracle Database Migration, Oracle Database Preparation, Oracle Database Certification, Oracle Database Skills, Oracle Database Career

For the User Name, we can use the Admin user, and for the User Password, we can create a secret in an OCI vault right here in the UI to store the password encrypted. The Connection String value will be auto-populated for you, so click next on the UI.

The next part of the Create Connection wizard needs the credentials from the Autonomous Database wallet. All you need to do here is click the Create Wallet Content Secret button, have the service get what you need via the Retrieve regional auto login wallet from the Autonomous Database option, and done. Once the secret is created, you can use the Create button and create the connection.

Oracle Database Migration, Oracle Database Preparation, Oracle Database Certification, Oracle Database Skills, Oracle Database Career

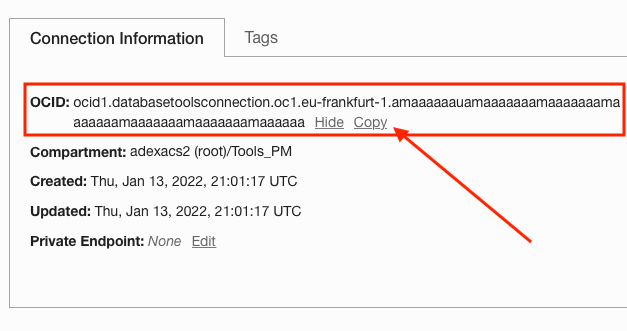
Once the connection is created, you can see the OCID in the Connection Information section of the page on the details page.

Oracle Database Migration, Oracle Database Preparation, Oracle Database Certification, Oracle Database Skills, Oracle Database Career

Use the Copy link to copy the OCID to your clipboard. Next, start SQLcl with the /nolog option.

Set the oci profile:

And now use the OCI to connect to the database with the following syntax:

For my connection, I would issue the following:

SQL> conn ocid1.databasetoolsconnection.oc1.eu-frankfurt-1.amaaaaaauamaaaaaaamaaaaaaamaaaaaaamaaaaaaamaaaaaaamaaaaaa

Oracle Database Migration, Oracle Database Preparation, Oracle Database Certification, Oracle Database Skills, Oracle Database Career

And that’s it; it gets all the information for me and logs me directly into the database.

Oracle Database Migration, Oracle Database Preparation, Oracle Database Certification, Oracle Database Skills, Oracle Database Career

No passwords, no remembering long service names; just supply an OCID and done. Also can be used in those CICD pipelines to ensure no passwords show up in log files or are being passed as variables!

Setup Steps


Get the Goods on the Right Path

The first step is to get SQLcl. Oracle makes this super easy by providing a URL that downloads the latest version with no strings attached. Just go to:


Once SQLcl is downloaded, you can install it by unzipping it and running the SQL command in the bin directory. It does require Java (JRE 11) to be installed locally. You can add this to your path on your Mac by adding the following to the .zshrc file (for Linux, it’s the .bashrc file) in the home directory:

export PATH=/Users/USERNAME/sqlcl/bin:$PATH

USERNAME is the username you use to log into your Mac.

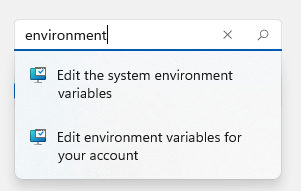
And on windows, you can search the system for environment and select “Edit environment variables for your account”. 

Oracle Database Migration, Oracle Database Preparation, Oracle Database Certification, Oracle Database Skills, Oracle Database Career

Here, just edit the Path

Oracle Database Migration, Oracle Database Preparation, Oracle Database Certification, Oracle Database Skills, Oracle Database Career

And add the location of the sqlcl/bin directory

Oracle Database Migration, Oracle Database Preparation, Oracle Database Certification, Oracle Database Skills, Oracle Database Career

You should now be able to access SQLcl by just typing sql in the macOS Terminal or Windows command prompt/Powershell.

Now, if you are using Linux, SQLcl is available via YUM. Just yum install sqlcl and done! In OCI, the yum repo is set up for this but is available via Oracle’s public YUM repositories if you are in another cloud or on a local instance.

Picture Perfect Profile

This example will use the OCI Object Store to stage the local Data Pump export, so we need to set our OCI profile if not already done. The simplest way to do this is to use the Users page in the OCI Web Console.

Oracle Database Migration, Oracle Database Preparation, Oracle Database Certification, Oracle Database Skills, Oracle Database Career

Select your username, and on the details page, on the left-hand side, select API Keys.

Oracle Database Migration, Oracle Database Preparation, Oracle Database Certification, Oracle Database Skills, Oracle Database Career

Click the Add API Key button and have the OCI Web Console generate you a pair of keys.

Oracle Database Migration, Oracle Database Preparation, Oracle Database Certification, Oracle Database Skills, Oracle Database Career

Download the key and then click Add.

After the key is added, a Configuration File Preview modal will appear. Here is the configuration information you will need for your OCI profile file.

Oracle Database Migration, Oracle Database Preparation, Oracle Database Certification, Oracle Database Skills, Oracle Database Career

Use the copy link to copy the contents of this file and paste them into a file named config in a .oci directory that’s in your home directory.

For example, I would put the .oci directory on my Mac in /Users/bspendol/. Then create the confile file and paste the contents of the Configuration File Preview modal. When the contents are pasted into this config file, update the key_file= to be the location of the key you downloaded in the previous step. You can always put the key in the .oci directory.

Again, in my example, the key_file would be /Users/bspendol/.oci/key.pem. Once this is done, save the file. On a Linux or Mac, you would also have to change the permissions of the key file to 600 (chmod 600 key.pem).

Source: oracle.com
Wednesday, January 19, 2022

DBMS_CLOUD : Installation on 19c and 21c On-Prem Databases

DBMS_CLOUD, 19c, 21c Databases, Oracle Database Exam Prep, Oracle Database Skills, Oracle Database Certification

This article describes how to install the DBMS_CLOUD package in on-prem 19c and 21c databases. This package is already installed in databases on the Oracle Cloud.

◉ Install DBMS_CLOUD

Create a directory to hold the installation files and an SSL wallet.

mkdir -p /home/oracle/dbc/commonstore/wallets/ssl

Create a file called "/home/oracle/dbc/dbms_cloud_install.sql" with the following contents.

@$ORACLE_HOME/rdbms/admin/sqlsessstart.sql

set verify off

-- you must not change the owner of the functionality to avoid future issues

define username='C##CLOUD$SERVICE'

create user &username no authentication account lock;

REM Grant Common User Privileges

grant INHERIT PRIVILEGES on user &username to sys;

grant INHERIT PRIVILEGES on user sys to &username;

grant RESOURCE, UNLIMITED TABLESPACE, SELECT_CATALOG_ROLE to &username;

grant CREATE ANY TABLE, DROP ANY TABLE, INSERT ANY TABLE, SELECT ANY TABLE,

CREATE ANY CREDENTIAL, CREATE PUBLIC SYNONYM, CREATE PROCEDURE, ALTER SESSION, CREATE JOB to &username;

grant CREATE SESSION, SET CONTAINER to &username;

grant SELECT on SYS.V_$MYSTAT to &username;

grant SELECT on SYS.SERVICE$ to &username;

grant SELECT on SYS.V_$ENCRYPTION_WALLET to &username;

grant read, write on directory DATA_PUMP_DIR to &username;

grant EXECUTE on SYS.DBMS_PRIV_CAPTURE to &username;

grant EXECUTE on SYS.DBMS_PDB_LIB to &username;

grant EXECUTE on SYS.DBMS_CRYPTO to &username;

grant EXECUTE on SYS.DBMS_SYS_ERROR to &username;

grant EXECUTE ON SYS.DBMS_ISCHED to &username;

grant EXECUTE ON SYS.DBMS_PDB_LIB to &username;

grant EXECUTE on SYS.DBMS_PDB to &username;

grant EXECUTE on SYS.DBMS_SERVICE to &username;

grant EXECUTE on SYS.DBMS_PDB to &username;

grant EXECUTE on SYS.CONFIGURE_DV to &username;

grant EXECUTE on SYS.DBMS_SYS_ERROR to &username;

grant EXECUTE on SYS.DBMS_CREDENTIAL to &username;

grant EXECUTE on SYS.DBMS_RANDOM to &username;

grant EXECUTE on SYS.DBMS_SYS_SQL to &username;

grant EXECUTE on SYS.DBMS_LOCK to &username;

grant EXECUTE on SYS.DBMS_AQADM to &username;

grant EXECUTE on SYS.DBMS_AQ to &username;

grant EXECUTE on SYS.DBMS_SYSTEM to &username;

grant EXECUTE on SYS.SCHED$_LOG_ON_ERRORS_CLASS to &username;

grant SELECT on SYS.DBA_DATA_FILES to &username;

grant SELECT on SYS.DBA_EXTENTS to &username;

grant SELECT on SYS.DBA_CREDENTIALS to &username;

grant SELECT on SYS.AUDIT_UNIFIED_ENABLED_POLICIES to &username;

grant SELECT on SYS.DBA_ROLES to &username;

grant SELECT on SYS.V_$ENCRYPTION_KEYS to &username;

grant SELECT on SYS.DBA_DIRECTORIES to &username;

grant SELECT on SYS.DBA_USERS to &username;

grant SELECT on SYS.DBA_OBJECTS to &username;

grant SELECT on SYS.V_$PDBS to &username;

grant SELECT on SYS.V_$SESSION to &username;

grant SELECT on SYS.GV_$SESSION to &username;

grant SELECT on SYS.DBA_REGISTRY to &username;

grant SELECT on SYS.DBA_DV_STATUS to &username;

alter session set current_schema=&username;

REM Create the Catalog objects

@$ORACLE_HOME/rdbms/admin/dbms_cloud_task_catalog.sql

@$ORACLE_HOME/rdbms/admin/dbms_cloud_task_views.sql

@$ORACLE_HOME/rdbms/admin/dbms_cloud_catalog.sql

@$ORACLE_HOME/rdbms/admin/dbms_cloud_types.sql

REM Create the Package Spec

@$ORACLE_HOME/rdbms/admin/prvt_cloud_core.plb

@$ORACLE_HOME/rdbms/admin/prvt_cloud_task.plb

@$ORACLE_HOME/rdbms/admin/dbms_cloud_capability.sql

@$ORACLE_HOME/rdbms/admin/prvt_cloud_request.plb

@$ORACLE_HOME/rdbms/admin/prvt_cloud_internal.plb

@$ORACLE_HOME/rdbms/admin/dbms_cloud.sql

@$ORACLE_HOME/rdbms/admin/prvt_cloud_admin_int.plb

REM Create the Package Body

@$ORACLE_HOME/rdbms/admin/prvt_cloud_core_body.plb

@$ORACLE_HOME/rdbms/admin/prvt_cloud_task_body.plb

@$ORACLE_HOME/rdbms/admin/prvt_cloud_capability_body.plb

@$ORACLE_HOME/rdbms/admin/prvt_cloud_request_body.plb

@$ORACLE_HOME/rdbms/admin/prvt_cloud_internal_body.plb

@$ORACLE_HOME/rdbms/admin/prvt_cloud_body.plb

@$ORACLE_HOME/rdbms/admin/prvt_cloud_admin_int_body.plb

-- Create the metadata

@$ORACLE_HOME/rdbms/admin/dbms_cloud_metadata.sql

alter session set current_schema=sys;

@$ORACLE_HOME/rdbms/admin/sqlsessend.sql

Run the script in all containers including this seed. This will make new containers already include the DBMS_CLOUD package installation.

$ORACLE_HOME/perl/bin/perl $ORACLE_HOME/rdbms/admin/catcon.pl \

  -u sys/SysPassword1 \

  --force_pdb_mode 'READ WRITE' \

  -b dbms_cloud_install \

  -d /home/oracle/dbc \

  -l /home/oracle/dbc \

  dbms_cloud_install.sql

Check the log files once the command is complete, to make sure it has run in all containers.

◉ Create a Wallet

Create a wallet to allow HTTPS access to the cloud URIs.

Download the dbc_certs.tar file from the link provided in the MOS note. These instructions assume it is placed on the "/tmp" directory.

mkdir -p /home/oracle/dbc/commonstore/wallets/ssl

cd /home/oracle/dbc/commonstore/wallets/ssl

tar -xvf /tmp/dbc_certs.tar

Create a wallet and load the certificates. We are using the wallet password "MyPassword1", but you should change it to something more secure for your installation.

orapki wallet create -wallet . -pwd MyPassword1 -auto_login

orapki wallet add -wallet . -trusted_cert -cert ./VeriSign.cer -pwd MyPassword1

orapki wallet add -wallet . -trusted_cert -cert ./BaltimoreCyberTrust.cer -pwd MyPassword1

orapki wallet add -wallet . -trusted_cert -cert ./DigiCert.cer -pwd MyPassword1

Edit the "sqlnet.ora" file, adding in the following entry to identify the wallet. For read-only Oracle homes, this will be in the "/u01/app/oracle/homes/OraDB21Home1/network/admin/sqlnet.ora" file. For regular Oracle homes it will be in the "$ORACLE_HOME/network/admin/sqlnet.ora" location.

WALLET_LOCATION=

  (SOURCE=(METHOD=FILE)(METHOD_DATA=

  (DIRECTORY=/home/oracle/dbc/commonstore/wallets/ssl)))

◉ Create Access Control Entries (ACEs)

We need to create an Access Control Entry (ACE) so the C##CLOUD$SERVICE can access the cloud services.

Create a file called "/home/oracle/dbc/dbc_aces.sql" with the following contents. Edit the sslwalletdir setting if you have altered the location.

@$ORACLE_HOME/rdbms/admin/sqlsessstart.sql

-- you must not change the owner of the functionality to avoid future issues

define clouduser=C##CLOUD$SERVICE

-- CUSTOMER SPECIFIC SETUP, NEEDS TO BE PROVIDED BY THE CUSTOMER

-- - SSL Wallet directory

define sslwalletdir=/home/oracle/dbc/commonstore/wallets/ssl

--

-- UNCOMMENT AND SET THE PROXY SETTINGS VARIABLES IF YOUR ENVIRONMENT NEEDS PROXYS

--

-- define proxy_uri=<your proxy URI address>

-- define proxy_host=<your proxy DNS name>

-- define proxy_low_port=<your_proxy_low_port>

-- define proxy_high_port=<your_proxy_high_port>

-- Create New ACL / ACE s

begin

-- Allow all hosts for HTTP/HTTP_PROXY

dbms_network_acl_admin.append_host_ace(

host =>'*',

lower_port => 443,

upper_port => 443,

ace => xs$ace_type(

privilege_list => xs$name_list('http', 'http_proxy'),

principal_name => upper('&clouduser'),

principal_type => xs_acl.ptype_db));

--

-- UNCOMMENT THE PROXY SETTINGS SECTION IF YOUR ENVIRONMENT NEEDS PROXYS

--

-- Allow Proxy for HTTP/HTTP_PROXY

-- dbms_network_acl_admin.append_host_ace(

-- host =>'&proxy_host',

-- lower_port => &proxy_low_port,

-- upper_port => &proxy_high_port,

-- ace => xs$ace_type(

-- privilege_list => xs$name_list('http', 'http_proxy'),

-- principal_name => upper('&clouduser'),

-- principal_type => xs_acl.ptype_db));

--

-- END PROXY SECTION

--

-- Allow wallet access

dbms_network_acl_admin.append_wallet_ace(

wallet_path => 'file:&sslwalletdir',

ace => xs$ace_type(privilege_list =>

xs$name_list('use_client_certificates', 'use_passwords'),

principal_name => upper('&clouduser'),

principal_type => xs_acl.ptype_db));

end;

/

-- Setting SSL_WALLET database property

begin

-- comment out the IF block when installed in non-CDB environments

if sys_context('userenv', 'con_name') = 'CDB$ROOT' then

execute immediate 'alter database property set ssl_wallet=''&sslwalletdir''';

--

-- UNCOMMENT THE FOLLOWING COMMAND IF YOU ARE USING A PROXY

--

-- execute immediate 'alter database property set http_proxy=''&proxy_uri''';

end if;

end;

/

@$ORACLE_HOME/rdbms/admin/sqlsessend.sql

Run script in the root container.

conn / as sysdba

@@/home/oracle/dbc/dbc_aces.sql

◉ Verify the Installation

Create a file called "/home/oracle/dbc/verify.sql" with the following contents. Edit the wallet path and password as required.

-- you must not change the owner of the functionality to avoid future issues

define clouduser=C##CLOUD$SERVICE

-- CUSTOMER SPECIFIC SETUP, NEEDS TO BE PROVIDED BY THE CUSTOMER

-- - SSL Wallet directory and password

define sslwalletdir=/home/oracle/dbc/commonstore/wallets/ssl

define sslwalletpwd=MyPassword1

-- create and run this procedure as owner of the ACLs, which is the future owner

-- of DBMS_CLOUD

CREATE OR REPLACE PROCEDURE &clouduser..GET_PAGE(url IN VARCHAR2) AS

request_context UTL_HTTP.REQUEST_CONTEXT_KEY;

req UTL_HTTP.REQ;

resp UTL_HTTP.RESP;

data VARCHAR2(32767) default null;

err_num NUMBER default 0;

err_msg VARCHAR2(4000) default null;

BEGIN

-- Create a request context with its wallet and cookie table

request_context := UTL_HTTP.CREATE_REQUEST_CONTEXT(

wallet_path => 'file:&sslwalletdir',

wallet_password => '&sslwalletpwd');

-- Make a HTTP request using the private wallet and cookie

-- table in the request context

req := UTL_HTTP.BEGIN_REQUEST(

url => url,

request_context => request_context);

resp := UTL_HTTP.GET_RESPONSE(req);

DBMS_OUTPUT.PUT_LINE('valid response');

EXCEPTION

WHEN OTHERS THEN

err_num := SQLCODE;

err_msg := SUBSTR(SQLERRM, 1, 3800);

DBMS_OUTPUT.PUT_LINE('possibly raised PLSQL/SQL error: ' ||err_num||' - '||err_msg);

UTL_HTTP.END_RESPONSE(resp);

data := UTL_HTTP.GET_DETAILED_SQLERRM ;

IF data IS NOT NULL THEN

DBMS_OUTPUT.PUT_LINE('possibly raised HTML error: ' ||data);

END IF;

END;

/

set serveroutput on

BEGIN

&clouduser..GET_PAGE('https://objectstorage.eu-frankfurt-1.oraclecloud.com');

END;

/

set serveroutput off

drop procedure &clouduser..GET_PAGE;

Run the script. The script should produce the phrase "valid response".

conn / as sysdba

@/home/oracle/dbc/verify.sql

◉ List the Contents of a Bucket

This section of the article assumes you have an object storage bucket on Oracle Cloud and you've defined an Auth Token to access it.

Create a test user.

conn sys/SysPassword1@//localhost:1521/pdb1 as sysdba

--drop user testuser1 cascade;

create user testuser1 identified by testuser1 quota unlimited on users;

grant connect, resource to testuser1;

Make sure the test user can create credentials and has access to the DBMS_CLOUD package.

grant create credential to testuser1;

grant execute on dbms_cloud to testuser1;

Connect to the test user and create a credential.

conn testuser1/testuser1@//localhost:1521/pdb1

begin

  dbms_credential.drop_credential(

    credential_name => 'obj_store_cred');

end;

/

begin

  dbms_credential.create_credential(

    credential_name => 'obj_store_cred',

    username        => 'me@example.com',

    password        => 'my-auth-token');

end;

/

We can now use the LIST_OBJECTS table function to get a list of objects in the bucket.

select object_name

from   dbms_cloud.list_objects(

         'obj_store_cred',

         'https://objectstorage.uk-london-1.oraclecloud.com/n/{my-namespace}/b/ob-bucket/o/');

OBJECT_NAME

--------------------------------------------------------------------------------

Image 930.png

SQL>

Source: oracle-base.com

Monday, January 17, 2022

How to Create Non-CDB Database in ExaCS

Introduction:

In Oracle Exadata Cloud Service (ExaCS), using dbaascli, you can create an Oracle Non-CDB database. You will first create an Oracle Database home with an available version and then create a database in that Oracle Database home. Here, we will see steps with example to create 19c Non-CDB Database with Apr 2021 Bundle Patch.

Steps:

Perform these steps on ExaCS VM Node1.

1. List available images

To get a list of available supported versions for creating Oracle Database, use the below command.

# dbaascli cswlib showImages

Above command result will show all versions images(CDB and Non-CDB) list.

In this example, we are creating 19c Apr 2021 Non-CDB version.

So look for detail with “Version-NC” tag as below from the above result.
CDB Database, Oracle Database Exam Prep, Database Preparation, Oracle Database Career, Database Skills, Database Jobs, Database Certification, Database Learning

2. Download the image.

Download the above Non-CDB image locally using below command, so that we can create DB home from that. Image tag can be found as above. 

# dbaascli cswlib download --imageTag 19.11.0.0.0-NC

CDB Database, Oracle Database Exam Prep, Database Preparation, Oracle Database Career, Database Skills, Database Jobs, Database Certification, Database Learning

3. Create DB Home.

To create an Oracle Database home of that version, use the dbaascli dbhome create command.

You can create an Oracle Database home with a specified Oracle home name. If you do not specify, then this is computed automatically (recommended).

# dbaascli dbhome create --version 19000 --imageTag 19.11.0.0.0-NC

Type 'yes' when it prompts for confirmation to 'Restoring from local acfs image'.

CDB Database, Oracle Database Exam Prep, Database Preparation, Oracle Database Career, Database Skills, Database Jobs, Database Certification, Database Learning

At the end of DB home create execution, we have new DB home name and Path detail as below.

CDB Database, Oracle Database Exam Prep, Database Preparation, Oracle Database Career, Database Skills, Database Jobs, Database Certification, Database Learning

4. Create database. 

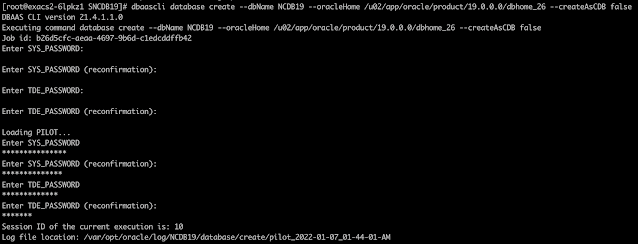
Create a Non-CDB Database under the DB home (created in step 3). Provide passwords for user sys and TDE when it prompts.

# dbaascli database create --dbName NCDB19 --oracleHome /u02/app/oracle/product/19.0.0.0/dbhome_26 --createAsCDB false

CDB Database, Oracle Database Exam Prep, Database Preparation, Oracle Database Career, Database Skills, Database Jobs, Database Certification, Database Learning

5. Verify the database. 

You can verify database status and type as Non-CDB by querying the v$database table.

CDB Database, Oracle Database Exam Prep, Database Preparation, Oracle Database Career, Database Skills, Database Jobs, Database Certification, Database Learning

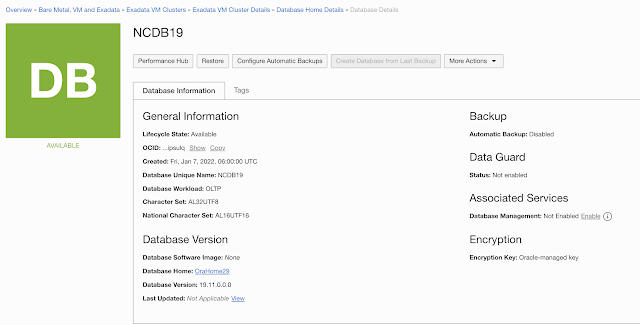
6. Viewing Non-CDB Database and Home in OCI Console.

The Non-CDB Home and database will be available in the OCI Console in minutes.

After DB is shown in OCI Console as below, we can perform all lifecycle operations such as patching, backups, etc.

CDB Database, Oracle Database Exam Prep, Database Preparation, Oracle Database Career, Database Skills, Database Jobs, Database Certification, Database Learning

CDB Database, Oracle Database Exam Prep, Database Preparation, Oracle Database Career, Database Skills, Database Jobs, Database Certification, Database Learning

We can see latest applicable patches Jul 2021 and Oct 2021 is available for the new Home as below which can be used to patch the Database. 

CDB Database, Oracle Database Exam Prep, Database Preparation, Oracle Database Career, Database Skills, Database Jobs, Database Certification, Database Learning

Source: oracle.com