Introduction:
Oracle Enterprise Manager Cloud Control provides a complete cloud lifecycle management solution for Oracle Database Exadata Cloud Service (ExaCS) and Oracle Database Exadata Cloud at Customer (ExaCC). In this Blog, we will see step by step to add ExaCS Storage servers into OEM Monitoring. Same steps are applicable for ExaCC.
Prerequisites:
1. Agent is already deployed in ExaCS nodes.
2. Exadata Plugin is available in OMS and Agents.
3. ExaCS VM Nodes, DB, ASM targets are added into Monitoring.
Steps:
To associate the storage servers of the grid infrastructure with the cloud target, we need to create an EM named credential for storing the ExaCLI username and password used for connecting to the Exadata Storage Server. Follow step1 and 2 to get username and password.
1) Get ExaCLI Username:
Username is in the format cloud_user_<clustername>
Obtain clustername from the ExaCS VM.
As grid user run "crsctl get cluster name". The output is shown as below.
[grid@exaash-XXXXXX ~]$ crsctl get cluster name
CRS-6724: Current cluster name is 'cl-27XXXXca-16b'
The ExaCLI user name is cloud_user_cl-27XXXXca-16b
2) Get ExaCLI Password:
As root user run this script "/opt/exacloud/get_cs_data.py" in ExaCS first node.
#cd /opt/exacloud/
#./get_cs_data.py
The output is shown below.
ExaCli initial password is:
XXXXXXXXXXXX
3) Create ExaCLI Named credential in OEM
1. Click the setup icon > click Security > select Named Credentials. The Named Credentials page is displayed.
2. Click Create. The Create Credential page opens.
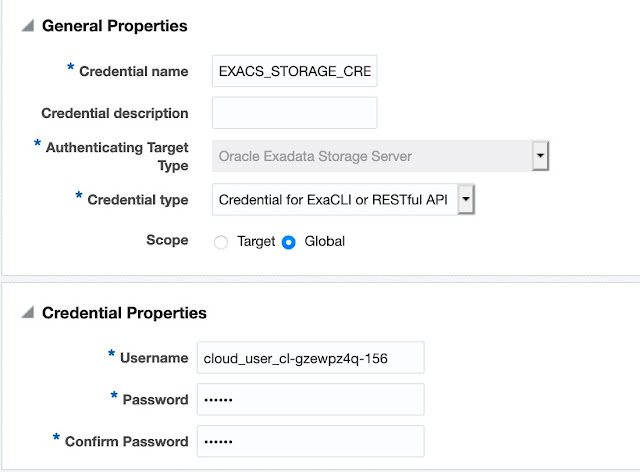
3. Provide the following information: (screen shot below).
- Credential Name: Provide a suitable name to the credential. For example, EXADATA_CRED.
- Credential Description: Describe the purpose of the credential and the intended use.
- Authenticating Target Type: Specify the target type for which this credential set will be used for authentication. Select Oracle Exadata Storage Server from the menu.
- Credential Type: Specify the type of the credential that you're creating. Select Credential for ExaCLI or RESTful API from the menu.
- Scope: Select the visibility of the credential in Enterprise Manager. Select Global.
- Username and Password: Provide the user name and password to access the storage cells which we generated in Step1 and 2.
- Click Save.
You can now view the new credential created in the Named Credentials page.
- configMap.targetName: Name of the target that you want to create
- configMap.region: The cloud region where the target is created
- configMap.tenancy: The tenancy where the cloud target is created
- configMap.serviceType: Specify ExaCC if the service type is Oracle Database Exadata Cloud at Customer, or ExaCS if the service type is Oracle Database Exadata Cloud Service
- configMap.monitorAgentUrl.0: The URL of the agent which will be used to monitor the new target. You can obtain this from the agent home page or run the following command to get the agent URL:
- emcli status agent
- credMap.cellCredSet: The credential set that we created earlier, which is used to discover the storage servers in the new cloud target. In the above example, SYSMAN is the owner of the credential and EXADATA_CRED is the name of the credential.
- To obtain the credential set information, click the setup icon > click Security > select Named Credentials. The Named Credentials page is displayed. Collect the required information about the credential set in this page. See Step 3.
- host.name.x: The host names on which the databases that must be associated with the new cloud target, are run. Specify all the host names for the discovery to complete successfully. Here, x is the host name number which should start with 0, and must be incremented by 1 for every additonal host name added to the file.


0 comments:
Post a Comment