This article shows how to create a database virtual machine under Oracle Cloud Infrastructure (OCI).
The screens change a little with each quarterly release of Oracle Cloud. Even so, the screen shots in this article will give you a good idea of what is involved.
This article assumes you've already defined a Virtual Cloud Network (VCN) in the same compartment as the database VM you are about to create.
This article describes the creation of a database VM on Oracle Cloud Infrastructure, similar to the Database Cloud Service on the "Classic" Oracle Public Cloud. This is not one of the autonomous database services. If that's what you want, links are provided above.
Before you start, you are going to need a key pair for authentication to your service.
$ ssh-keygen -b 2048 -t rsa -f myOracleCloudKey
$ chmod 600 myOracleCloudKey*
Enter and confirm the passphrase when prompted. You will be asked to upload the public key during the service creation.
If you have any problems, or need instructions for using PuTTYgen on Windows
Log into the Oracle Cloud.
Connect to the "opc" operating system user by specifying your private key and the public IP address from your DB Systems page.
$ ssh -i ./myOracleCloudKey opc@123.123.123.123
[opc@obtest1 ~]$
Once connected, you can switch to the "oracle" OS user and do all the usual stuff.
[opc@obtest1 ~]$ sudo su - oracle
[oracle@obtest1 ~]$ . oraenv
ORACLE_SID = [cdb1] ?
The Oracle base has been set to /u01/app/oracle
[oracle@obtest1 ords]$ sqlplus / as sysdba
SQL*Plus: Release 19.0.0.0.0 - Production on Fri Dec 6 12:18:51 2019
Version 19.4.0.0.0
Copyright (c) 1982, 2019, Oracle. All rights reserved.
Connected to:
Oracle Database 19c EE High Perf Release 19.0.0.0.0 - Production
Version 19.4.0.0.0
SQL> ALTER SESSION SET CONTAINER = pdb1;
Session altered.
SQL> CREATE USER test IDENTIFIED BY TesT123456##;
User created.
SQL> GRANT CREATE SESSION TO test;
Grant succeeded.
SQL>
If you need to perform any tasks as root, you must connect to the "opc" user and run them using "sudo".
$ ssh -i ./myOracleCloudKey opc@123.123.123.123
-bash-4.1$ sudo vi /etc/hosts
The screens change a little with each quarterly release of Oracle Cloud. Even so, the screen shots in this article will give you a good idea of what is involved.
◉ Assumptions
This article assumes you've already defined a Virtual Cloud Network (VCN) in the same compartment as the database VM you are about to create.
This article describes the creation of a database VM on Oracle Cloud Infrastructure, similar to the Database Cloud Service on the "Classic" Oracle Public Cloud. This is not one of the autonomous database services. If that's what you want, links are provided above.
◉ Create SSH Key
Before you start, you are going to need a key pair for authentication to your service.
$ ssh-keygen -b 2048 -t rsa -f myOracleCloudKey
$ chmod 600 myOracleCloudKey*
Enter and confirm the passphrase when prompted. You will be asked to upload the public key during the service creation.
If you have any problems, or need instructions for using PuTTYgen on Windows
◉ Create a Database VM (DBaaS)
Log into the Oracle Cloud.
Use the top-left menu to select the "Bare Metal, VM and Exadata" option.
Select the compartment and click on the "Create DB System" button.
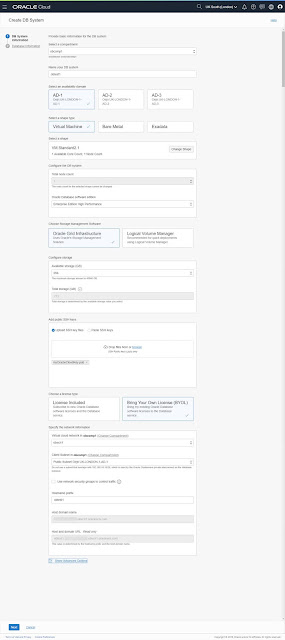
Enter the details about the system you want to provision, including the system and networking details. You will need to upload your public key for operating system access, and remember to select the Virtual Cloud Network and associated subnet you created previously. All other settings should be self explanatory. When you are ready, click the "Next" button.
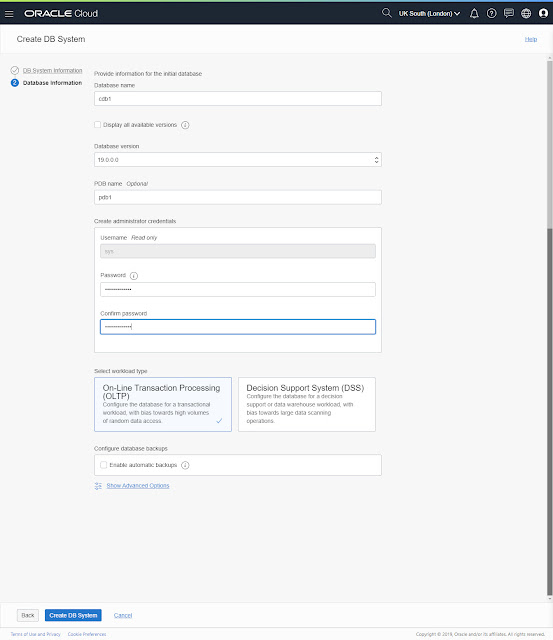
On the second page, enter the details about the database instance and click the "Create DB System" button.
Wait for the service to be provisioned.
Once the service is provisioned, the status will turn to available. Clicking on the "Nodes" link will display the public IP address of the server.
◉ Connecting to the VM using SSH
Connect to the "opc" operating system user by specifying your private key and the public IP address from your DB Systems page.
$ ssh -i ./myOracleCloudKey opc@123.123.123.123
[opc@obtest1 ~]$
Once connected, you can switch to the "oracle" OS user and do all the usual stuff.
[opc@obtest1 ~]$ sudo su - oracle
[oracle@obtest1 ~]$ . oraenv
ORACLE_SID = [cdb1] ?
The Oracle base has been set to /u01/app/oracle
[oracle@obtest1 ords]$ sqlplus / as sysdba
SQL*Plus: Release 19.0.0.0.0 - Production on Fri Dec 6 12:18:51 2019
Version 19.4.0.0.0
Copyright (c) 1982, 2019, Oracle. All rights reserved.
Connected to:
Oracle Database 19c EE High Perf Release 19.0.0.0.0 - Production
Version 19.4.0.0.0
SQL> ALTER SESSION SET CONTAINER = pdb1;
Session altered.
SQL> CREATE USER test IDENTIFIED BY TesT123456##;
User created.
SQL> GRANT CREATE SESSION TO test;
Grant succeeded.
SQL>
If you need to perform any tasks as root, you must connect to the "opc" user and run them using "sudo".
$ ssh -i ./myOracleCloudKey opc@123.123.123.123
-bash-4.1$ sudo vi /etc/hosts


0 comments:
Post a Comment