Monday, January 11, 2021

Create a Database in Oracle 19c on Windows

You can create an Oracle 19c database during the installation of Oracle software or after installation with the Oracle Database Configuration Assistant (DBCA) tool. This guide describes the simple steps to create a database in Oracle 19c with DBCA.

Before you begin, ensure that the minimum requirements are met. If you have not yet installed the Oracle software, I recommend you follow this tutorial on installing Oracle 19c on Windows.

Create a database in Oracle 19c on Windows step by step

1. Launch DBCA

The Oracle DBCA tool is available after installing the Oracle 19c software. To launch it, you must log into Windows as an administrator and use one of the methods below:

◉ open it from the Windows Start menu;

◉ run the dbca command from the Windows command prompt;

◉ execute the following combination: “Windows + R”, then type dbca.

2. Select “Create a database” and click “Next”

Database Oracle 19c, Oracle Database Exam Prep, Oracle Database Prep, Oracle Database Certification, Oracle Database Career

3. Select database configuration mode

DBCA enables you to create a database with typical configuration or with advanced configuration:

◉ in “Typical configuration” mode, you can set up your database quickly using Oracle prebuilt templates.

◉ in “Advanced configuration” mode, you can customize storage locations, management options, database options, configuration option, user credentials, etc. It allows you to have full control of your database configuration.

In the following, we use the Advanced configuration mode.

Database Oracle 19c, Oracle Database Exam Prep, Oracle Database Prep, Oracle Database Certification, Oracle Database Career

4. Select database deployment type

This step enables you to select the type of database and template to use to create the database. You can select:

◉ Oracle Single Instance Database
◉ RAC database
◉ RAC node database

for the database type and

◉ Data Warehouse
◉ General Purpose or Transaction Processing
◉ Custom Database

for the database template. In this guide, I use “Oracle Single Instance Database” and “General Purpose or Transaction Processing” as a template. However, you can select the type and template suited to the type of workload your database will support. For more information on templates, click on “View details” next to each template.

Database Oracle 19c, Oracle Database Exam Prep, Oracle Database Prep, Oracle Database Certification, Oracle Database Career

5. Specify database identification details

In this step, provide the global database name, something like “database.domaine_name”. You don’t need to fill the SID. It is created automatically from the global database name.

If you want to create a multitenant container database (CDB), then check Create as Container Database and specify the number of pluggable databases the CDB can support. You can also create an empty CDB.

Database Oracle 19c, Oracle Database Exam Prep, Oracle Database Prep, Oracle Database Certification, Oracle Database Career

6. Select database storage option

You can customize the database storage options in different ways. Make sure your select “Use template file for database storage attributes” and click “Next”.

If you want to specify your own location to store database files select “Use following for the database storage attributes” option. With this option, you need to choose how the database files will be managed:

◉ File System option: your operating system will manage your database files.

◉ Automatic Storage Management (ASM) option: you place your data files in Oracle Automatic Storage Management (Oracle ASM) disk groups.

◉ Oracle-Managed Files (OMF) option: Oracle Database will directly manage operating system files comprising an Oracle database.

Database Oracle 19c, Oracle Database Exam Prep, Oracle Database Prep, Oracle Database Certification, Oracle Database Career

7. Select Fast recovery option

The fast recovery is an essential component of your database. In fact, it allows you to recover your data if a system failure occurs. It is a location in which Oracle Database can store and manage files related to backup and recovery.

Check “Specify Fast Recovery Area” to specify a backup and recovery area and its directory location, file storage type and size.

You can also to enable the archiving of database online redo log files, which Oracle uses to recover a database with the “Enable archiving” option.

Database Oracle 19c, Oracle Database Exam Prep, Oracle Database Prep, Oracle Database Certification, Oracle Database Career

8. Specify network configuration details

Configuring a listener is mandatory if you want to access your database remotely. A listener receives incoming client connection requests and manages the traffic of these requests to the database server.

In this step, you can select among the listeners in the current Oracle home or create a new one by providing the listener name and a port number. Then click “Next” to continue.

Database Oracle 19c, Oracle Database Exam Prep, Oracle Database Prep, Oracle Database Certification, Oracle Database Career

You can configure Oracle Database Vault and Oracle Label Security in the next window, or you can click Next to continue through DBCA without configuring Oracle Database Vault and Oracle Label Security. I’ll skip this in this guide.

9. Specify configuration options

Memory allocation: The Memory tab enables you to control how the database manages its memory. You can either use:

◉ Automatic Shared Memory Management if you want to allocate specific amounts of memory to the SGA and aggregate PGA to your database instance;

◉ Manual Shared Memory Management if you want to allocate specific memory amount for each SGA component and the aggregate PGA;

◉ Automatic Memory Management if you want Oracle to automatically tune the memory components of the SGA, and allocates memory to individual PGAs as needed.

Database Oracle 19c, Oracle Database Exam Prep, Oracle Database Prep, Oracle Database Certification, Oracle Database Career

Block size and processes: this tab allows you to set the database data block size and the maximum number of user processes that can simultaneously connect to the database.

The maximum number of processes depend on many parameters. The value you select should allow for all background processes, user processes, and parallel execution processes. A small value for the maximum number of processes may result to the database not running.

Database Oracle 19c, Oracle Database Exam Prep, Oracle Database Prep, Oracle Database Certification, Oracle Database Career

Character sets: Use this tab to to determine how character data is stored in the database. Select Unicode (AL32UTF8) as the database character set.

Database Oracle 19c, Oracle Database Exam Prep, Oracle Database Prep, Oracle Database Certification, Oracle Database Career

Connection mode: this tab enables you to select the database connection mode.

In Dedicated server mode, each user process is associated with a dedicated server process. This option is suitable when the number of clients is small.

In Shared serve mode, several client connections share a database-allocated pool of resources. This mode is the best option when client load is expected to cause a strain on memory and other system resources. If you select this mode, then make sure you provide the number of Shared servers.

Database Oracle 19c, Oracle Database Exam Prep, Oracle Database Prep, Oracle Database Certification, Oracle Database Career

Sample schemas: this tab allows you to include the sample schemas like HR and OE in your database. Select “Add sample schemas to the database” if you want to use them later.

Database Oracle 19c, Oracle Database Exam Prep, Oracle Database Prep, Oracle Database Certification, Oracle Database Career

10. Specify management options

Enterprise Manager provides Web-based management tools for Oracle databases. You can select Configure Enterprise Manager (EM) express and click “Next”.

If Enterprise Manager cloud control is installed on your host computer, then you can choose Register with Enterprise Manager (EM) cloud control and provide the necessary connection details (host, port number, username and password).

Database Oracle 19c, Oracle Database Exam Prep, Oracle Database Prep, Oracle Database Certification, Oracle Database Career

11. Specify database user credentials

Provide passwords for the administrative accounts SYS and SYSTEM and the Oracle home user account. You can specify a password for each administrative account or use the same password for all accounts. For security reasons, I recommend to set different password for each administrative account.

Database Oracle 19c, Oracle Database Exam Prep, Oracle Database Prep, Oracle Database Certification, Oracle Database Career

12. Select database creation option

In this step, you can select any of the following options for creating the database: 

“Create database” to create your database now;
“Save as a database template” to save the database definition as a template to use at a later time;
“Generate database creation scripts” to generate a SQL database creation script that you can run at a later time.

Moreover, you can adjust the server initialization parameters, relocate or replicate your database files (control files, redo logs, etc.).

Database Oracle 19c, Oracle Database Exam Prep, Oracle Database Prep, Oracle Database Certification, Oracle Database Career

13. Oracle database creation summary

This step enables you to review the summary information. To change any of these options, click “Back” and return to the window where you can modify the option.

Click “Finish” to start the creation of the database.

Database Oracle 19c, Oracle Database Exam Prep, Oracle Database Prep, Oracle Database Certification, Oracle Database Career

Voila! You have successfully created your Oracle 19c database with DBCA.

Before closing the window, make sure you copy the “Enterprise Manager Database Express URL”.

Database Oracle 19c, Oracle Database Exam Prep, Oracle Database Prep, Oracle Database Certification, Oracle Database Career

14. Test the database

To check if your database is running properly, you can:

start a new SQLPlus session with an administrative account.

Database Oracle 19c, Oracle Database Exam Prep, Oracle Database Prep, Oracle Database Certification, Oracle Database Career

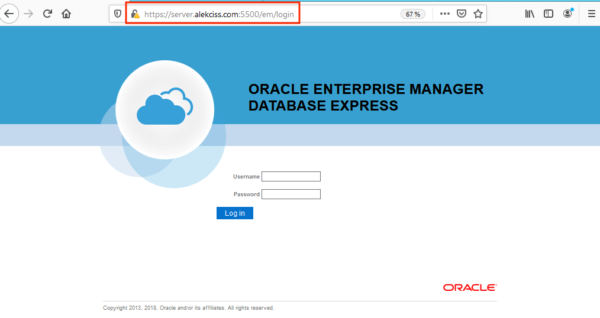
or connect to EM Express with SYS administrative account.

Database Oracle 19c, Oracle Database Exam Prep, Oracle Database Prep, Oracle Database Certification, Oracle Database Career

You should see the following screen if everything is okay.

Database Oracle 19c, Oracle Database Exam Prep, Oracle Database Prep, Oracle Database Certification, Oracle Database Career

Saturday, January 9, 2021

Oracle Database 12c Network configuration

This post will help you completely configure your client/server network.

For a client application and a database to communicate, the client application must be able to identify the database it wants to connect to, and the database must provide an identification. You can use a service name to connect to a database. A service name is a logical representation of a database, which is the way a database is presented to clients. A single database can be presented as multiple services.

Service names can provide location transparency so that the client application does not have to know the server’s location. If the database is moved to another location, then you must reconfigure only Oracle Net. No changes are necessary to client applications.

Configuring a database listener with Oracle Net Manager

Oracle Net Manager provides various network configuration features, including the ability to configure profiles.

Note that you can also configure a database listener using NetCA.

In order to create and configure a listener from Oracle Net Manager, you will need to

1. launch it from Windows start menu

2. scroll down to “Listeners” and hit the “Create” button (+)

Oracle Database 12c Network configuration, Oracle Database 12c, Oracle Database Learning, Oracle Database Exam Prep, Oracle Database Certification

Next, provide a unique identifier for the listener. In this example, we use “LISTENER_GIT2”.

Oracle Database 12c Network configuration, Oracle Database 12c, Oracle Database Learning, Oracle Database Exam Prep, Oracle Database Certification

Select protocol addresses that identify the database. This address defines the protocol the listener is listening on and any other protocol-specific information. Click the “Add Address” button to add a listening protocol address.

Oracle Database 12c Network configuration, Oracle Database 12c, Oracle Database Learning, Oracle Database Exam Prep, Oracle Database Certification

Provide a hostname or IP address, a port number for the listening protocols TCP/IP and TCP/IP with SSL

Oracle Database 12c Network configuration, Oracle Database 12c, Oracle Database Learning, Oracle Database Exam Prep, Oracle Database Certification

After specifying protocol addresses, you will need to attach your listener to an Oracle database instance. To do so, select “Database Services” from the drop-down menu.

Oracle Database 12c Network configuration, Oracle Database 12c, Oracle Database Learning, Oracle Database Exam Prep, Oracle Database Certification

Provide the global name and SID of your database and the Oracle Home Directory in order to link your listener with your instance.

Important: Don’t forget to save your network configuration. Go to “File” and “Save Network Configuration”

Oracle Database 12c Network configuration, Oracle Database 12c, Oracle Database Learning, Oracle Database Exam Prep, Oracle Database Certification

Once you save your configuration, you can start or see the newly created listener using the integrated tool LSNRCTL.

Oracle Database 12c Network configuration, Oracle Database 12c, Oracle Database Learning, Oracle Database Exam Prep, Oracle Database Certification

To start a specific listener, you will need to enter the following command

start listener_name

If no name is specified, LSNRCTL will try to start the default listener (configured with TCP/IP and port number 1521).

Oracle Database 12c Network configuration, Oracle Database 12c, Oracle Database Learning, Oracle Database Exam Prep, Oracle Database Certification

The status command of LSNRCTL will give you detailed informations of the listener configuration such as the listener identifier, start date, listener parameter file, protocol descriptions (hostname or host IP address and port numbers), the linked database.

Oracle Database 12c Network configuration, Oracle Database 12c, Oracle Database Learning, Oracle Database Exam Prep, Oracle Database Certification

Oracle database 12c Client configuration


This section describes how to use SQL*Plus to connect to an Oracle database from a client computer. SQL*Plus is typically installed when you install Oracle Database client software.

After client installation, Oracle provide bunch of tools to access or manage the database from the client. For example, from the client computer, you can test the connectivity of your database using tnsping utility. In the following, we check if the database service dic2git is available on server.ept.sn listening on port number 1599. 

Oracle Database 12c Network configuration, Oracle Database 12c, Oracle Database Learning, Oracle Database Exam Prep, Oracle Database Certification

Once, the availability of the instance verified, we can connect to the database from the client using an easy connect connection string. The easy connect naming method provides TCP/IP connectivity to databases without requiring you to configure Oracle Net Services.

Oracle Database 12c Network configuration, Oracle Database 12c, Oracle Database Learning, Oracle Database Exam Prep, Oracle Database Certification

Configuring Oracle Net Services from the client


To configure Oracle Net Services, you will need to start Oracle Net Manager from Windows start menu. In this section, we will configure only Service naming methods to create a network SID.

Select “Service Naming” and click on the “Create” button.

Oracle Database 12c Network configuration, Oracle Database 12c, Oracle Database Learning, Oracle Database Exam Prep, Oracle Database Certification

Provide then a service name. This network SID will be used to access the database remotely from the client. Make sure the name you select refers to the remote instance. In this example, we use git2client.

Oracle Database 12c Network configuration, Oracle Database 12c, Oracle Database Learning, Oracle Database Exam Prep, Oracle Database Certification

Next, select a network protocol you want to use to access the database. Make sure the protocol is configured on the server side.

Oracle Database 12c Network configuration, Oracle Database 12c, Oracle Database Learning, Oracle Database Exam Prep, Oracle Database Certification

Provide the server hostname or IP address and a port number. This information can be found on the listener configuration (server side). In our case, the server name is server.ept.sn and the port number is 1599 (see Page 1)

Oracle Database 12c Network configuration, Oracle Database 12c, Oracle Database Learning, Oracle Database Exam Prep, Oracle Database Certification

Next, you will need to enter the database global name you want to access and select a connection mode (dedicated mode, shared server, …)

Oracle Database 12c Network configuration, Oracle Database 12c, Oracle Database Learning, Oracle Database Exam Prep, Oracle Database Certification

The last step allow you test your network SID configuration. The wizard will try to connect to the remote database using a prebuilt user account, namely Scott. If there are no configuration issues, the wizard will be able to connect to the instance.

Oracle Database 12c Network configuration, Oracle Database 12c, Oracle Database Learning, Oracle Database Exam Prep, Oracle Database Certification

The connection attempt fails since Scott account is locked. On the other hand, it means the wizard was able to access the database server remotely. We can perform the test again using a non-locked account on the database.

Oracle Database 12c Network configuration, Oracle Database 12c, Oracle Database Learning, Oracle Database Exam Prep, Oracle Database Certification

If the HR account is not locked, we may use it to perform another test.

Oracle Database 12c Network configuration, Oracle Database 12c, Oracle Database Learning, Oracle Database Exam Prep, Oracle Database Certification

Oracle Database 12c Network configuration, Oracle Database 12c, Oracle Database Learning, Oracle Database Exam Prep, Oracle Database Certification

One last thing you will to do is to save the current network configuration. Otherwise, no change will be made on the client computer and all the configuration may be lost.

Oracle Database 12c Network configuration, Oracle Database 12c, Oracle Database Learning, Oracle Database Exam Prep, Oracle Database Certification

After saving your configuration, you can test the service you have configured using the tnsping utility. Since the service is configured on the client computer, we will provide only the SID.

Oracle Database 12c Network configuration, Oracle Database 12c, Oracle Database Learning, Oracle Database Exam Prep, Oracle Database Certification

The service is available on the network and allow us to connect to the remote database using a simplified connection string.

Oracle Database 12c Network configuration, Oracle Database 12c, Oracle Database Learning, Oracle Database Exam Prep, Oracle Database Certification

Friday, January 8, 2021

Oracle BlueKai Data Management Platform scales to 1 Million transactions per second with Oracle Database Sharding deployed in Oracle Cloud Infrastructure

Oracle Database Tutorial and Material, Database Exam Prep, Database Certifications, Database Career, Database Prep

I recently had a conversation with Matt Abrams who is

Group Vice President of Engineering for Oracle BlueKai Data Management Platform, a part of Oracle Cloud Applications.

We talked about the use of the Sharding feature of Oracle Database for the BlueKai Oracle Data Management Platform.

This may be one of the biggest relational OLTP database deployments in the world.  

Below is an excerpt.

Could you please start by describing the scale of the deployment?

Matt: The Oracle Database shards are deployed across multiple availability domains in Oracle Cloud. Below are key metrics for primary databases:

Transactions 1 Million/second
Events  30 Billion/day 
API Calls   30 Billion/day 
API Payload Size   125 Kilobytes/API call (Average) 
Average read time   1.6 Milliseconds/API call 
Average write time   2.5 Milliseconds/API call 
Total database size   2.5 Petabytes 
Rows in largest table   22 Billion
Redo generation rate   180 Terabytes/hour 
Network traffic   1 Terabit/second 
Total machines   52 Oracle Compute Instances
Total CPU   2,704 Cores 
Total memory   38,740 Gigabytes 

Oracle Database shards are configured for High Availability and Disaster Recovery to meet 99.99% uptime SLAs. 

Very cool. Seems like a very interesting application!

Matt: Yes, this is the Data Management Platform (DMP), formerly known as BlueKai, a company that was acquired by Oracle in 2014. The DMP ingests, organizes, provides insights and analytics on, and activates audiences on a large number of advertising platforms.

Efficiently processing data on this scale requires a significant amount of innovation in various areas including: 

◉ Automatic content classification algorithms
◉ Bespoke probabilistic data structures used to perform unique counting and overlap analysis at a massive scale
◉ Autonomic infrastructure services that automatically adapt to the dynamic nature of our data processing environments
◉ Robust audience taxonomies
 
These are impressive numbers. How did Oracle Sharding help DMP meet its business objectives?

Matt: Oracle Sharding helped us improve in following areas.

Scalability: Sharding’s linearly scalable architecture allows us to continue to scale as transactions and data volume grows with no impact on latency. Having linear scalability is absolutely critical for us to be able to support our business growth.

Availability: Sharding improved application availably by provides fault isolation. Any issue with a given shard has no impact on availability of other shards. 

Oracle DMP is deployed in Oracle Cloud Infrastructure regions with multiple availability domains. We have spread our primary shards across all the availability domain in a given region. We are using Oracle Data Guard to have a replica/standby instance in a different availability domain than that of primary instance.

Due to high transaction rate coupled with write intensity of our application, we do see occasional hardware failures. In such recent instances, the failover was seamless.

By using multiple availability domain and multiple regions in Oracle Cloud Infrastructure along with Oracle Data Guard, we have protection from failure of an availability domain or even an entire region.

Performance: This might sound counterintuitive, but with Oracle Sharding, we saw our performance improve compared to other key-value stores we have used in past.

Stability: And there is something to be said about stability of Oracle Database. Since going live with Oracle Database, we haven’t had a single database outage due to software issues.

Holiday season tends to be our busiest time of the year. In past, with key-value stores, we typically saw about 3 to 4 percent of request failures (and retries) during peak loads. This year with Oracle Database, holiday season came and went, and we did not see any such failure.

What are the key reasons for adopting Oracle Sharding?

Matt: Oracle DMP’s data processing ecosystem has grown organically over time. We have systems for data streaming, real-time key-value databases, distributed batch data processing, and workflow management to name just a few. More systems mean more complexity and cost. Complexity comes in many forms such as:

◉ Workflow management and coordination between disparate systems
◉ Data consistency issues between systems
◉ Lack of ACID transactions places the burden on the application
◉ Storing the same data multiple times in different systems to support various use cases is expensive

In the past, once your data volume and velocity reached a certain threshold, it became impractical and usually impossible to use traditional RDBMS technology. Scaling vertically hits both cost and practical limits and consolidates the blast radius for system failure. Key-value stores can scale horizontally, but until now that has meant sacrificing features that a traditional database would provide.  

This changes with the release of Oracle Sharding. With Oracle Sharding we have an ACID compliant and horizontally scalable database that is capable of supporting both near real-time key-value use cases as well as complex analytics operations.

Oracle Database Tutorial and Material, Database Exam Prep, Database Certifications, Database Career, Database Prep
With Oracle Database’s converged architecture, we now can use a single data system that drastically reduces complexity, decreases cost, and allows us to simplify our data architecture by consolidating logic and data into a single data store that meets a diverse set of needs.

What alternative solutions did Oracle DMP explore before adopting Oracle Database? In what ways is Oracle Database superior to those alternatives?

Matt: Oracle DMP has used a variety of key-value stores alongside more traditional databases for years. When thinking of alternatives to an Oracle Sharded Database, you aren’t thinking about a single database. Instead, you are thinking about a group of databases that each perform in one specific area. The promise of a sharded Oracle Database is that it can perform in all of the areas we need it to.

Any lessons learned, or advice to other companies in a similar position?

Matt: Over the past 20 years we’ve been trained to make compromises in our data processing systems because legacy databases couldn’t scale to meet our scalability and availability requirements. With Oracle Sharding we have the opportunity to rethink and simplify our data architectures. My advice is not to look at the Sharded database as a replacement for one system or function, but instead use it as an opportunity to simplify your data architecture and claw back some of the compromises you may have made in the past for the sake of scalability and availability.  

How does Oracle DMP expect the deployment of Oracle Database Sharding technology to impact the business overall and the customers it supports?

Matt: Over time we expect to deliver new features to our customers more quickly thanks to the simplified data processing architecture. Now that we have full transactions and the ability to run analytics queries in the same environment, when we run our real-time data queries, we will be able to offer more precise and lower latency responses to queries generated on behalf of our customers.

Any thoughts on the potential adoption of other Oracle technologies that will further strengthen the architecture?

Matt: Oracle Sharding + Oracle Cloud Infrastructure is a powerful combination.  

Sharding represents a fundamental shift in how Oracle Database technology works.

Elasticity is a critical value proposition here.

Source: oracle.com

Wednesday, January 6, 2021

Announcing Customer-Managed Encryption Keys for Oracle Exadata Cloud Service

Oracle Exadata Cloud Service (ExaCS) uses Oracle Transparent Data Encryption (TDE) to protect data at rest for its databases. TDE is a two-tier key architecture comprising of data encryption and master encryption keys. The data encryption keys protect table and tablespaces but are wrapped by a single database master encryption key. The master key is separated from encrypted data and are stored outside of the database. Currently, the TDE master key is Oracle-Managed and stored in an Oracle Wallet, a PKCS#12 standard-based key storage file.

We are excited to announce the general availability of ExaCS integration with Oracle Cloud Infrastructure (OCI) Vault service. You now have the control to create and manage TDE master keys that protect your Exadata database, where all network connections between your databases and OCI Vault are encrypted and mutually authenticated using SSL/TLS.

What are the benefits of Vault?

- You centrally control and manage your TDE master keys.

- Your keys are stored in a highly available, durable and managed service.  

- Your keys can be protected by hardware security modules (HSM) that meet Federal Information Processing Standards (FIPS) 140-2 Security Level 3 security certification.

- You can rotate your keys and audit their cryptographic operations to meet compliance and regulatory needs.

In order to use customer managed keys with Exadata database, you should first access the Vault service and create encryption keys. The encryption key algorithm you use must be AES-256. Next, you should ensure the required IAM policy is set for you to manage keys in Vault. Once these prerequisite steps are complete, you can create Exadata database protected by customer managed keys. Only databases after Oracle Database 11g release 2 (11.2.0.4) are supported.

How to use customer-managed keys for ExaCS in OCI console?

Creation of Database:

Creation of Exadata database has a new encryption field under Show Advanced options called customer-managed keys. Once selected, you can then choose the Vault and encryption keys you control as your TDE master key. It’s that simple. The default encryption option is Oracle-Managed. Once the database is created, you can check whether it was protected with Oracle or Customer-managed in the Database details page.

The below image shows an example of selecting customer-managed keys and the database details page.

Oracle Database Tutorial and Material, Oracle Database Certification, Database Career, Database Prep

Oracle Database Tutorial and Material, Oracle Database Certification, Database Career, Database Prep

Migration from Oracle-Managed to Customer-Managed:

If your Exadata database is already using Oracle-Managed encryption, then no worries. You can easily migrate it to Customer-Managed and vice versa.  Use the Change Key Management Type operation to choose the Vault and encryption keys you desire to migrate the database to customer-managed encryption. Migration of keys will require a short period of unavailability to your databases, so please exercise caution before you execute this operation.

The below image shows an example of Administrator Encryption Key page to perform the migration of encryption keys

Oracle Database Tutorial and Material, Oracle Database Certification, Database Career, Database Prep

Address Compliance:

You can rotate customer-managed keys on-demand to address your compliance goals, like managing Payment Card Industry (PCI) DSS. Security is further enabled by limiting the amount of information protected by a specific key. In order to ensure that your Exadata database uses the most current versions of the Vault’s encryption key, key rotation is supported only on the Exadata database console or APIs. Do not use the Vault service.

The below image shows an example of Administrator Encryption Key page to perform the rotation of encryption keys.

Oracle Database Tutorial and Material, Oracle Database Certification, Database Career, Database Prep

Source: oracle.com

Monday, January 4, 2021

Configuring a Listener in Oracle Database (12c, 18c and 19c editions)

In this post, we will learn how to configure a Listener in Oracle Database (12c, 18c and 19c editions) step by step.

Note: the same procedure works for the latest versions of Oracle Database (12c, 18c and 19c).

Oracle Database Listener configuration

Many times, users and applications connect to the database from a machine outside of the database server. These users or applications request a connection be made to the database. On the Oracle database server, the listener is a process that listens for client connection requests. It receives incoming client connection requests and manages the traffic of these requests to the database server. Once the listener detects a connection request, it sets up any needed processes on the server to get the connection up and running. Once the user or application is connected to the database, the listener hangs around listening for new connection request.

You can easily create and manage a lister with the following tools :

◉ Oracle Network Configuration Assistant (NetCA)

◉ Oracle Network Manager

In this post, we will use NetCA.

Creating a listener using NetCA

The Oracle Net Configuration Assistant is a useful tool which allows to configure listeners, naming methods, local network services and directory usage.

To configure an Oracle Database listener, we can follow the steps below :

◉ First step : You need to launch NetCA from the command line of the Windows start menu.


◉ Then choose “Listener configuration”


◉ The configuration wizard allows you to add a new listener, reconfigure, delete or rename an existing listener. Choose “Add” and click “Next”.


◉ An Oracle instance can be served using multiple listeners and each listener has its unique identifier. Provide a speaking name which makes maintenance operations easy.


◉ Next, choose connection protocols : The IPC, TCP/IP, and TCP/IP with Secure Sockets Layer protocol supports each have an address specification that is used in Oracle Net Services configuration files. Add the protocols to use :

     ◉ TCP/IP is the standard communication protocol used for client/server communication over a network. The TCP/IP protocol support enables communication between client programs and Oracle Database, whether they are installed on the same or different systems.

     ◉ The TCP/IP with Secure Sockets Layer protocol support enables an Oracle application on a client to communicate with remote Oracle Database instances through TCP/IP and Secure Sockets Layer. To use TCP/IP with Secure Sockets Layer, you must install Oracle Advanced Security.

     ◉ The IPC protocol support can be used only when the client program and Oracle Database are installed on the same system. This protocol support requires a listener.


◉ Provide  a port number to use for TCP


◉ Repeat the same operation for TCPS and IPC and finish the listener configuration. Choose “No” and click “Next”.


◉ Finally, check if there are any errors after the listener configuration.

Friday, January 1, 2021

Install Oracle Database 19c on Windows

Install Oracle Database 19c on Windows: Complete Guide

Are you planning to install Oracle 19c on Windows Server or Windows 10? Then this step by step guide is for you.

The installation of Oracle Software is not always an obvious operation, as it is the case for many DBMS (SQL Server, MySQL, etc.). The steps are however simple, but If you read Oracle documentation, more than 190 pages, you can get lost pretty quickly. There is a lot of information.

In this guide, I’ll simplify theses processes for you. I’ll show you the key steps to successfully install Oracle 19c on Windows, from the first attempt. Upon completion of this installation, all of the components required to create and administer a database in Oracle Database 19c will be available.

So I assume that you already have your Windows server set up and running. To avoid issues during the installation process, make sure your environment meets Oracle 19c installation requirements.

Install Oracle Database 19c on Windows step by step

1. Download Oracle Database 19c software for Windows. Our first step is to get the Oracle 19c software for Windows from the official Oracle download page. On this page you will find many packages. In this guide, we will focus on the Oracle Database 19c (19.3) for Microsoft Windows x64 (64-bit) package. If you want to access your future Oracle database remotely, you can also download the Oracle Database 19c Client (19.3) for Microsoft Windows x64 (64-bit) or Oracle Database 19c Client (19.3) for Microsoft Windows (32- bit) according to the architecture of the client computer.

Downloading Oracle 19c software is free, however to use it in the production environment requires a license. Note also that downloading requires an Oracle account.

2. Launch the setup wizard. Once the download is complete

◉ unzip the package then copy it to the root of your disk;

◉ rename the folder, choose a shorter name (eg. db_home);

◉ then launch the setup.

Note: the installation wizard may take several minutes to open. So be patient.

Oracle Database 19c on Windows, Oracle Database Tutorial and Material, Oracle Database Guides, Oracle Database Learning, Oracle Database Exam Prep

3. Choose database installation options. This step is very important. It allows you to choose the database installation options. You can install Oracle software and create a database at the same time (Create and configure a single instance database).Since we only want to install the Oracle 19c software and its components, we will opt for “Set up Software Only”. This option installs the essential components for creating and administering a database. You can also use it to upgrade an older version of Oracle (example: 12c or 18c) or install RAC.

Oracle Database 19c on Windows, Oracle Database Tutorial and Material, Oracle Database Guides, Oracle Database Learning, Oracle Database Exam Prep

4. Select database installation type. The first option allows you to install a single instance database on your server. Oracle Database with the Oracle Real Application Clusters (RAC) option allows multiple instances running on different servers to access the same physical database stored on shared storage.As we want to install Oracle 19c on a single server, we select option 1.

You can create a database after installation by using Oracle Database Configuration Assistant (Oracle DBCA).

Oracle Database 19c on Windows, Oracle Database Tutorial and Material, Oracle Database Guides, Oracle Database Learning, Oracle Database Exam Prep

5. Choose database edition. The version of the database to install depends on your needs. For an application developer or and medium-size companies, the standard version covers practically all needs.To take full advantage of Oracle 19c, you can install the Enterprise version. Obviously, the Enterprise version requires more resources (storage, RAM, CPU).

Oracle Database 19c on Windows, Oracle Database Tutorial and Material, Oracle Database Guides, Oracle Database Learning, Oracle Database Exam Prep

6. Specify Oracle home user. During Oracle Database installation, you can specify an optional Oracle home user associated with the Oracle home. Oracle home user can be a Windows built-in account (LocalSystem for Server and LocalService for Client), virtual account, or a regular (not an administrator) Windows account. If you specify an existing user as the Oracle home user, then the Windows user account you specify can either be a Windows domain user or a Windows local user.

A Windows user account need not be created by the administrator if a virtual account or a Windows built-in account is used during installation. If you specify a non-existing user as the Oracle home user, then the Windows user account you specify must be a Windows local user. The installer creates this account automatically to run the Windows services for the Oracle home. Do not log in using this account to perform administrative tasks.

Oracle Database 19c on Windows, Oracle Database Tutorial and Material, Oracle Database Guides, Oracle Database Learning, Oracle Database Exam Prep

7. Specify the location of Oracle software. In a default Windows installation, the Oracle base directory appears as follows: DRIVE_LETTER:\app\username where username is the Oracle installation user if you choose Windows built-in account, else it is the Oracle Home user (standard Windows user account). You can change this directory at your convenience or leave it as default.

Oracle Database 19c on Windows, Oracle Database Tutorial and Material, Oracle Database Guides, Oracle Database Learning, Oracle Database Exam Prep

8. Minimum requirements checks, summary and end of the installation.

Oracle Database 19c on Windows, Oracle Database Tutorial and Material, Oracle Database Guides, Oracle Database Learning, Oracle Database Exam Prep

Click install if no error occurs.

Oracle Database 19c on Windows, Oracle Database Tutorial and Material, Oracle Database Guides, Oracle Database Learning, Oracle Database Exam Prep

That’s it. You can close the installation wizard now.

Oracle Database 19c on Windows, Oracle Database Tutorial and Material, Oracle Database Guides, Oracle Database Learning, Oracle Database Exam Prep

You can take a look at the different components of your installation from the Windows start menu.

Oracle Database 19c on Windows, Oracle Database Tutorial and Material, Oracle Database Guides, Oracle Database Learning, Oracle Database Exam Prep